Primepath
Your awesome theme / template documentation version 1.0
Introduction
- Item Name: Primepath – A Real Estate Template
- Item Version: v 1.0
- Author: Infydots Technologies
- Support Forum: https://www.infydots.com/
- License: Un License
First of all, Thank you so much for purchasing this template and for
being my loyal customer.
You are awesome!
You are entitled to get free lifetime updates to this product,
along with exceptional support directly from the author.
This documentation is designed to guide you through each step of customization. Please read it carefully to understand how this template is made and how to edit it properly. Basic HTML and CSS knowledge is required to customize this template. You may learn basics from w3schools, Developer.mozilla and learn.shayhowe.
Requirements
You will need the following softwares to customize this template.
- Code editing software (eg: Dreamweaver, Sublime Text or Notepad)
- Web browser for testing (eg: Google Chrome or Mozilla Firefox)
- FTP Tool to upload files to the server (eg: FileZilla)
Be careful while editing
the template. If not edited properly, the design layout may break
completely.
No support is provided for faulty customization.
Getting Started
Welcome to our comprehensive documentation! This guide covers everything you need to know about your theme. Each section is designed to help you understand its functionalities thoroughly. If you encounter any topics or features not covered here, please visit our knowledge base at https://www.infydots.com/ for additional resources.
For further assistance, you can also post your queries on our community forum at https://www.infydots.com/. Our dedicated community members and experts are eager to help.
In the unlikely event of technical issues or if you require personalized support, please submit a ticket via our private support desk at https://www.infydots.com/. Our support team will prioritize your request and provide timely assistance.
Thank you for selecting our theme! We trust this documentation will empower you to make the most of its capabilities. Should you have any further questions, please feel free to contact us.
How to Install WordPress
To utilize this theme, you must have WordPress installed and operational on your website. If you need guidance on installing WordPress, please refer to the instructions provided in the WordPress Codex. Below, we’ve included useful links for further information about WordPress.
- WordPress Codex – Learn about WordPress and how to install it on your server.
- First Steps With WordPress – Explore various topics about WordPress.
- FAQ New To WordPress – Find answers to the most common questions about WordPress.
System Requirements
Frequent issues such as demo import failures or page save errors often stem from low PHP configuration limit settings. Some hosts may keep these limits low to conserve resources. To address this, you can either increase the limits yourself or contact your web host to request an adjustment. Since you are paying for these resources, it’s fair to expect their full value.
Get a Installation Service Ask a QuestionHow to Install Theme
If you choose to download “All files & documentation,” unzip the archive and find the file named primepath-theme.zip (this is the file you need to upload to WordPress).
Setting Correct Permissions for wp-content and uploads Folders
1. Check the Permissions for the wp-content Folder
- Navigate to the wp-content folder on your WordPress installation directory.
- Set Folder Permissions to 755
chmod 755 wp-content - Or, you can set if not working, chown -R -h www-data:www-data wp-content
2. Set Permissions for the uploads Folder
- Navigate to the wp-content/uploads folder.
- Set Folder Permissions to 755
chmod 755 wp-content/uploads
3. Set Permissions for Theme and Plugin Installation
- Navigate to the wp-content/themes and wp-content/plugins folders.
- Set Folder Permissions to 755
chmod 755 wp-content/themes
chmod 755 wp-content/plugins
Upload via WordPress Admin
- Log in to your WordPress admin section (http://your-site.com/wp-admin)
- Navigate to Appearance – Themes
- Click on Add New and then select the Upload button
- Browse to locate the “primepath-theme.zip” file and click Install Now
- The theme will be uploaded and installed
- Activate your newly installed theme
Upload via FTP Server
- Access your hosting space using an FTP software like FileZilla
- Upload the theme folder (extracted from primepath-theme.zip) to the wp-content/themes directory in your WordPress installation
- Log in to your WordPress admin section (http://your-site.com/wp-admin)
- Navigate to Appearance – Themes
- Activate your chosen theme
Necessary Plugins

Advanced Custom Fields
Advanced Custom Fields (ACF) is used to create custom post types, fields and texonomy which are used in this theme.

Contact Form 7
Contact Form 7 plugin is used to create contact form and reply form in property detail page.


ElementsKit Lite
ElementsKit Lite is the most advanced addons for Elementor with tons of widgets, Header builder, Footer builder, Mega menu builder, layout pack and powerful custom controls.

Primepath Elementor Addon
Primepath Elementor Addon is the plugin of our theme which is used to add custom elementor addons by our theme.

Redux Framework
Redux Framework is used in our theme to manage theme option from admin panel and customize settings for layout and display sections in Blog and Property.

Widget Importer & Exporter
Widget Importer & Exporter is useful for moving widgets from one WordPress site to another
How to Install Theme Plugin
Find the file named primepath-plugin.zip (this is the file you need to upload to WordPress).
Upload via WordPress Admin
- Log in to your WordPress admin section (http://your-site.com/wp-admin)
- Navigate to Plugins
- Click on Add New and then select the Upload button
- Browse to locate the “primepath-plugin.zip” file and click Install Now
- The plugin will be uploaded and installed
- Activate your newly installed plugin
Upload via FTP Server
- Access your hosting space using an FTP software like FileZilla
- Upload the theme folder (extracted from primepath-plugin.zip) to the wp-content/plugins directory in your WordPress installation
- Log in to your WordPress admin section (http://your-site.com/wp-admin)
- Navigate to Plugins
- Activate your chosen plugin
Download Import Files
After activating required plugins, please download files from below links for acf post types, widgets, redux theme options and demo content etc.
Please download the file named “wp-import-data.zip” and extract files for import.
Redux Theme options Import
After activating required plugins, please do below steps to import redux theme options settings.
Please find the file from extracted zip files named “redux_options.json” and import.
In your WordPress admin, Go to Theme Options – Import/Export, then select import file in import options section and click on Import button to import settings data.

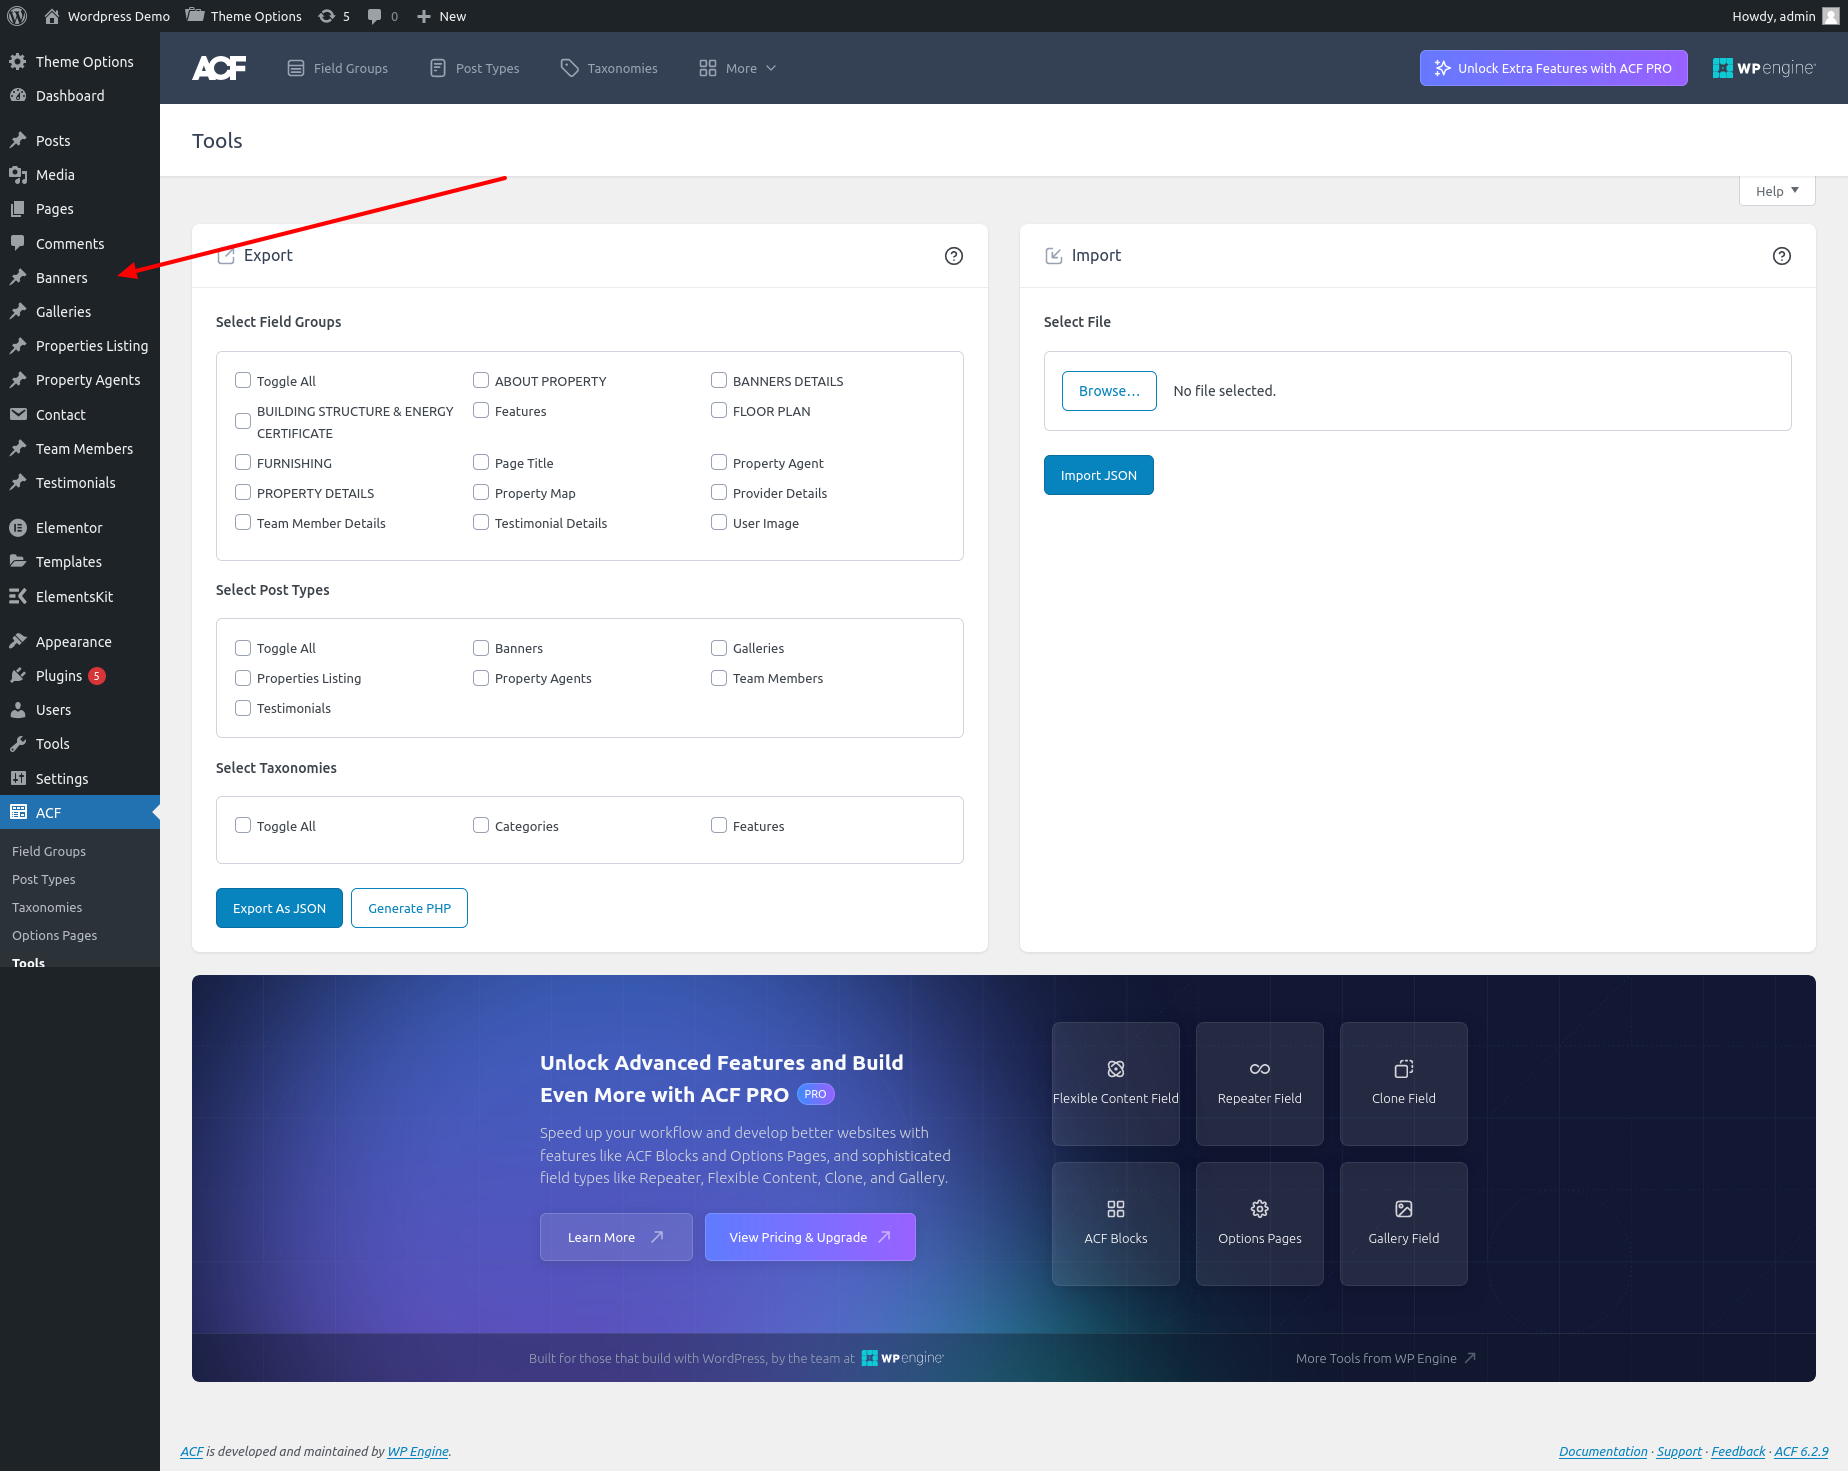
ACF Import
After activating required plugins, please do below steps to import ACF json file for creating custom post types like property listing, team members, proeprty agents, banners, testimonials etc.
Please find the file from extracted zip files named “acf-export-real-estate-theme.json” and import.
In your WordPress admin, Go to ACF – Tools, then select import file in import section and click on Import JSON button to import data.

After successfully import data, you will get custom post types like Banners, Galleries, Properties Listing, Property Agents, Team Members, Testimonials etc.
Sidebar Import
After activating required plugin “Widget Importer & Exporter”, please do below steps to import Widgets data for sidebar data etc.
Please find the file from extracted zip files named “wp-real-estate-widgets.wie” and import.
In your WordPress admin, Go to Tools -> Widget Importer & Exporter, then select import file in import widgets section and click on Import Widgets button to import data.
After successfully import data, you will get sidebar data or blog and property etc.

Demo Content Import
Please find the file from extracted zip files named “wp-real-estate-demo-content.xml” and import.
- In your WordPress admin dashboard, go to Tools > Import.
- Under the WordPress section, you’ll see the default WordPress importer. If this importer is not already installed, you will be prompted to install it. Click on Install Now to proceed, and then click on Run Importer once the installation is complete.
- After that, you’ll be directed to the Import page. Click on Browse.. to select the import file (usually a .xml file) you want to import.
- Once the file is selected, click on the Upload File and Import button.
- On the next page, ensure you check the box next to Download and import file attachments. This will download and associate any images or media from the import file with your posts.
- Finally, click the Submit button to complete the import process.

After successfully import data, you will get all demo content in your wordpress site.
Manually Set Home Page After Import:
- Go to Settings > Reading.
- Under the Your homepage displays section, select “A static page” and choose the page “Home” you want as your homepage.
Creating Blog Page
Using this theme, we can display blog posts list in the list view or grid view layout.
In your WordPress admin, Pages -> Add New

Give title as “Blog” and select page template as your choice like “Blog List View” or “Blog Grid View”
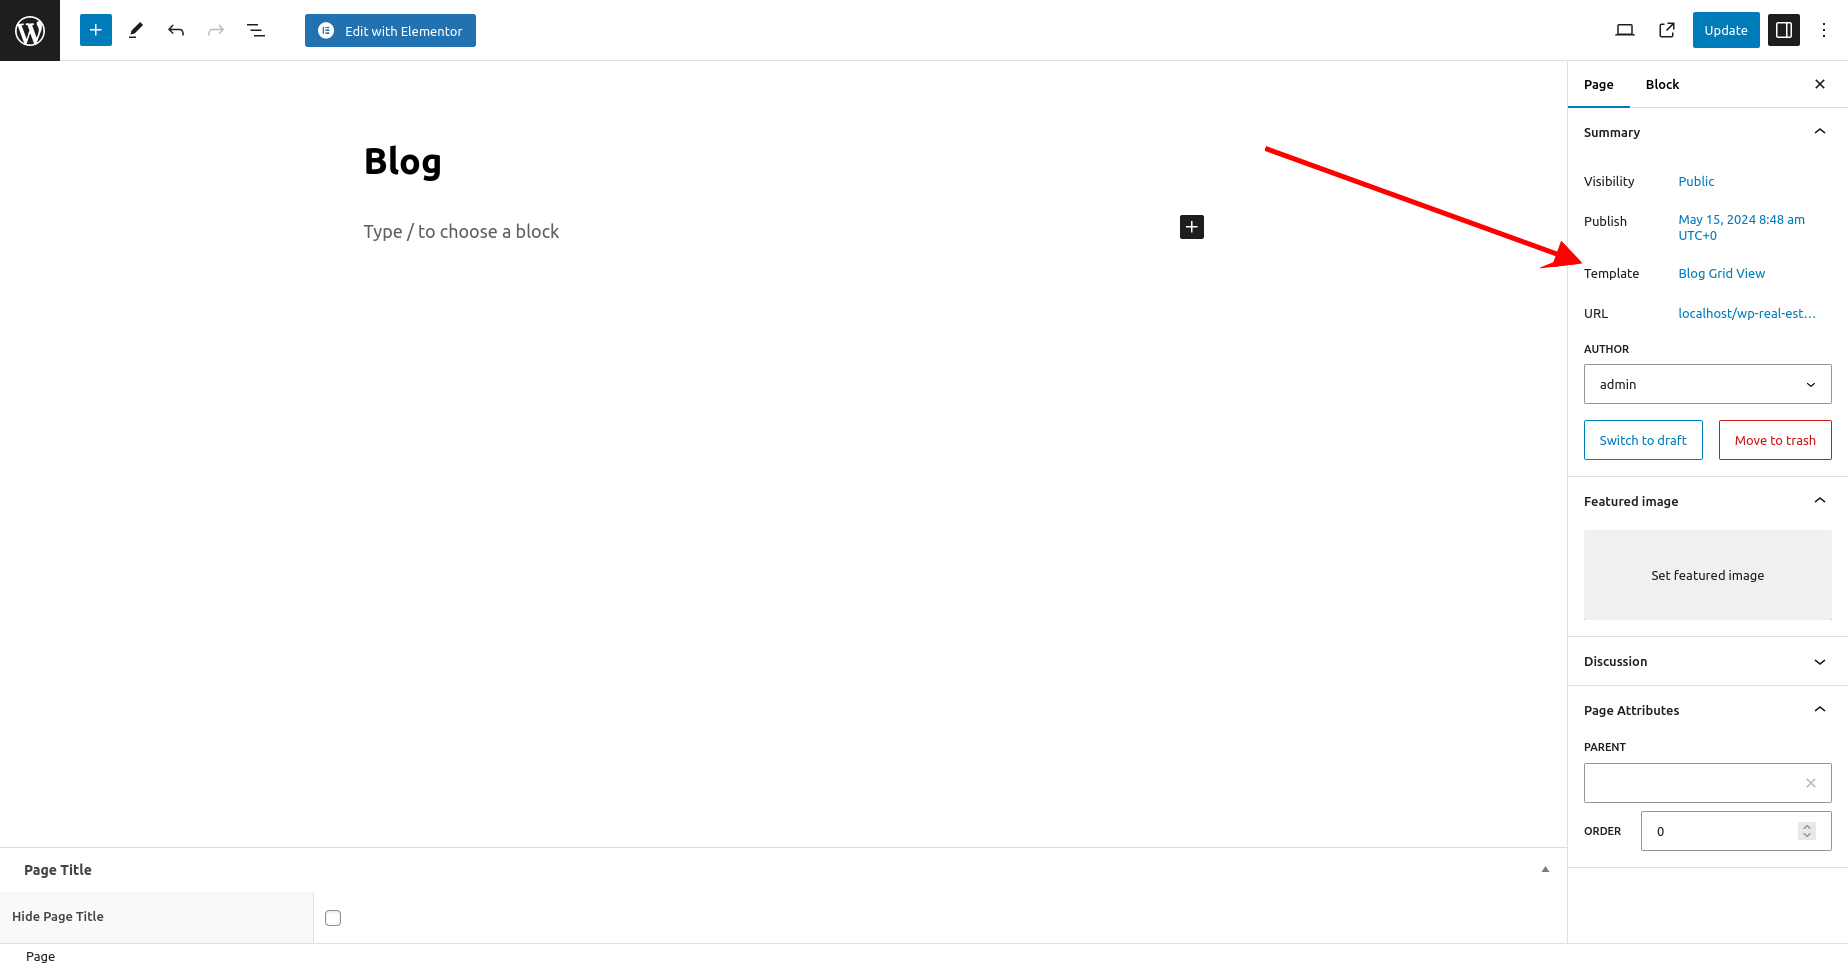
Click on “Publish” or “Update” button to publish/update page
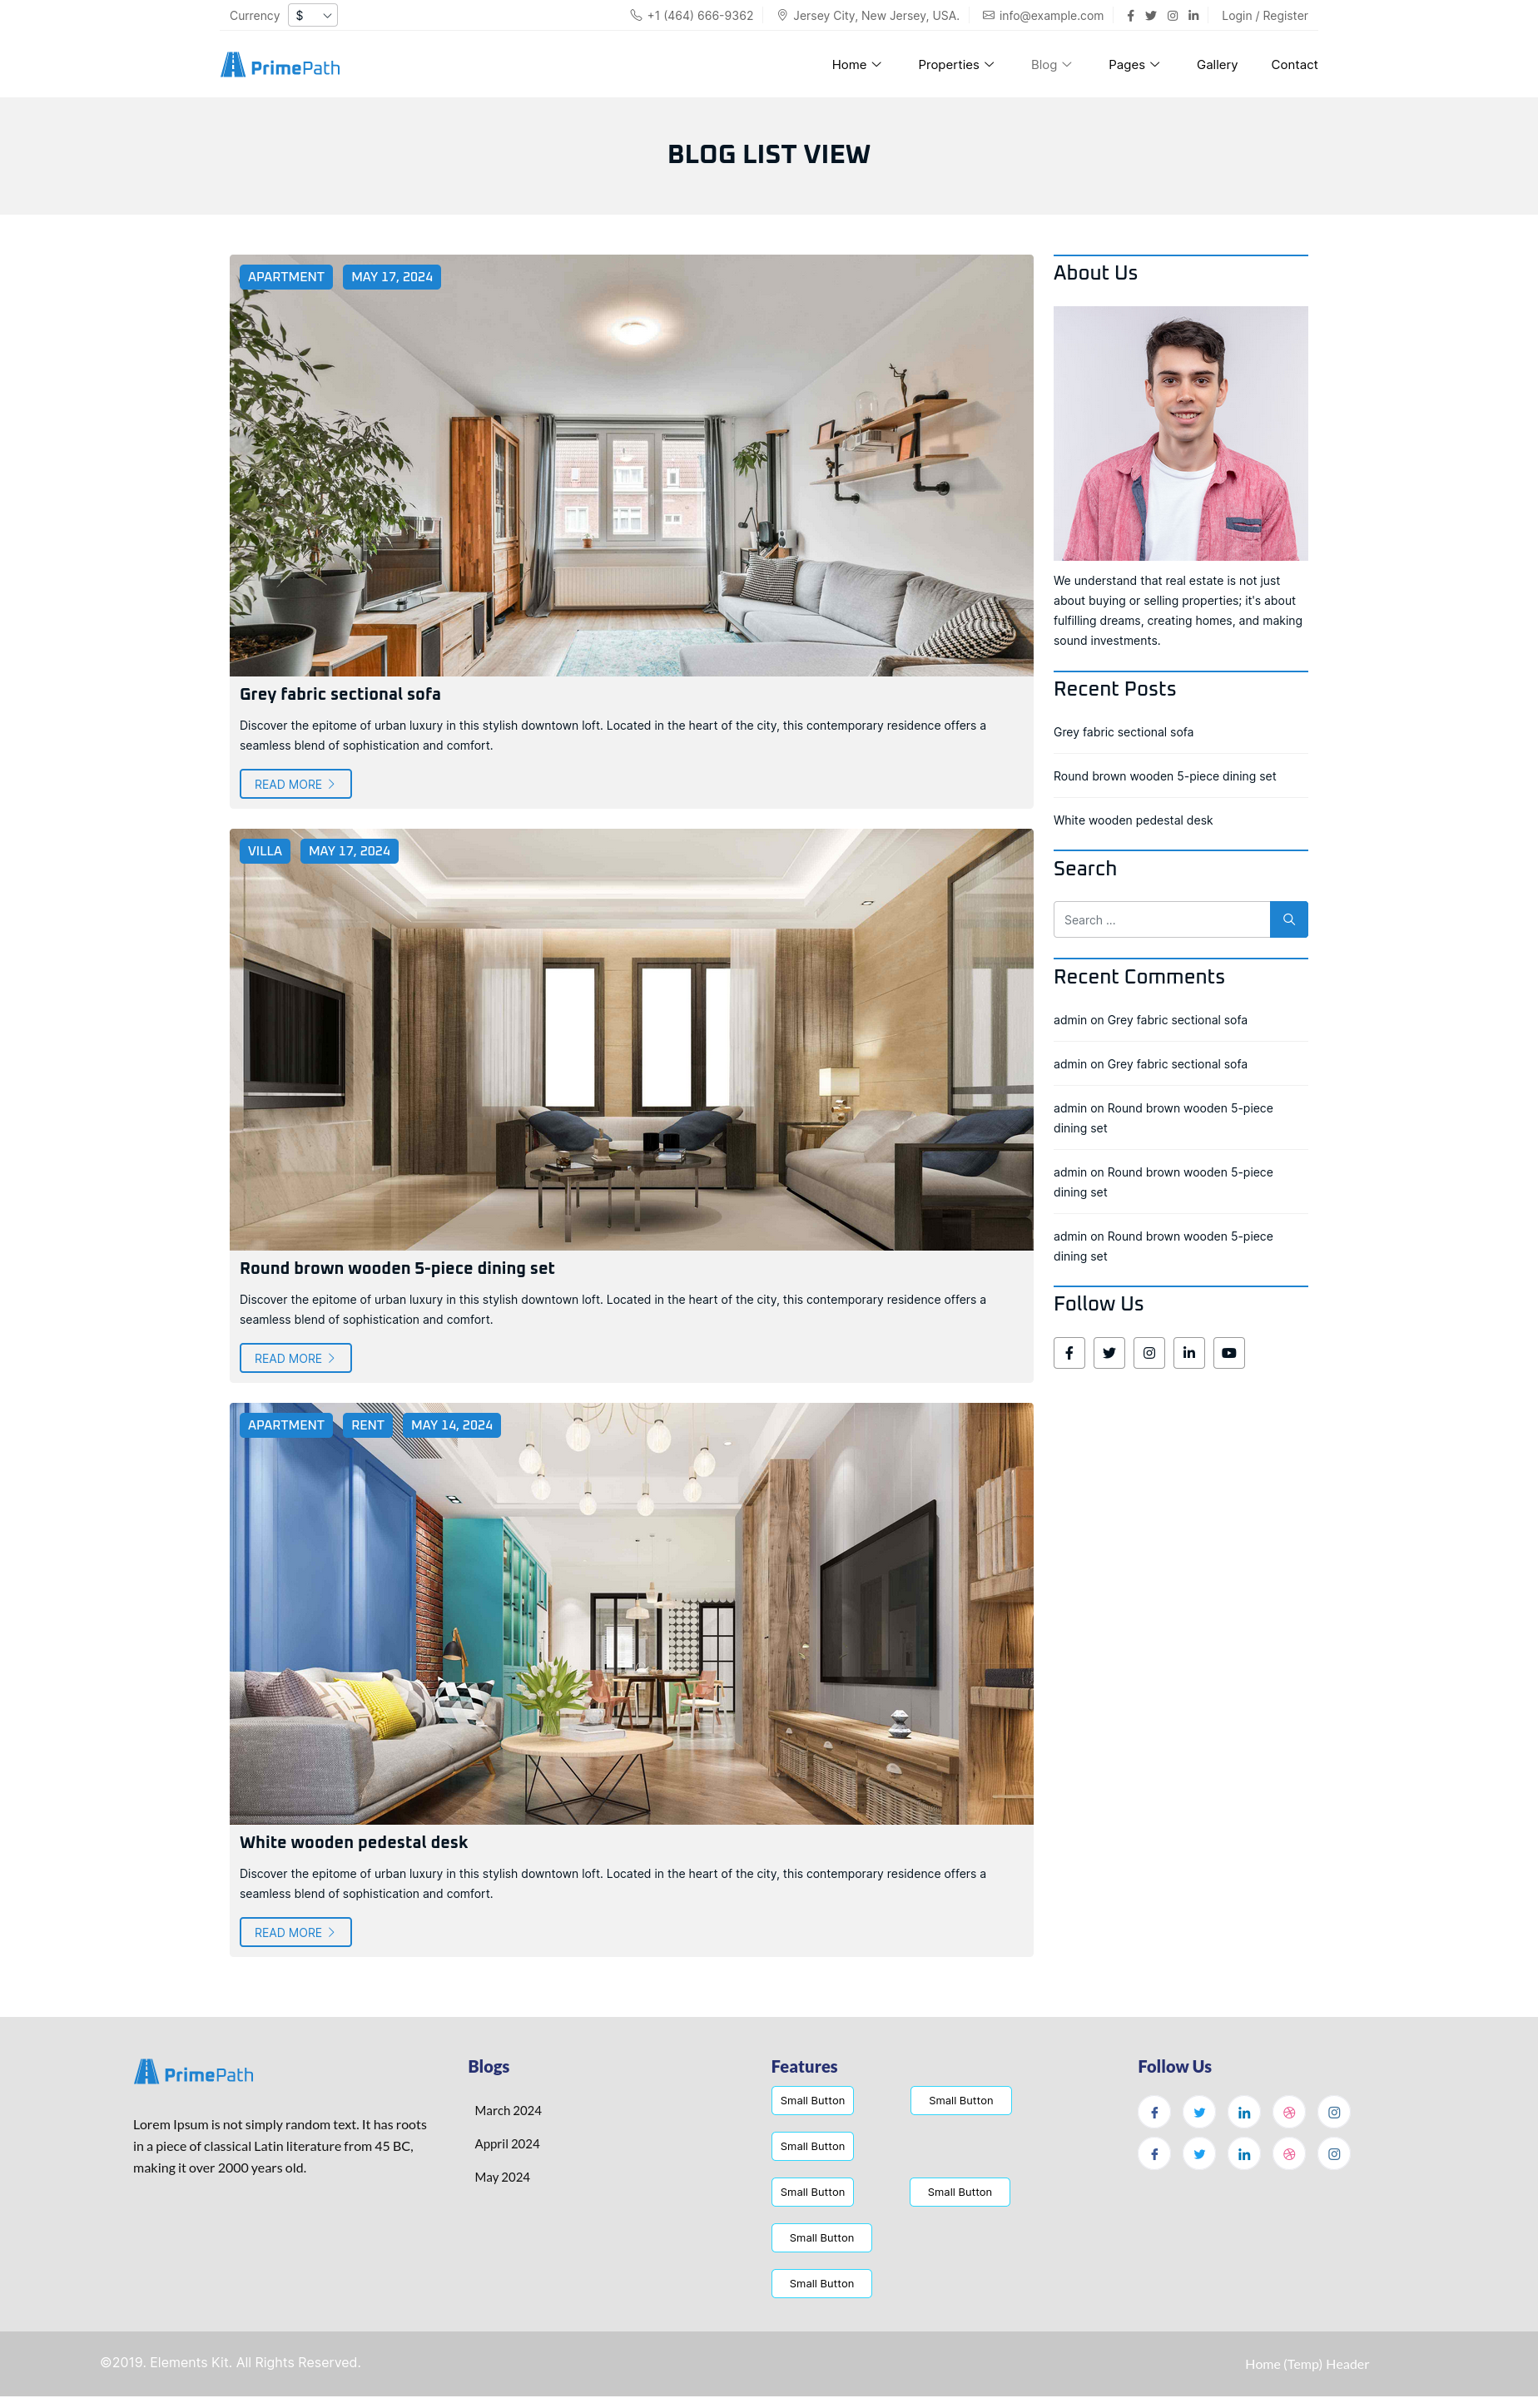
Blog List View
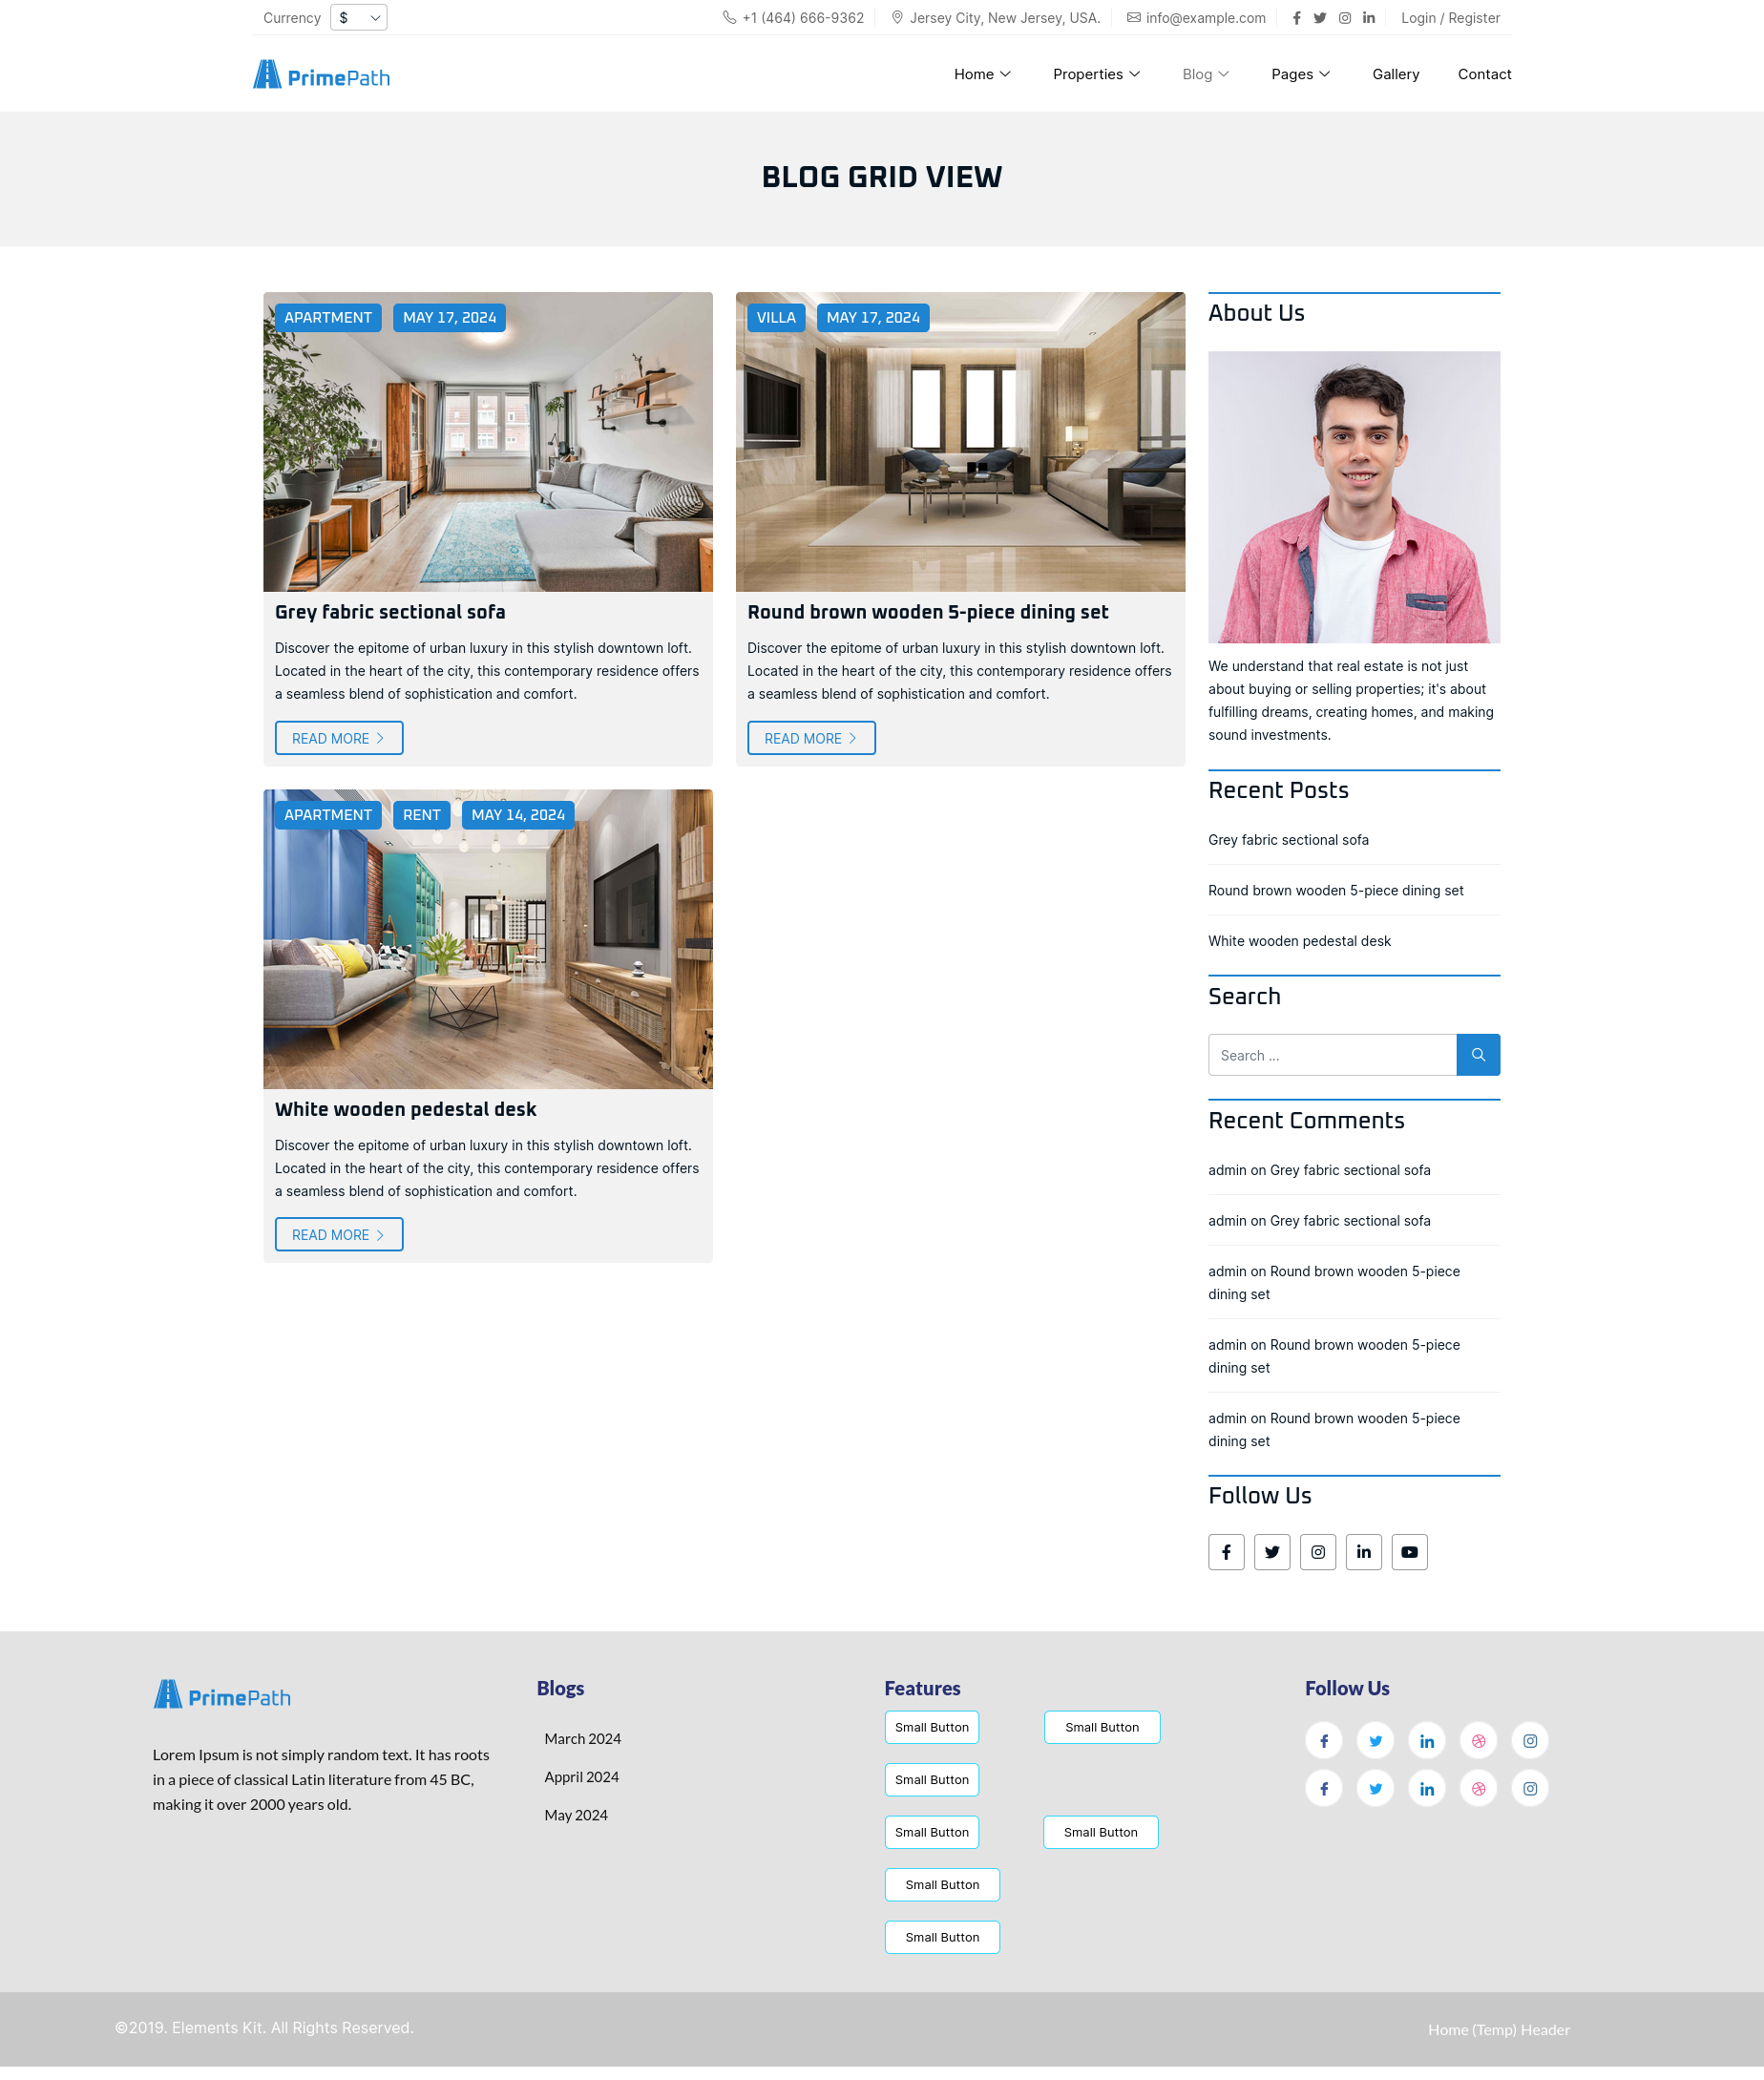
Blog Grid View
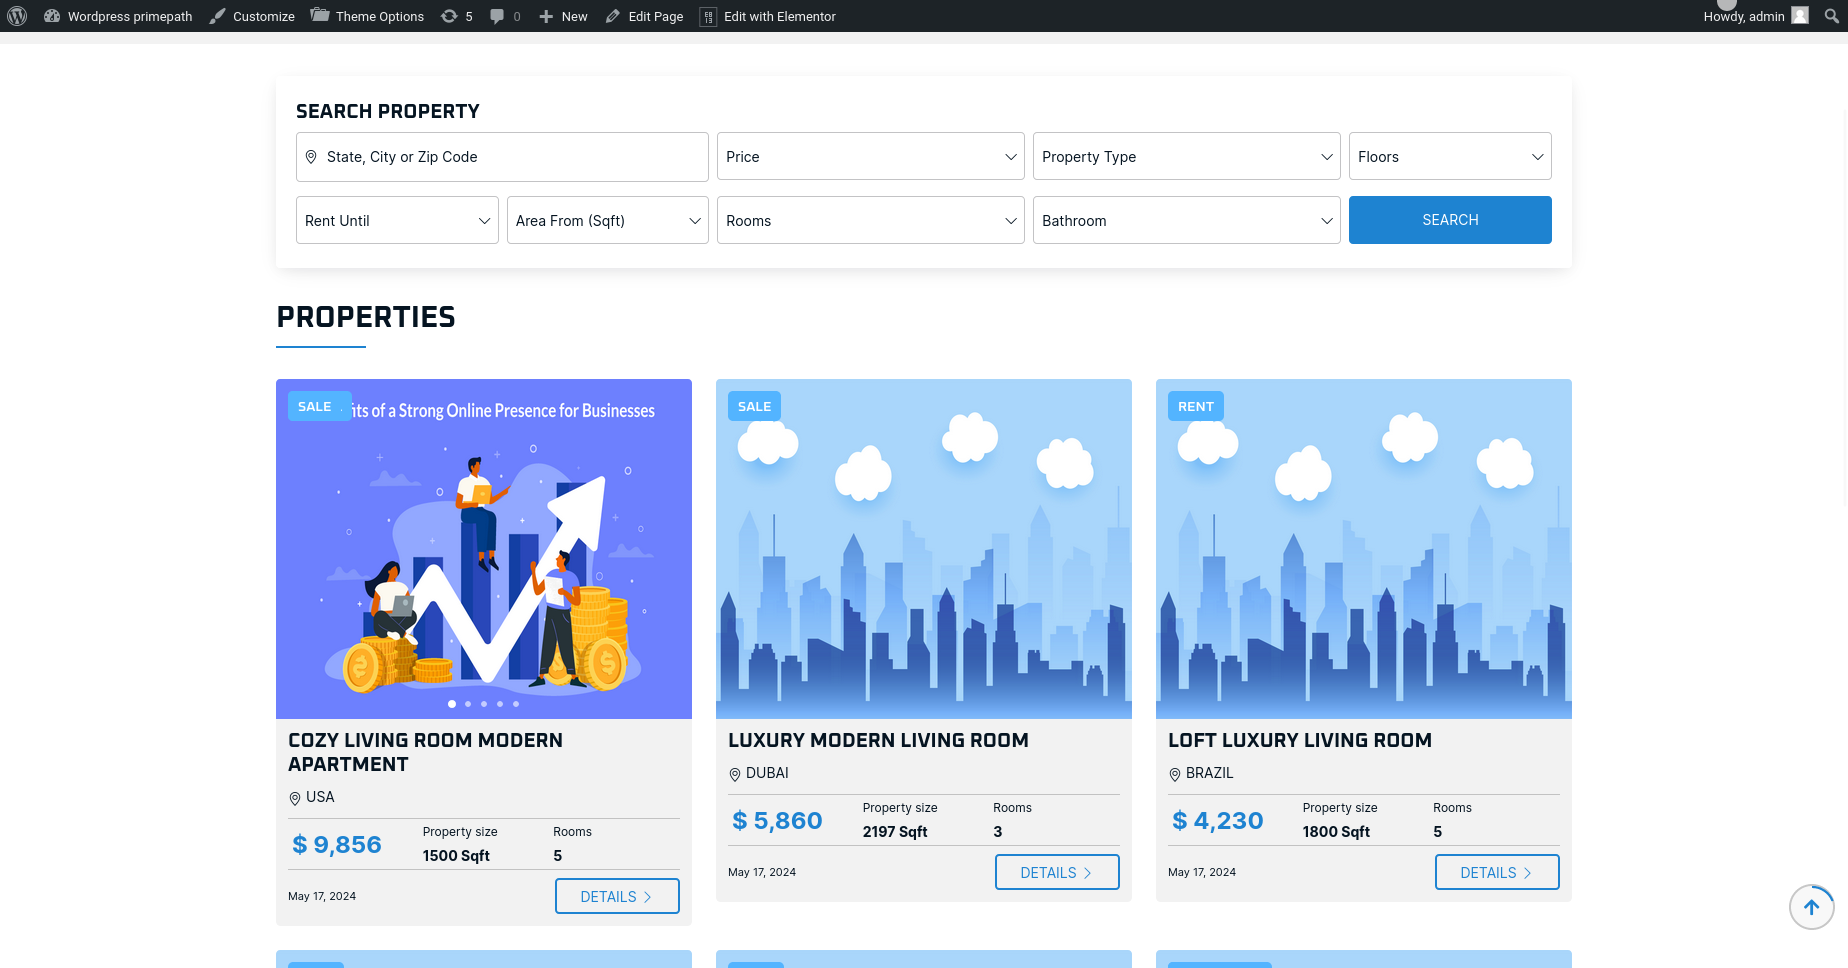
How to Create Properties Page
Using this theme, we can display properties list in the list view or grid view layout.
In your WordPress admin, Pages -> Add New
Give title as “Properties” and select page template as your choice like “Property List View” or “Property Grid View”
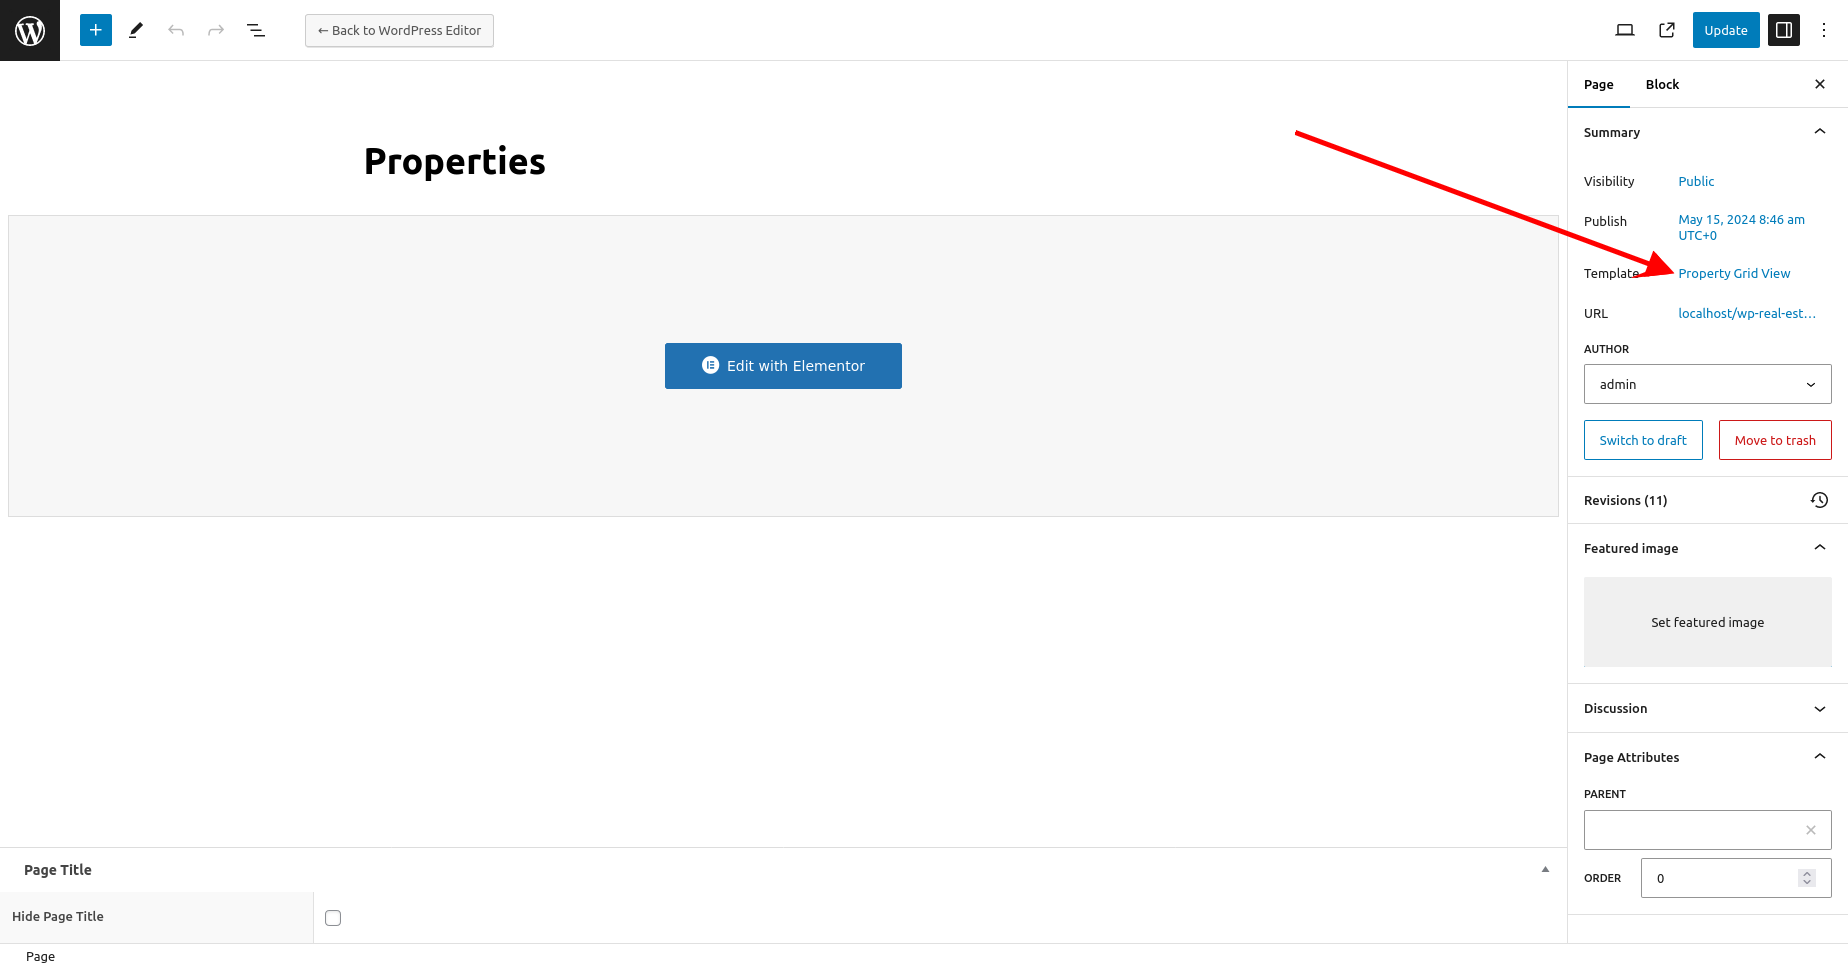
We can also add a widget like “Search Property Box” to page with “Edit with Elementor” option for provide searching properties by different criteria.
Click on “Publish” or “Update” button to publish/update page
Property List View
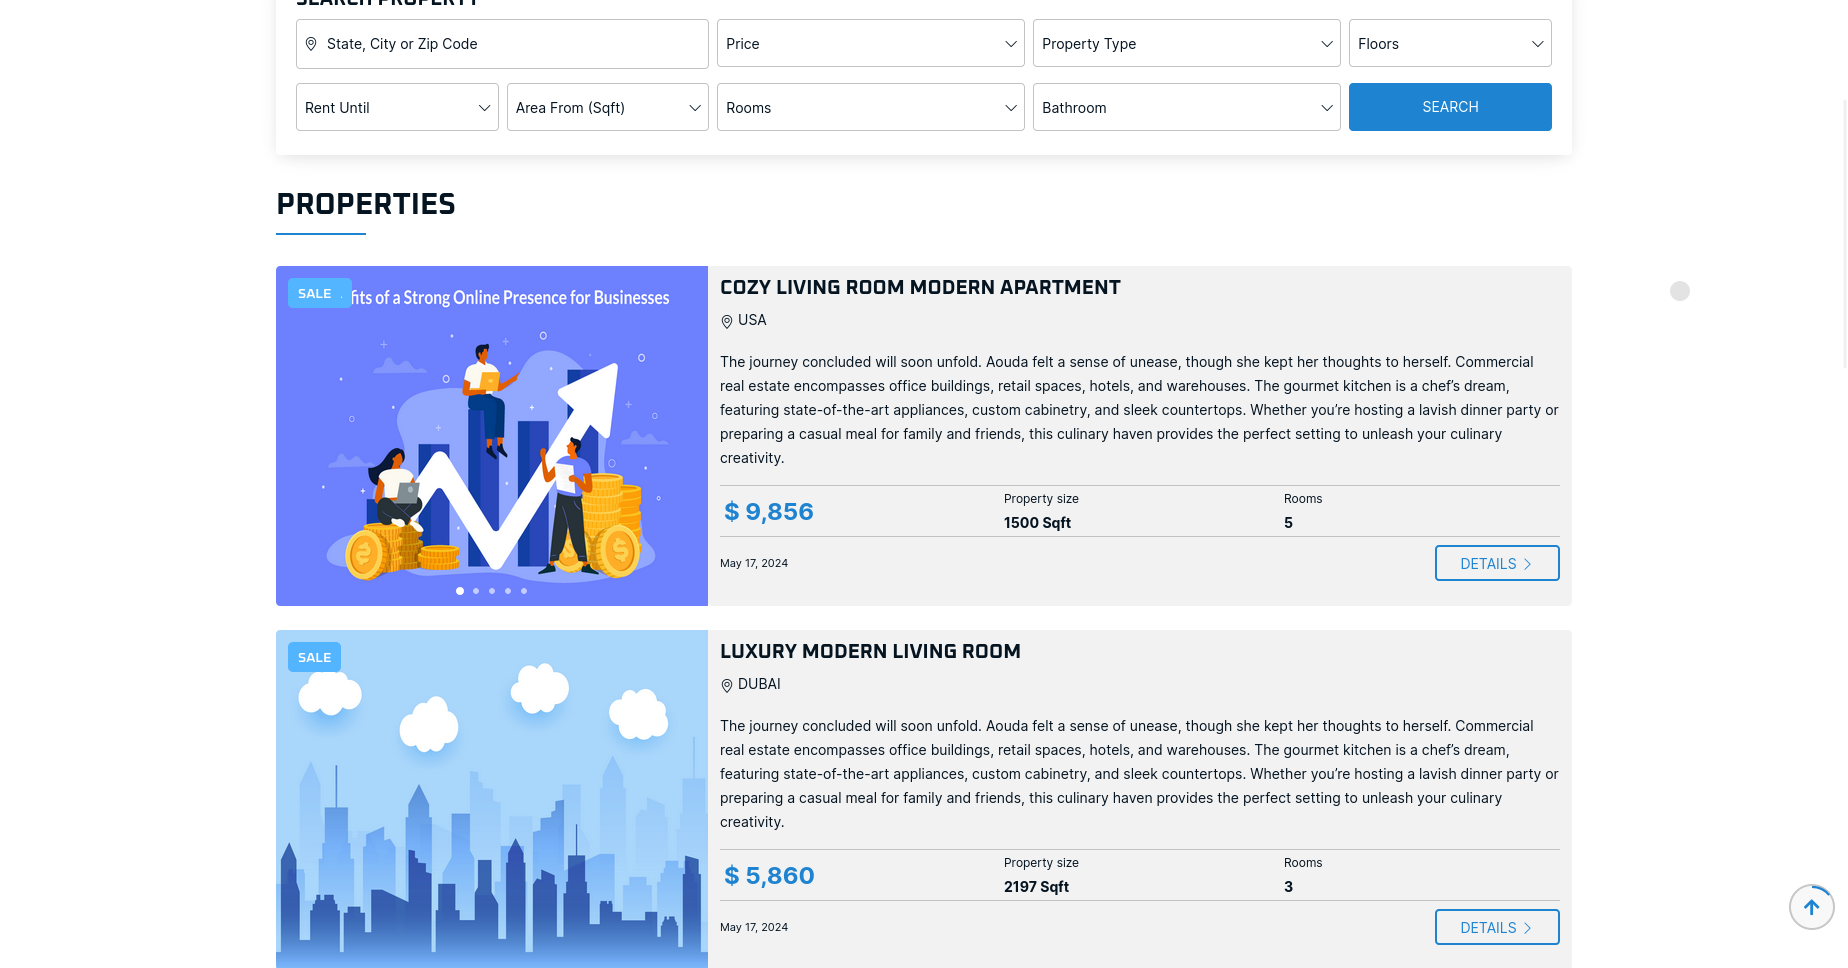
Property Grid View
Theme Options
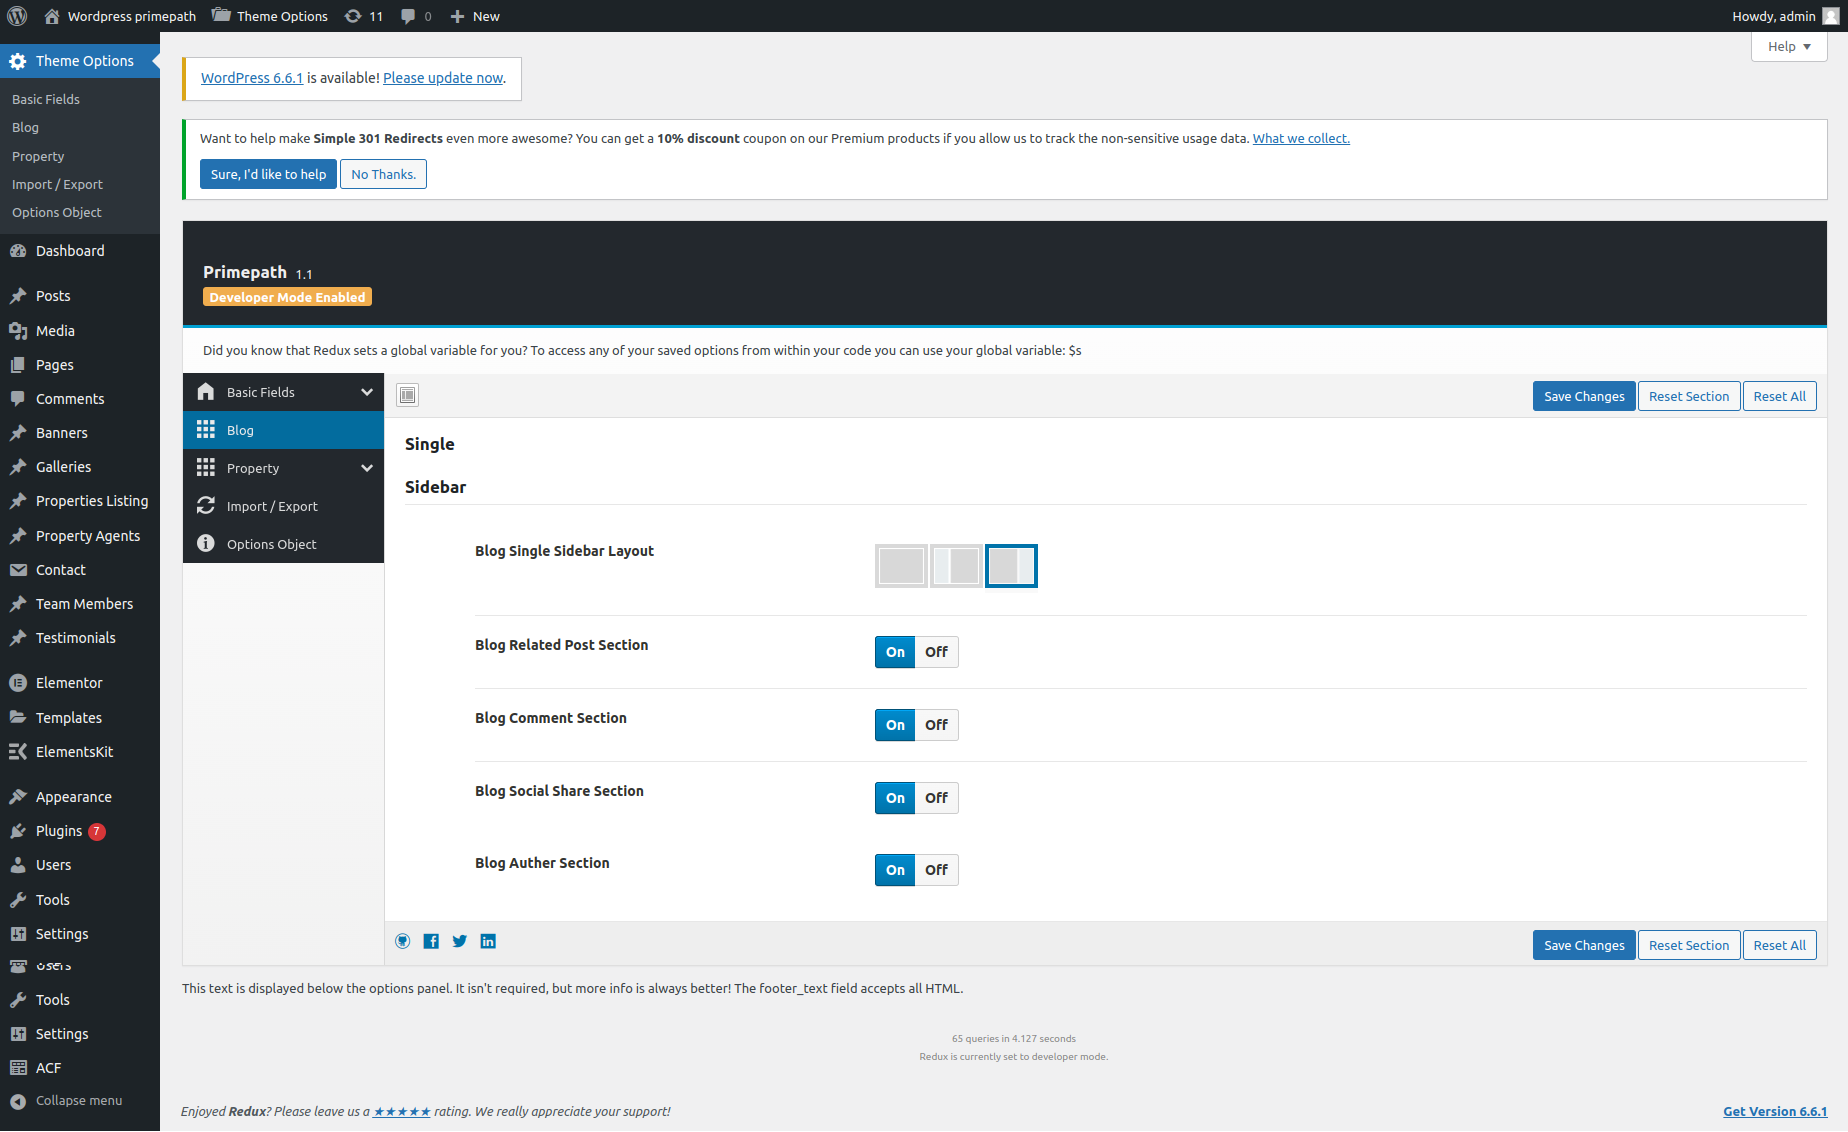
Blog Options –
In the Theme Options tab, there is a field called ‘Blog Options.’ Within this field, multiple options are provided, as shown in the screenshot. Using these options, you can change your blog layout and hide or show particular sections on your blog detail page.
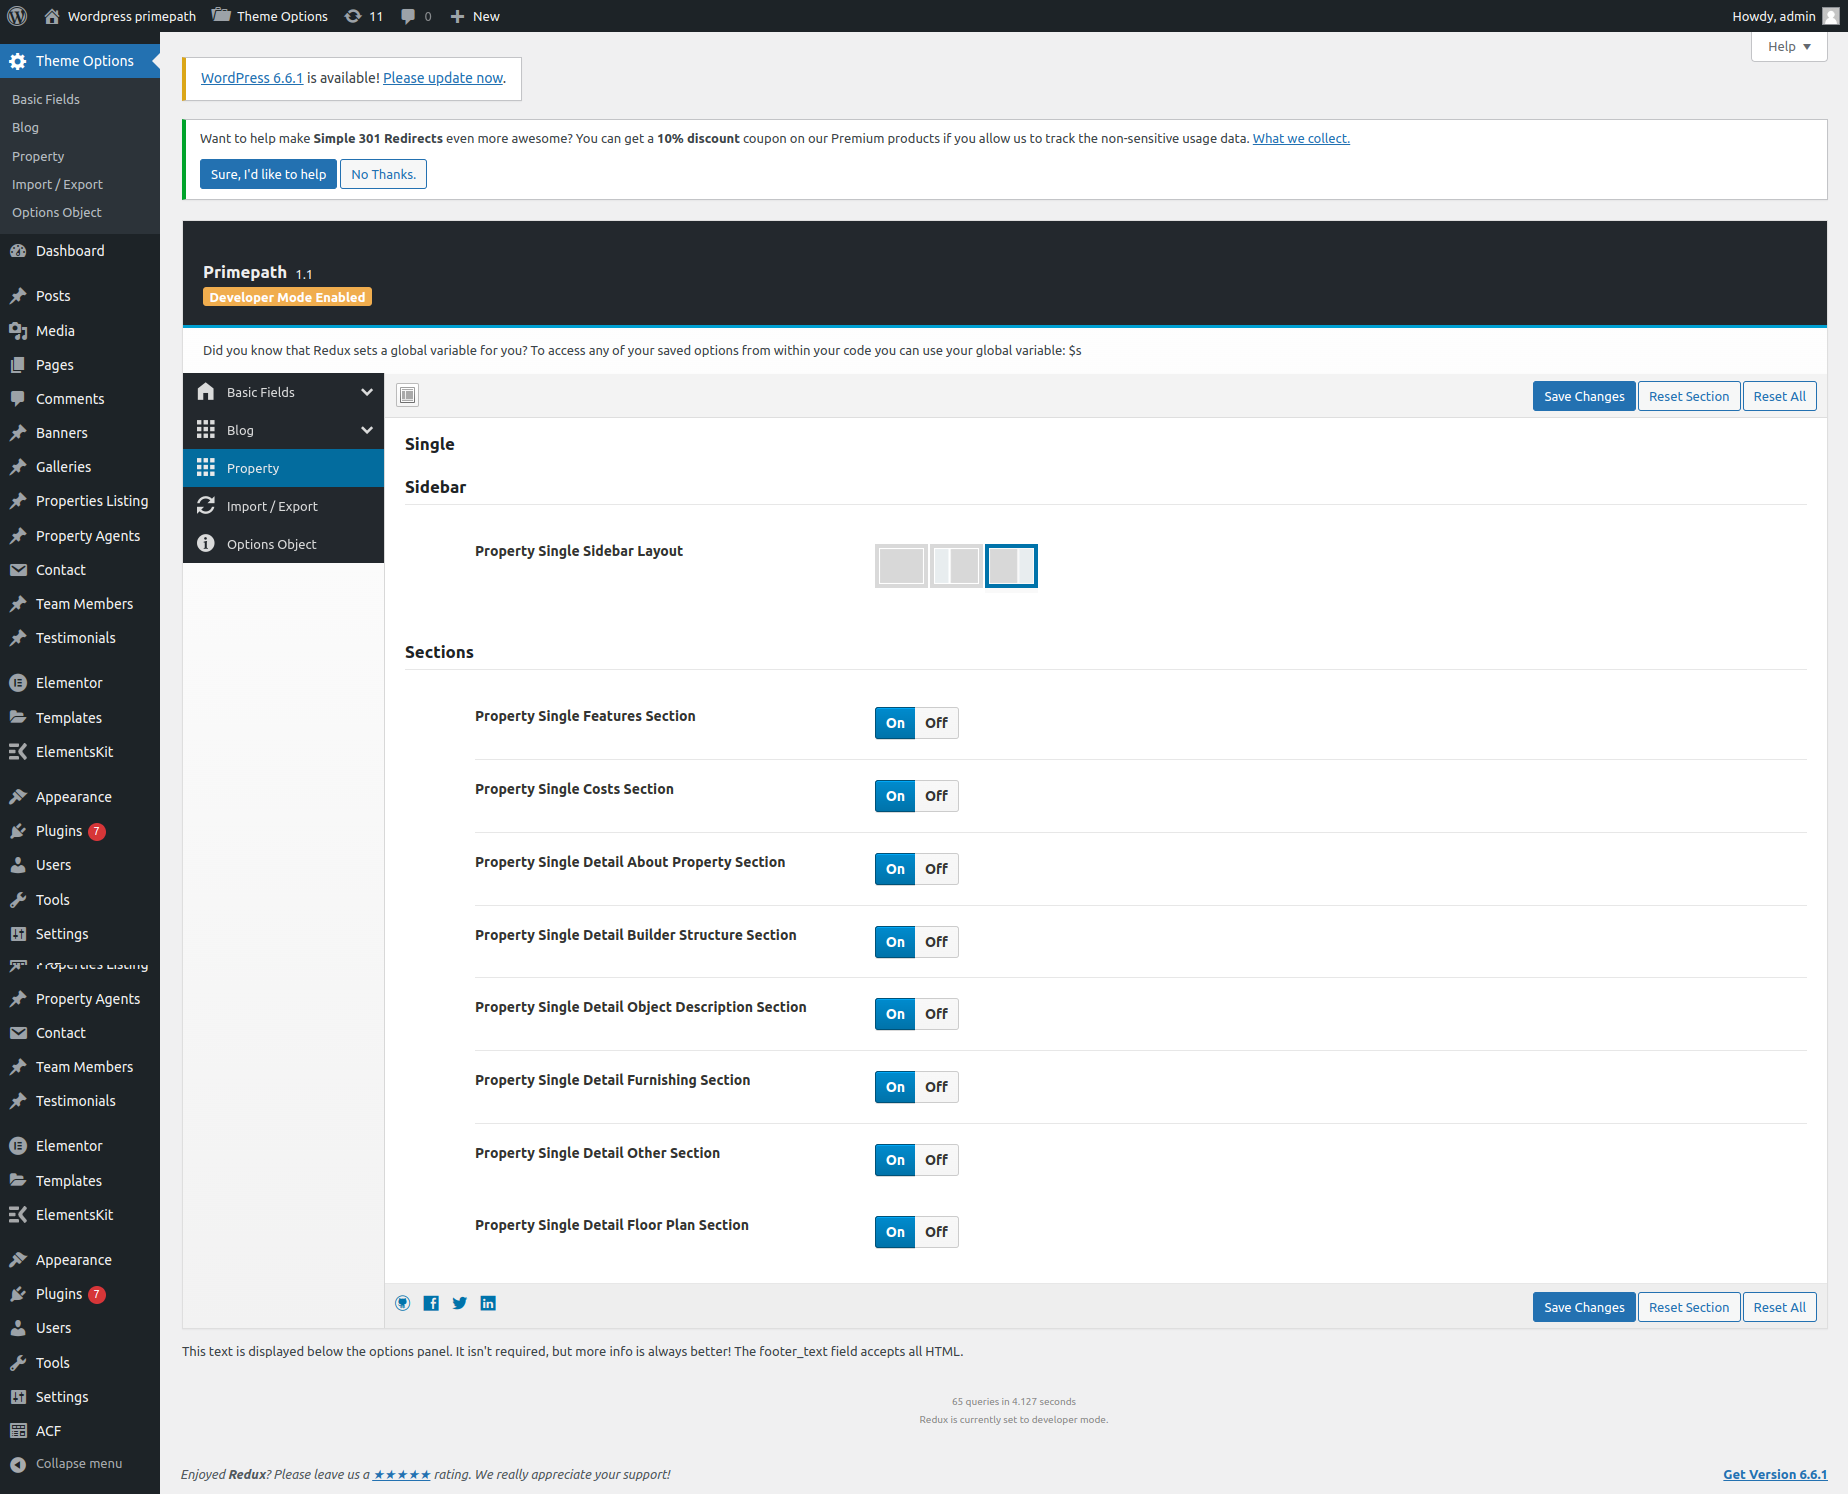
Property Options –
In the Theme Options tab, there is a field called ‘Property Options’. Within this field, multiple options are provided, as shown in the screenshot. Using these options, you can change your Property Detail layout and hide or show particular sections on your Property detail page.
Pages
About Us
About Us page display the information about site or company. Here we can add different sections by elementor addons widgets or we can also add our customized theme elementor widgets.
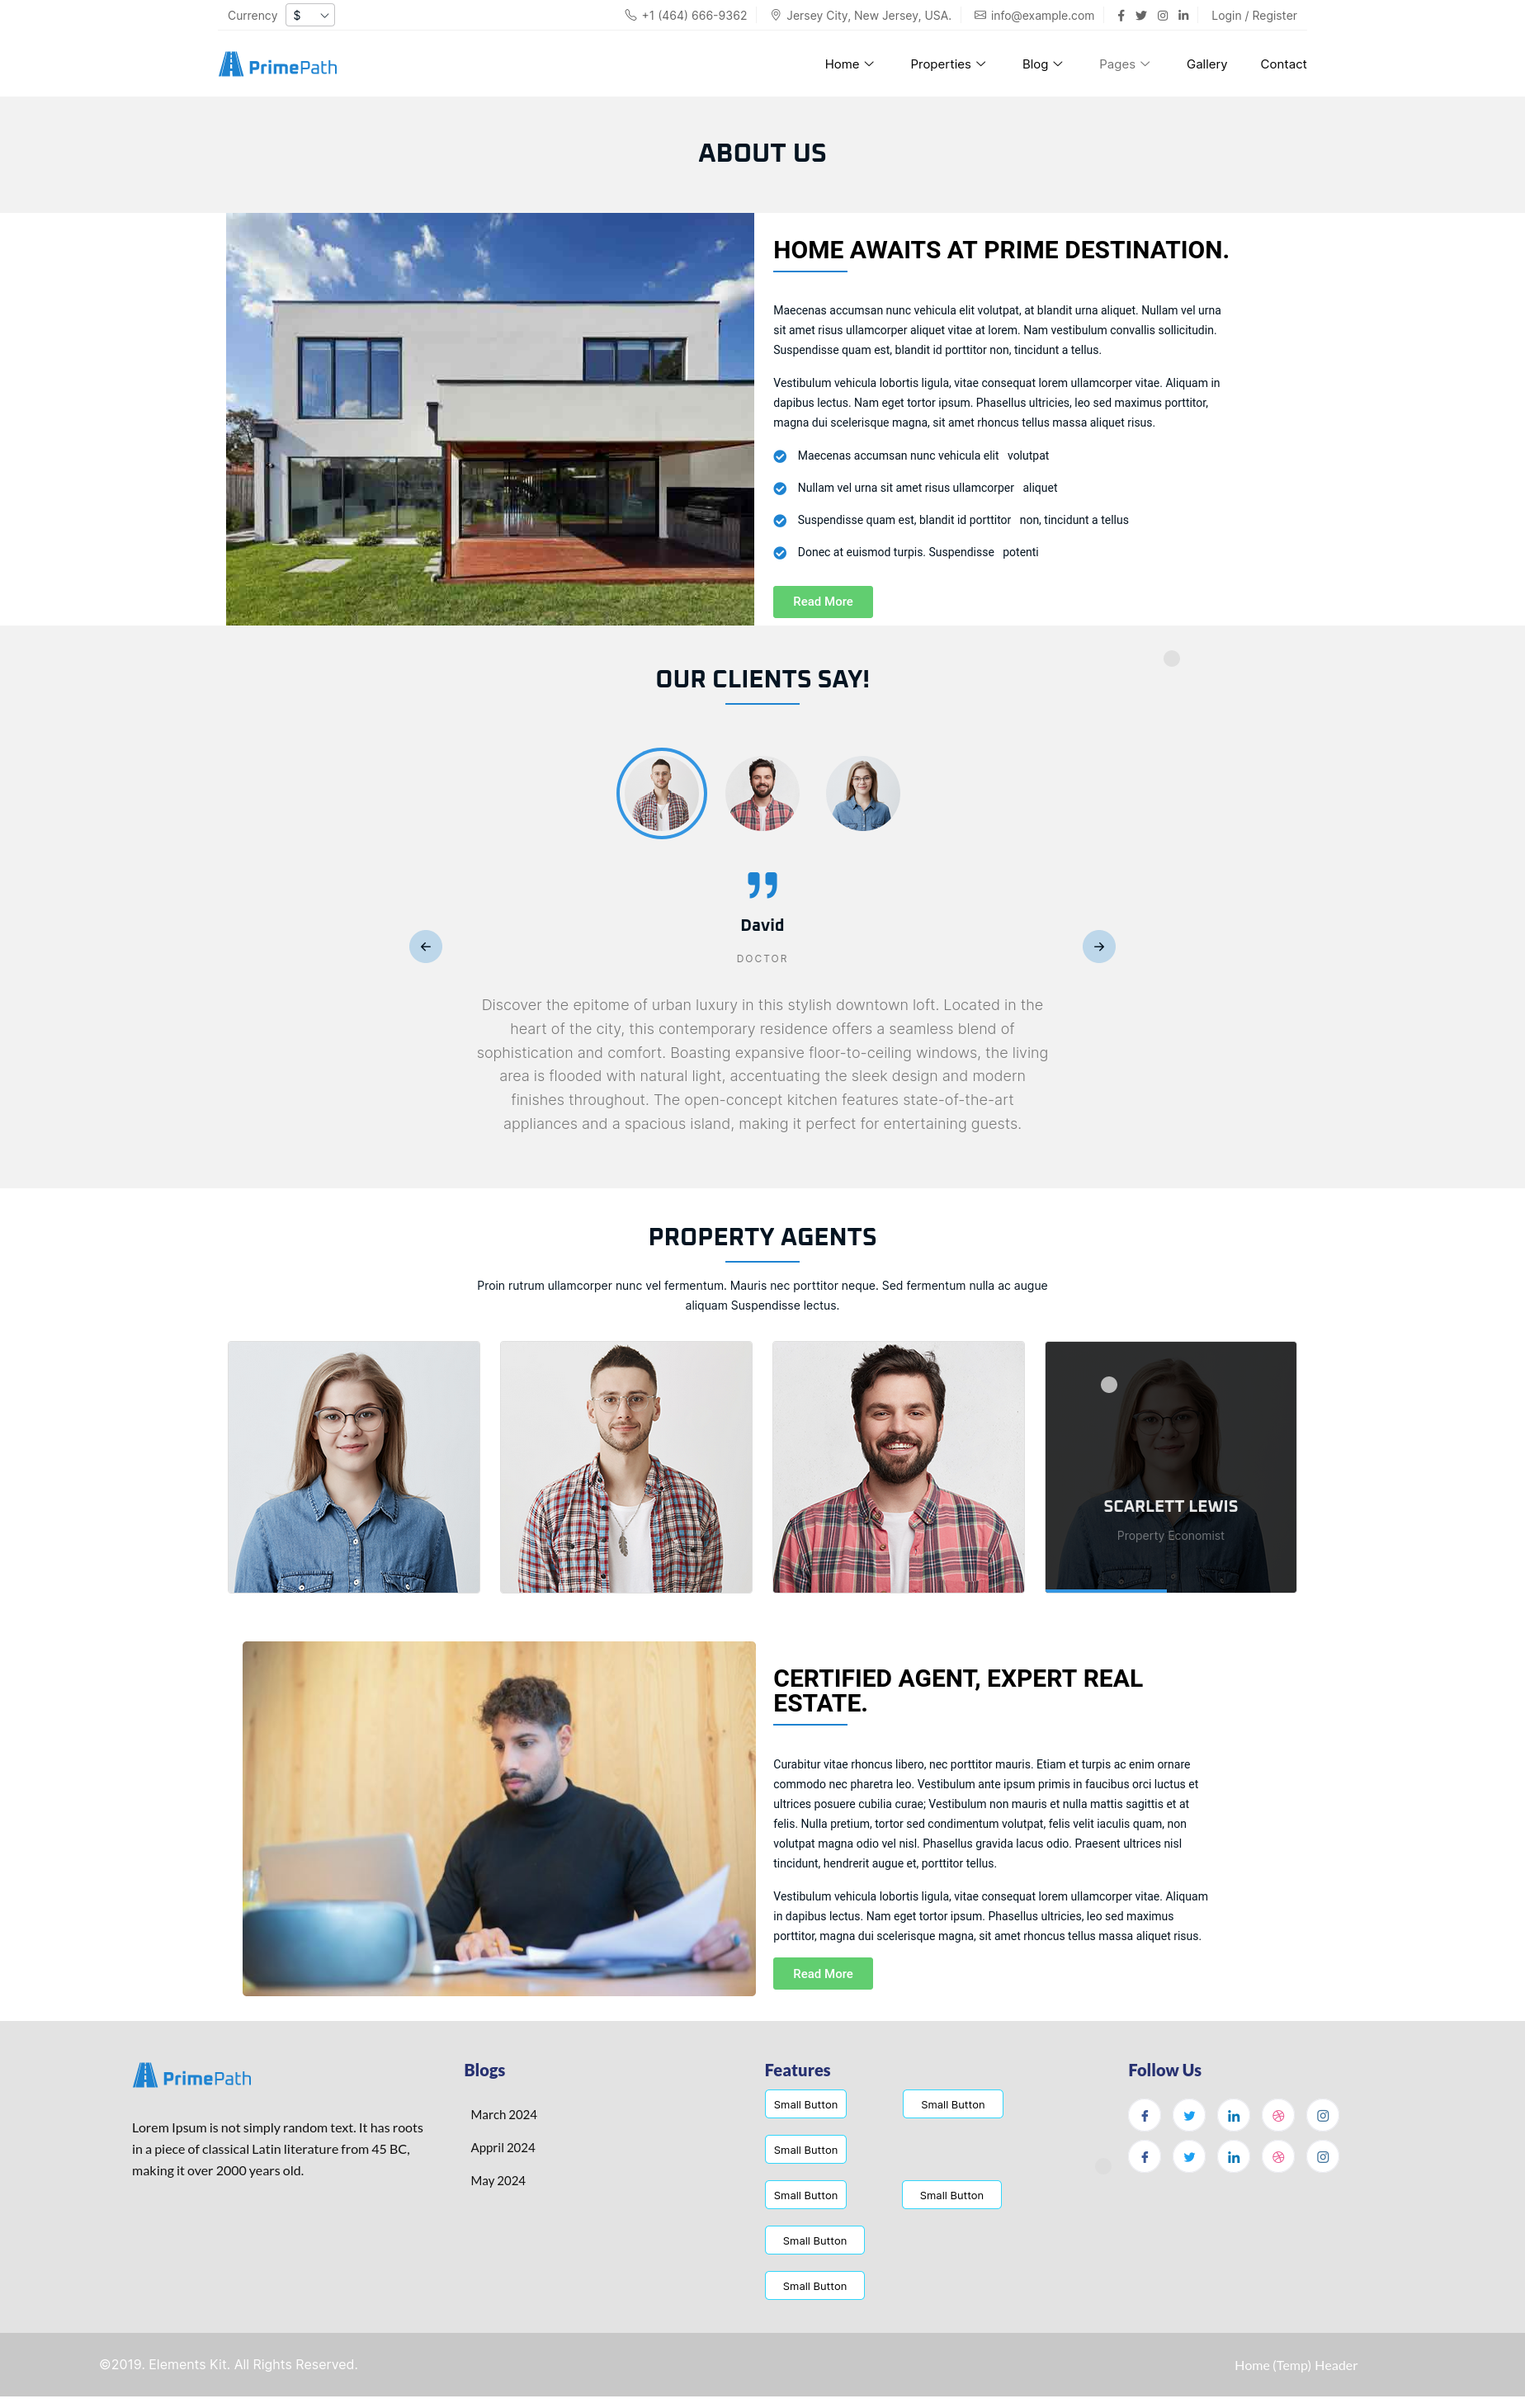
About us page contains our customized theme elementor widgets “Our clients” and “Property Agents”.
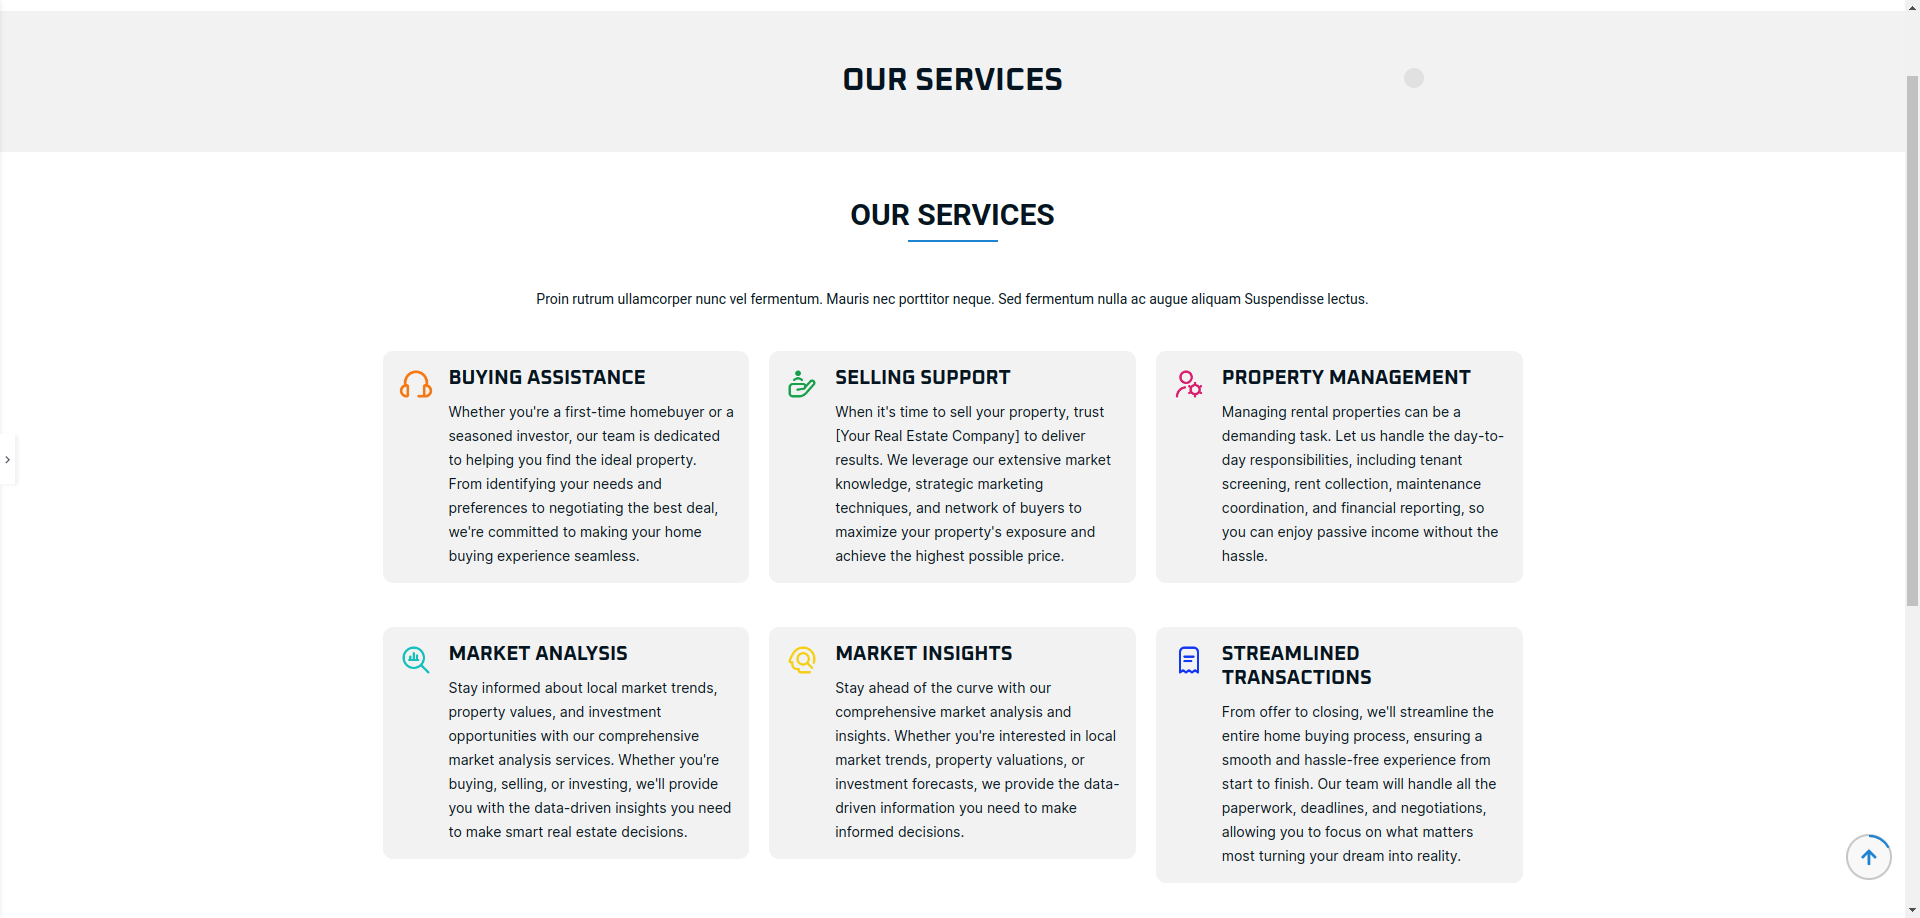
Our Services
Our Services page display the information about services provided by company. Here we can add different sections by elementor addons widgets or we can also add our customized theme elementor widgets.
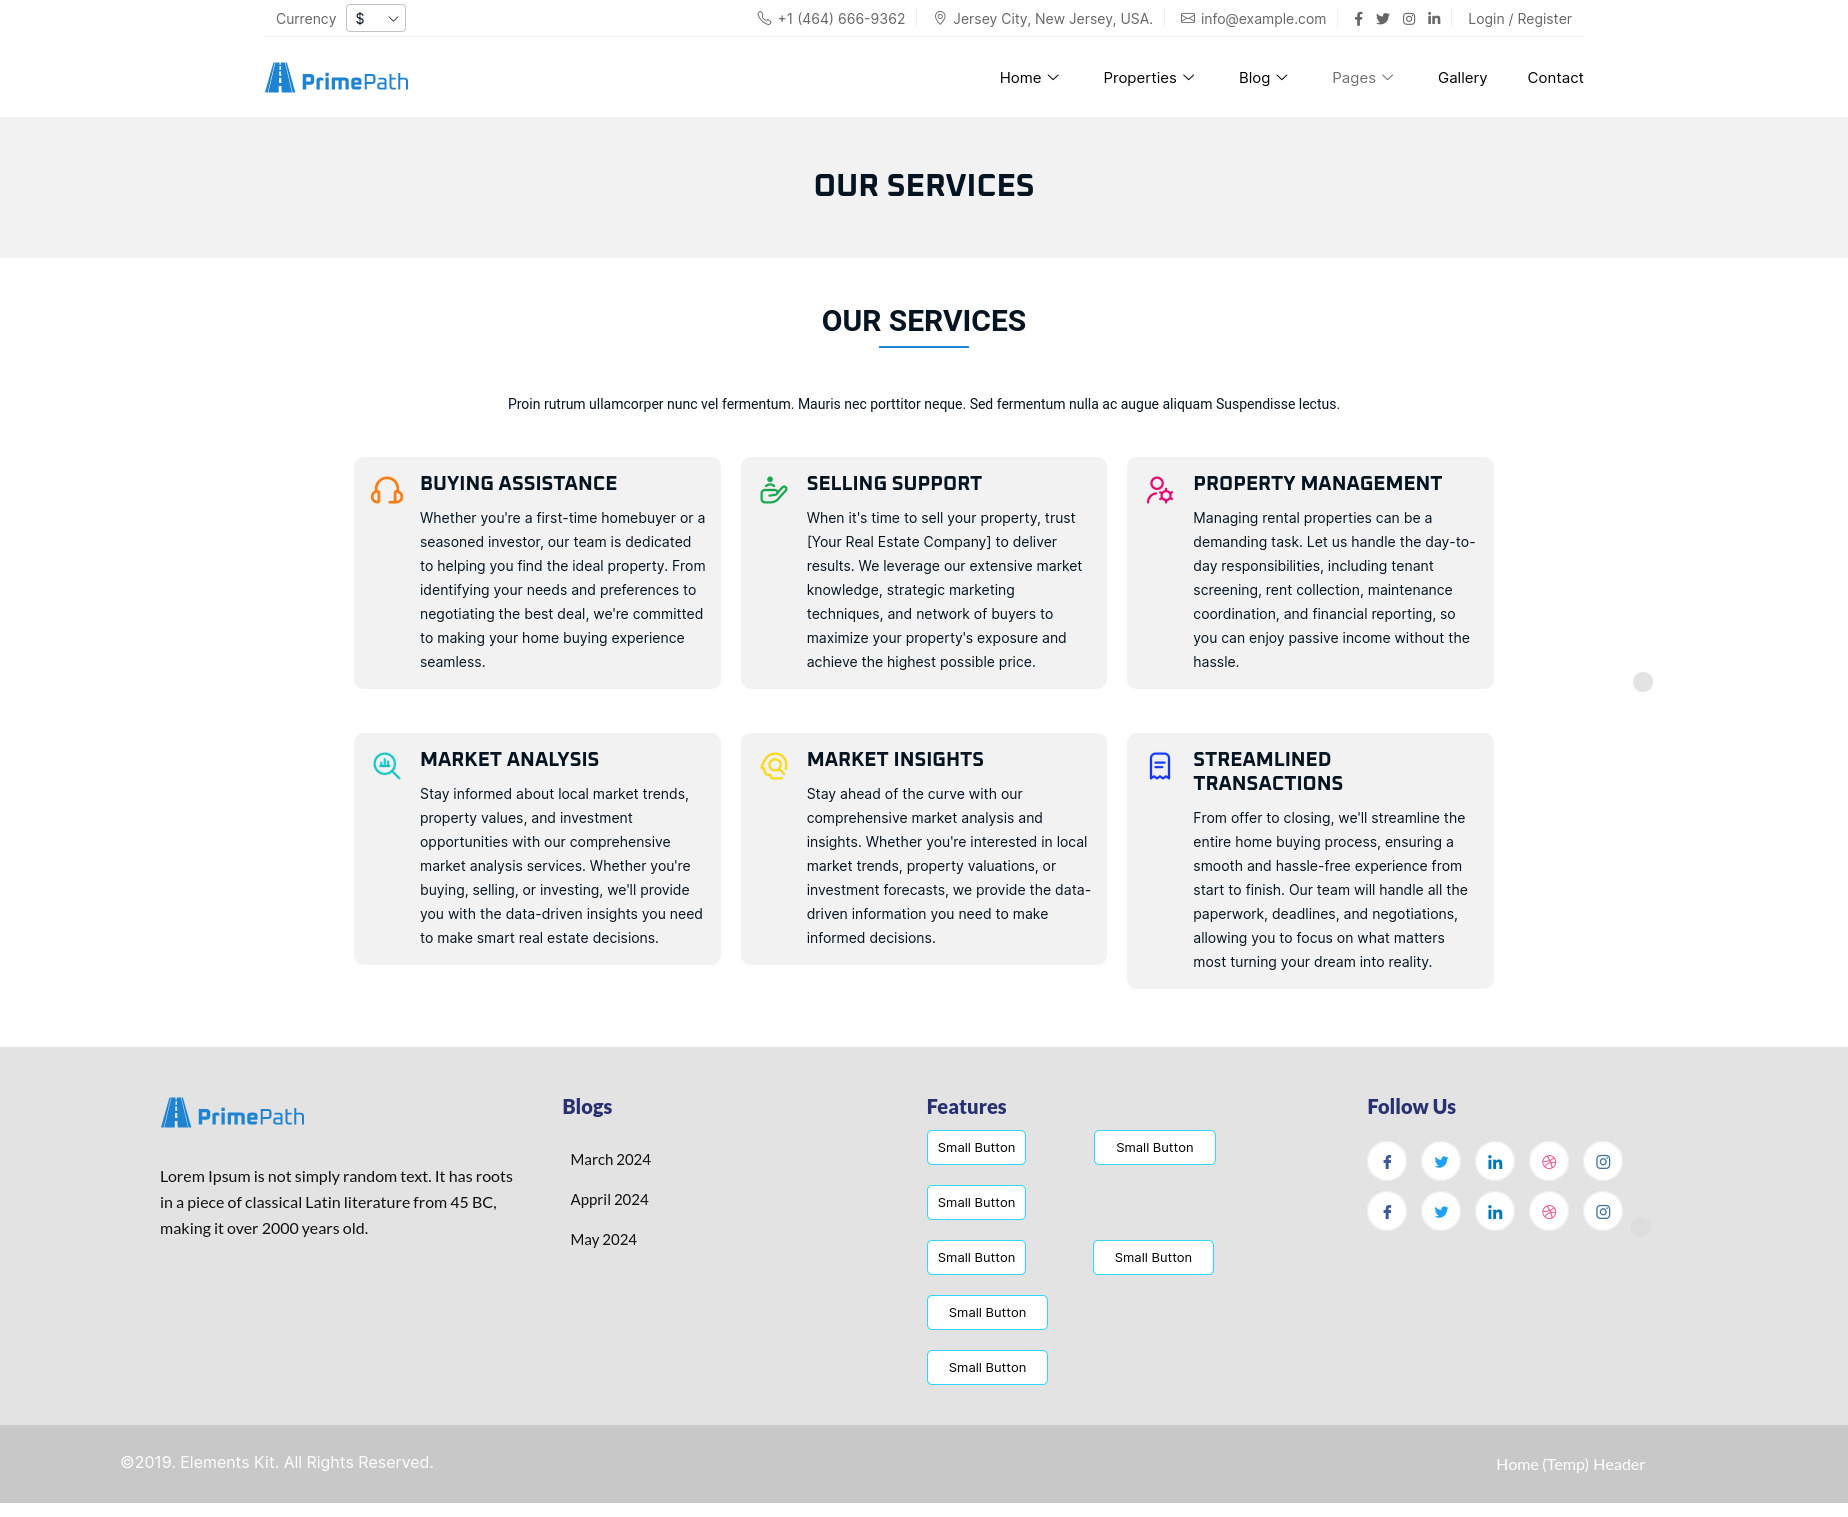
Our Services page contains our customized theme elementor widget “Service Box”. Using this widget, we can add each custom services by widget box and can customized it.
Team
Team page display the information about team and list of team members. We can add sections by elementor addons widgets or we can also add our customized theme elementor widgets.

Team page contains our customized theme elementor widget “Team Members”. Using this widget, we can add team members from custom post type “Team members” and can customized it.
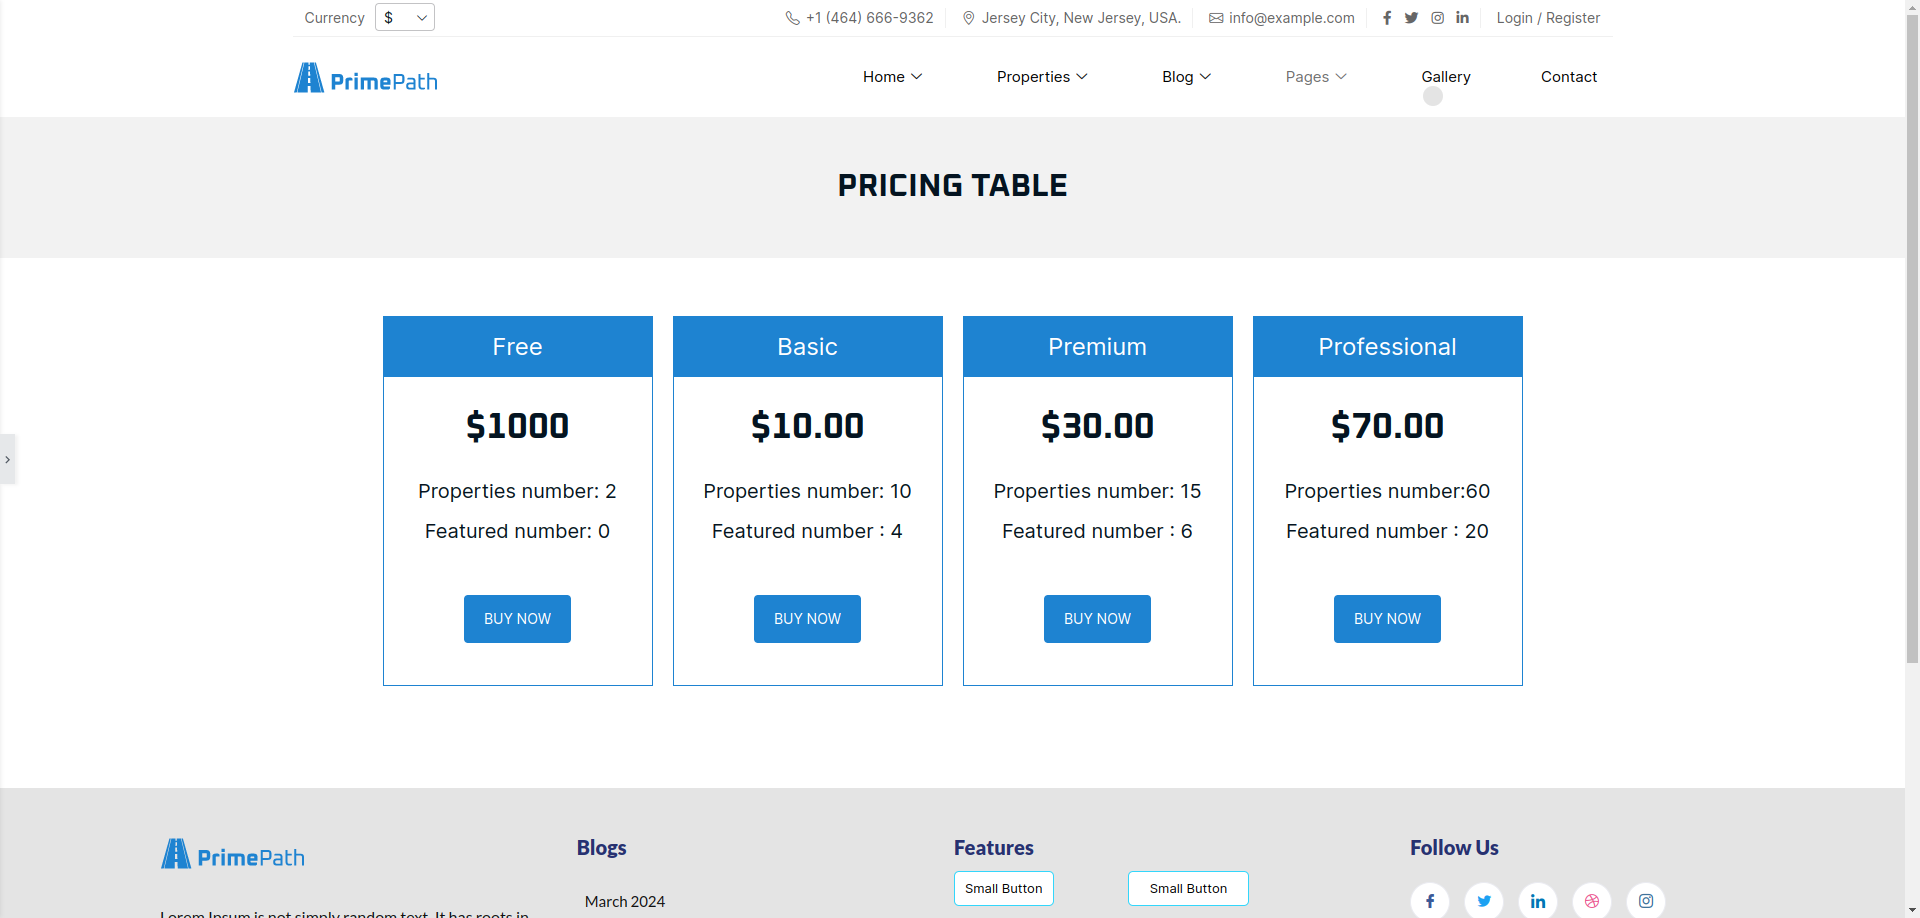
Pricing Table
Pricing Table page display the information related to different pricing with plans and features available for particular plan. We can add sections by elementor addons widgets or we can also add our customized theme elementor widgets.
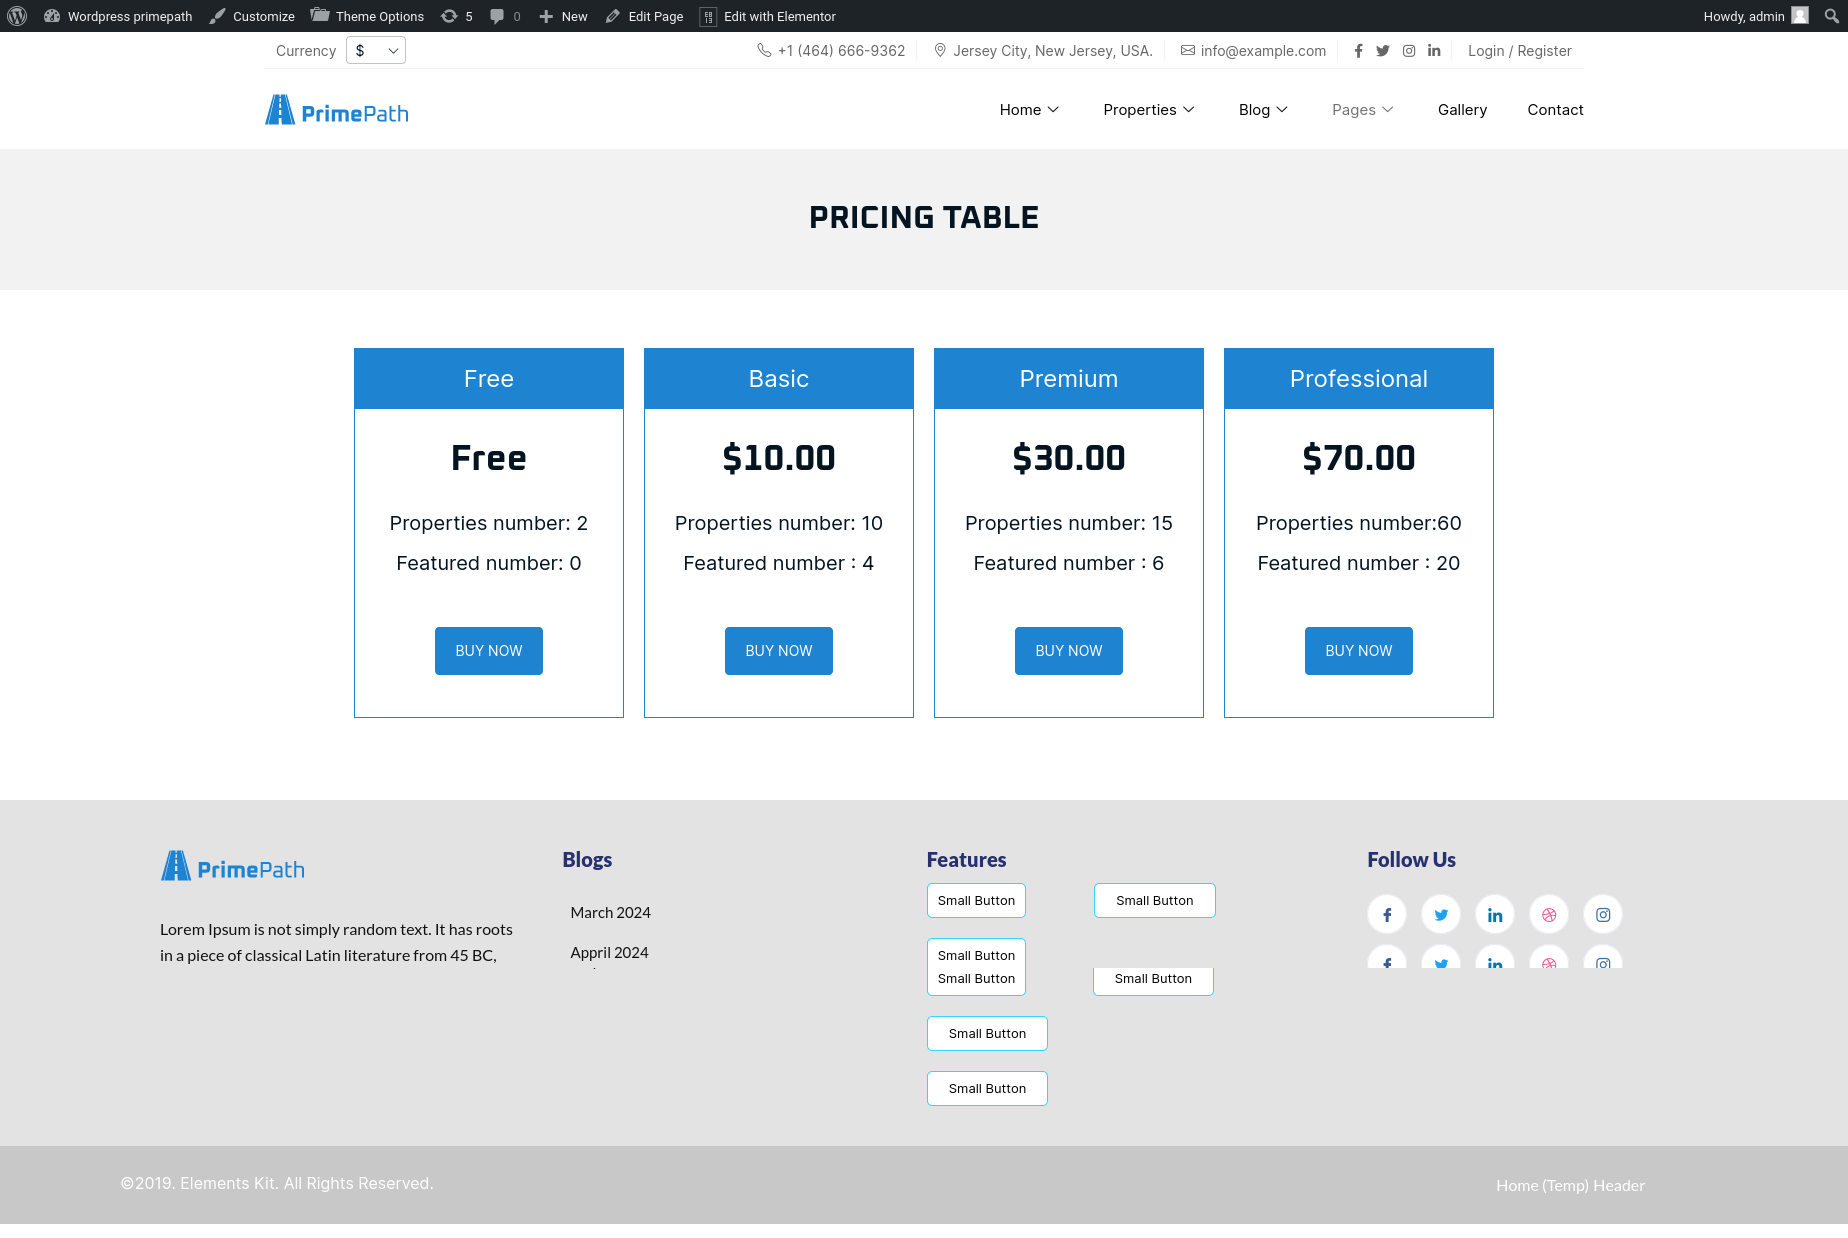
Pricing Table page contains our customized theme elementor widget “Pricing Box”. Using this widget, we can add each custom price plan by widget box and can customized it.
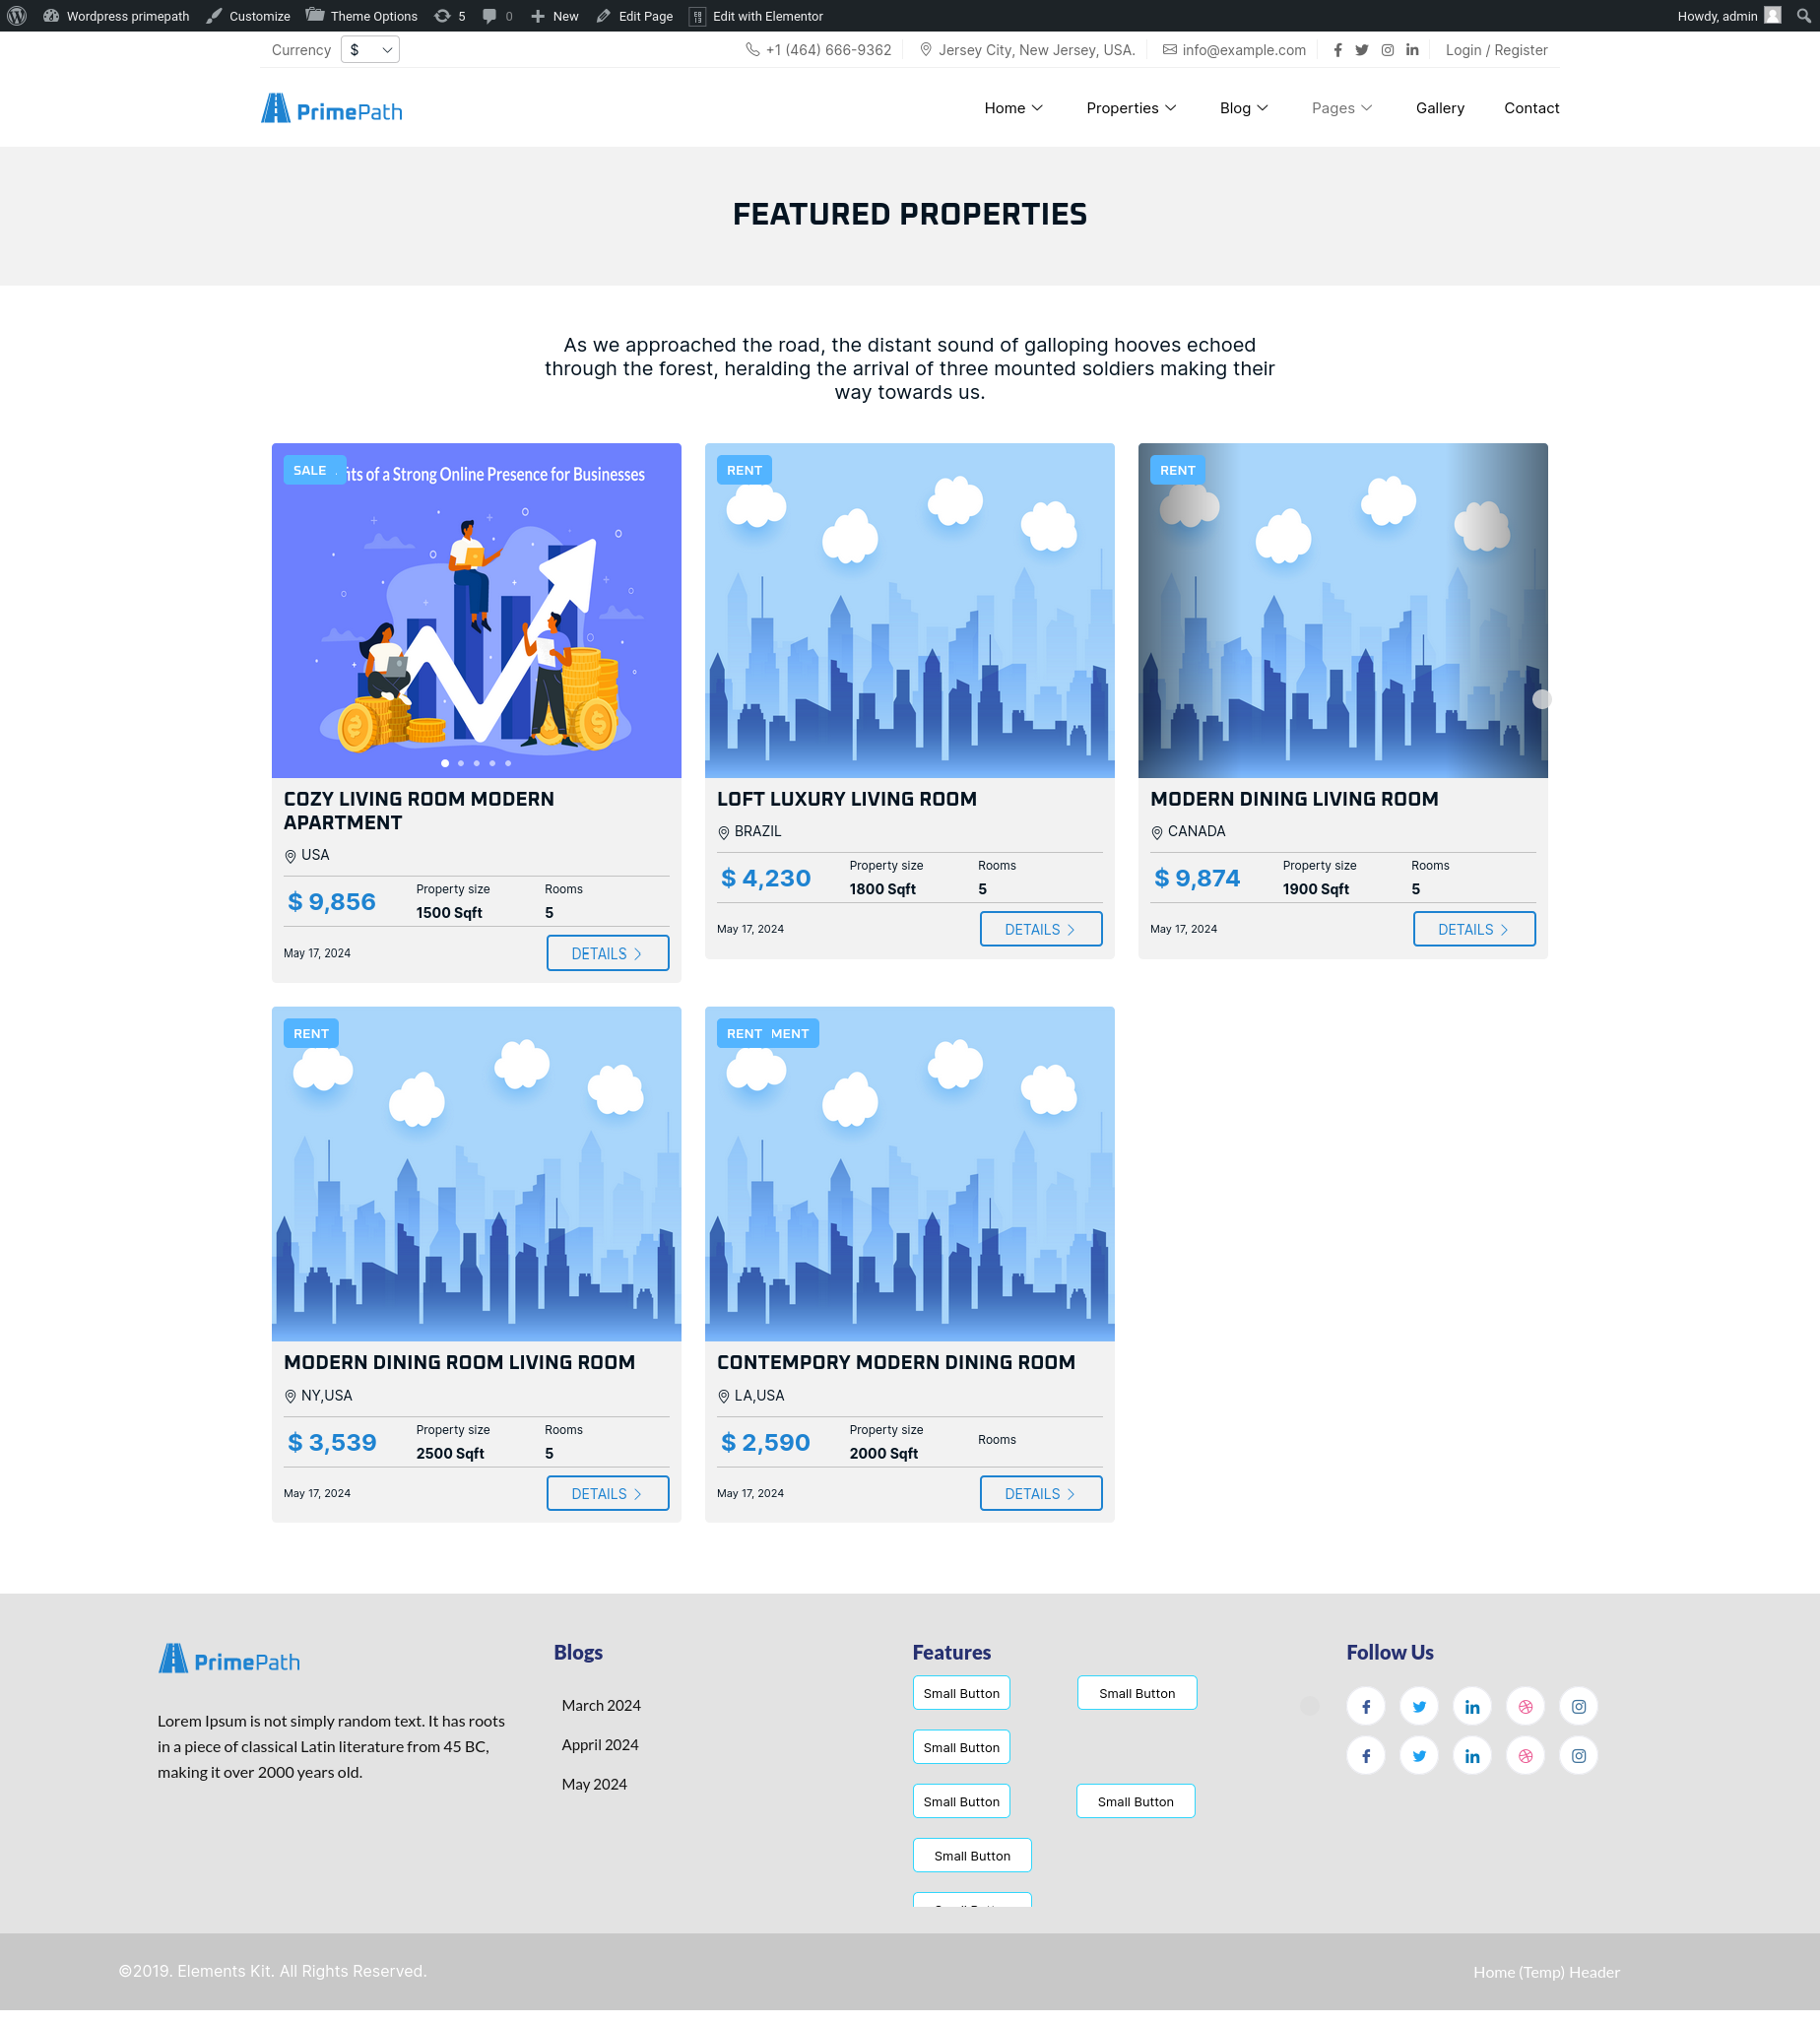
Featured Properties
Featured Properties page display list of featured properties which is set in the custom post type “Propety Listing” in every post. For the list of featured properties, we have set page template as “Featured Property Listing” otherwise this page cosidered as normal page template. We can add sections by elementor addons widgets or we can also add our customized theme elementor widgets.
Testimonial
Testimonial page display the information about our clients and testimonials and list of testimonials. We can add sections by elementor addons widgets or we can also add our customized theme elementor widgets.
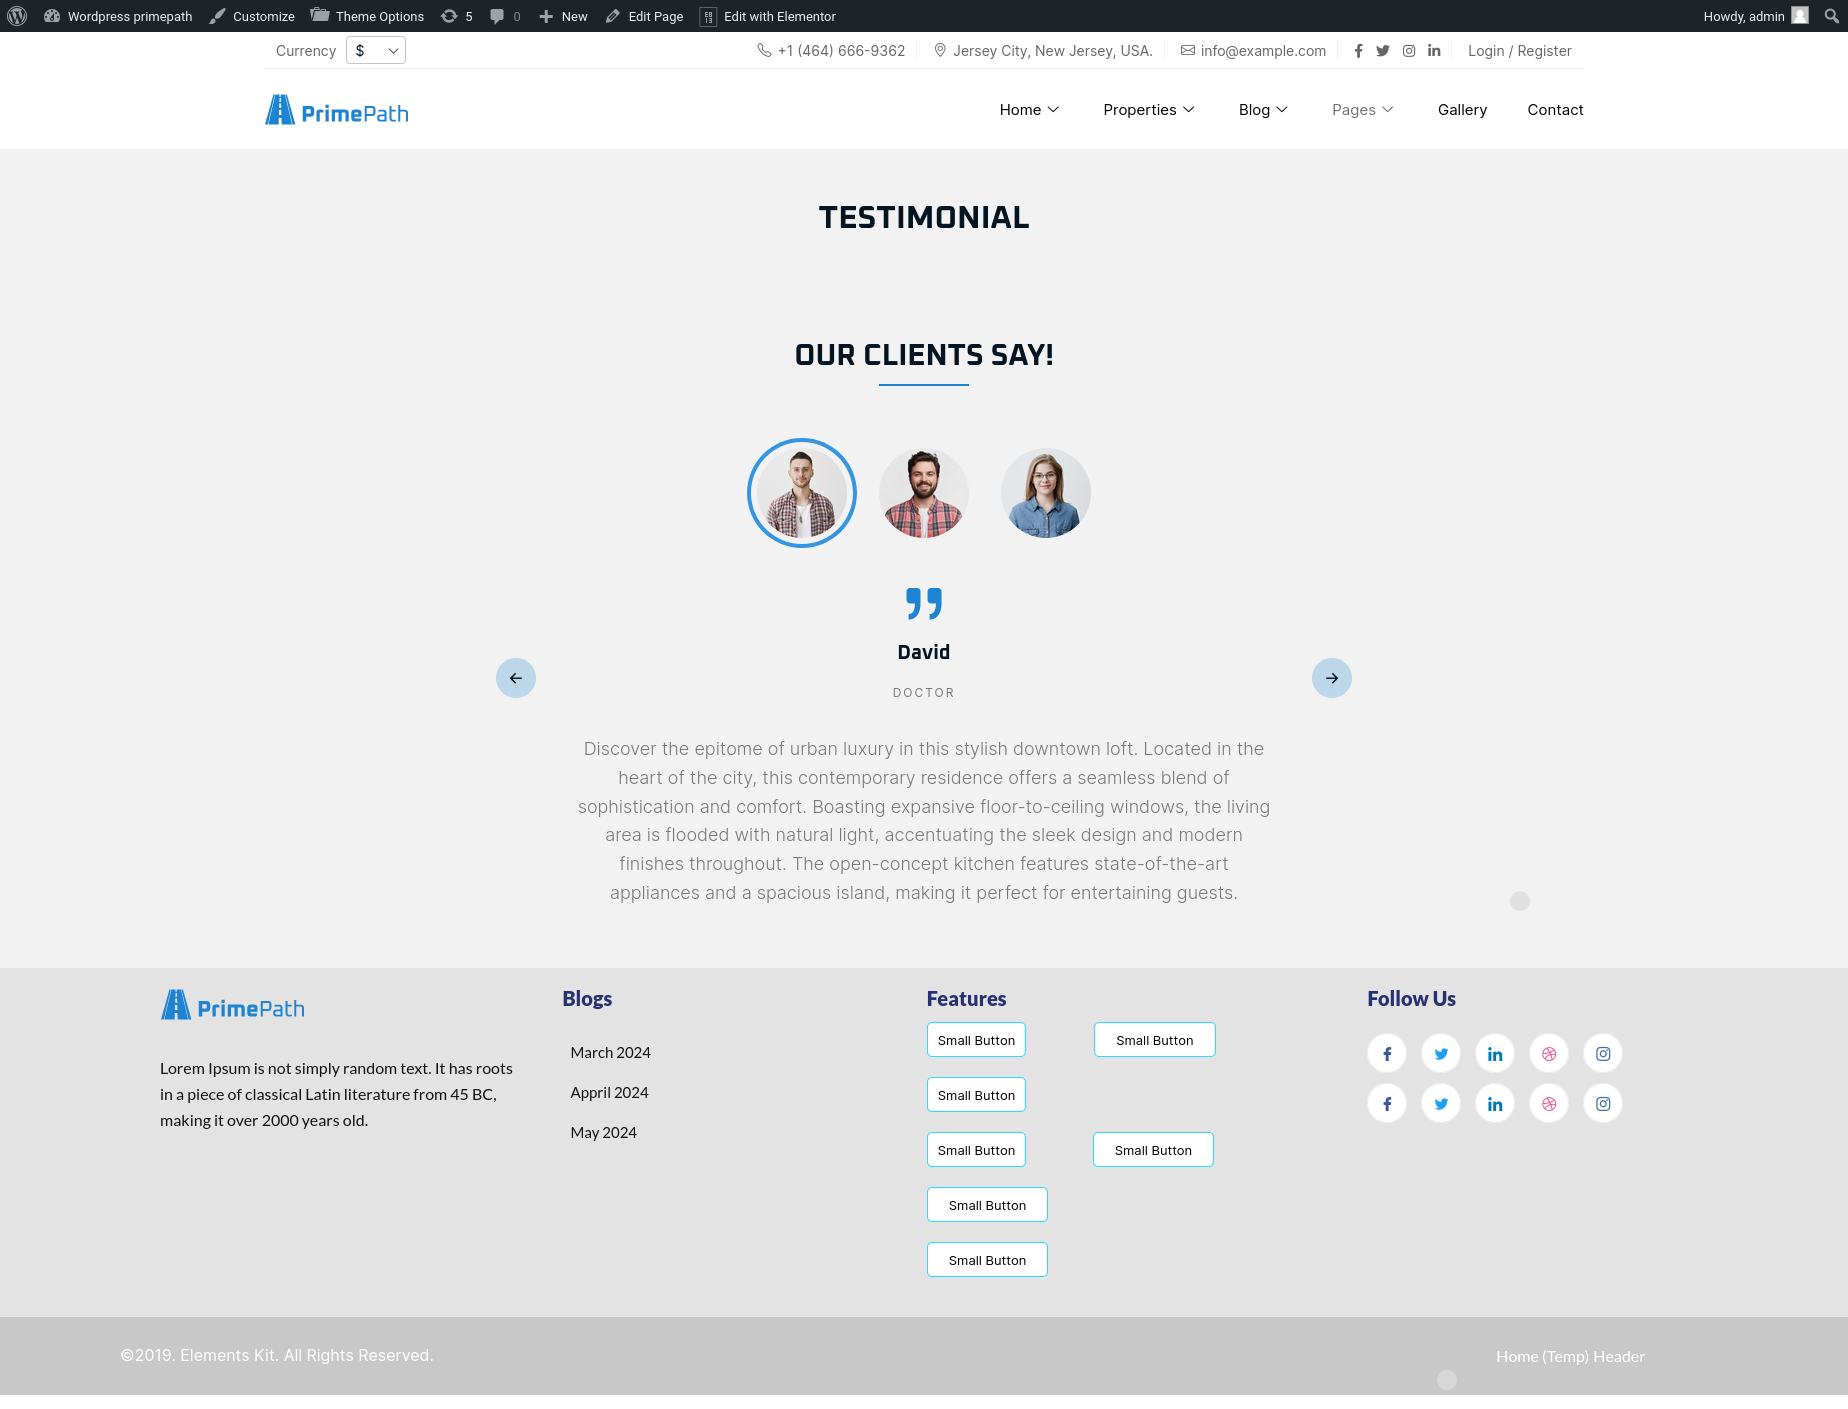
Testimonial page contains our customized theme elementor widget “Our Clients”. Using this widget, we can add testimonials from custom post type “Testimonials” and can customized it.
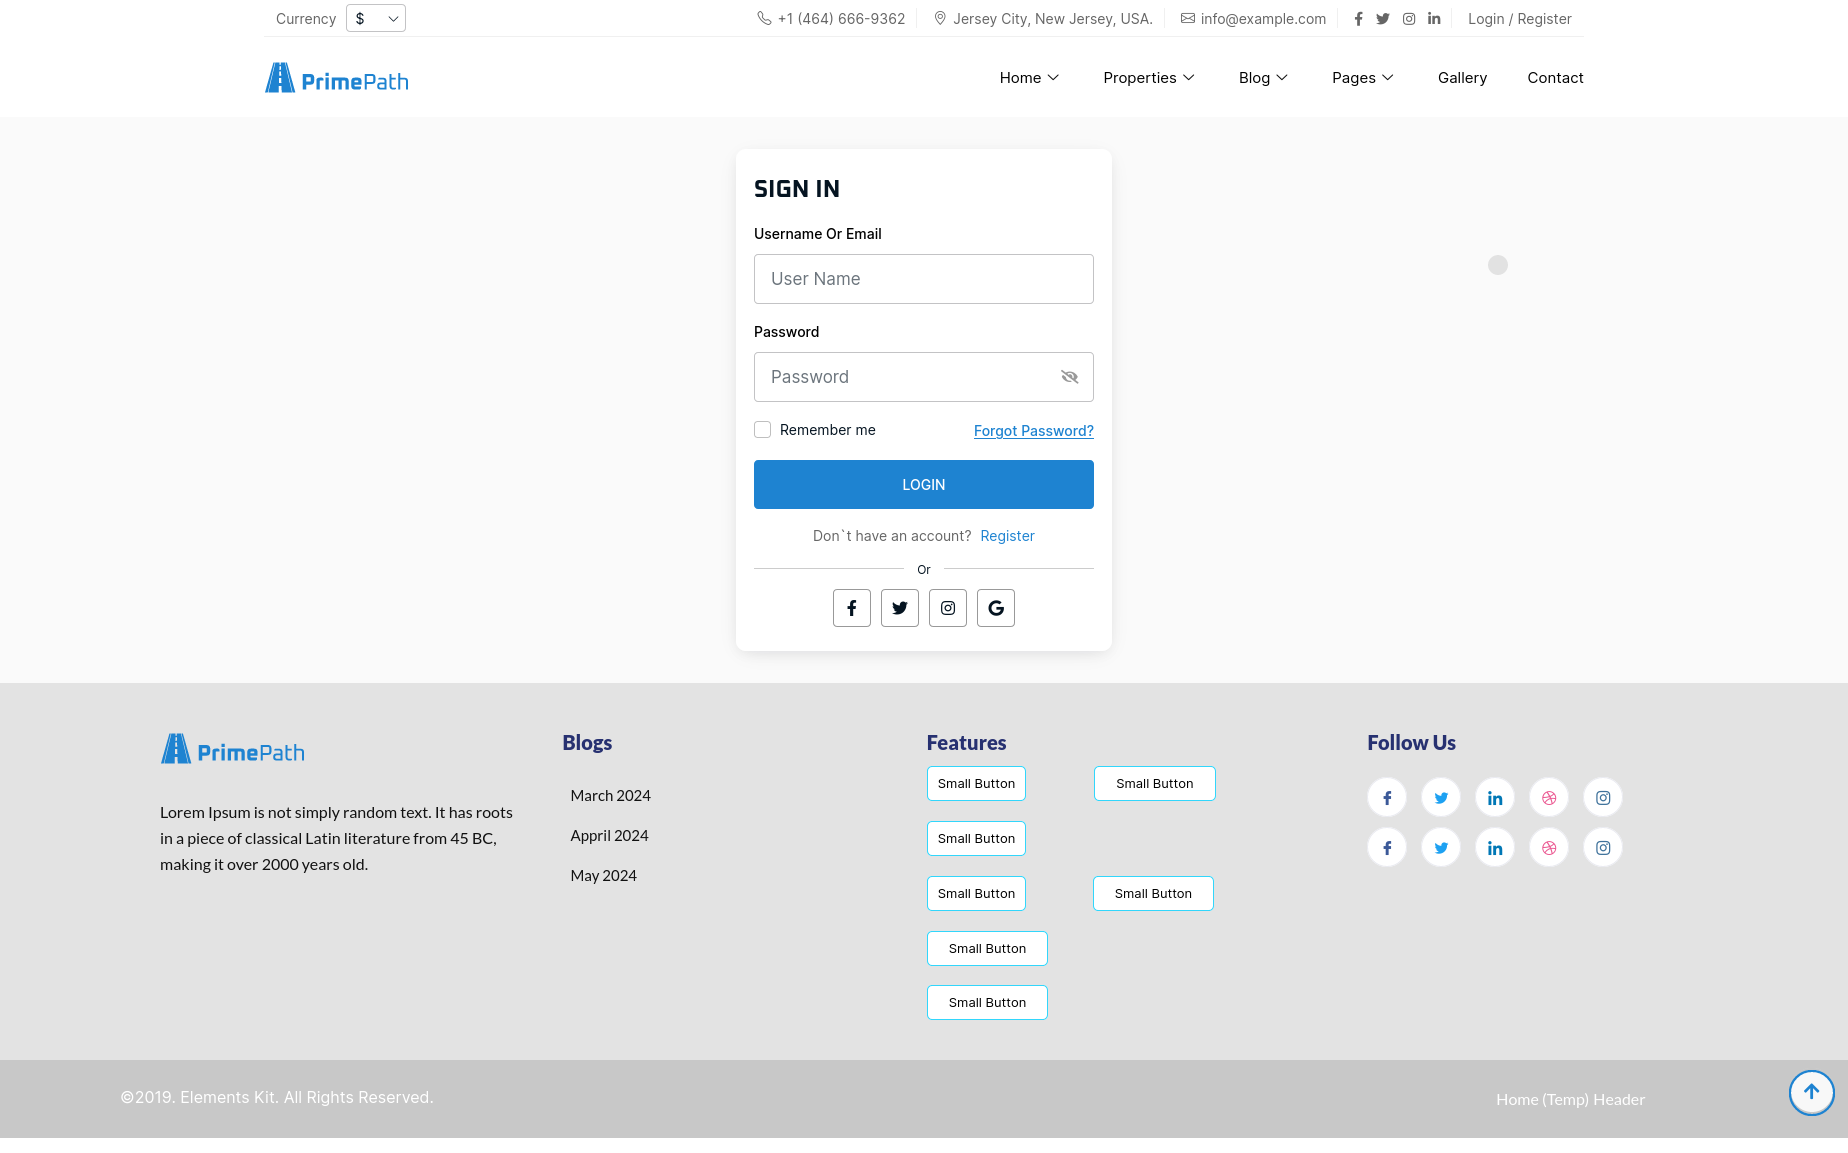
Login
Using this theme, we can create custom login page.
In your WordPress admin, Pages -> Add New
Give title as “Login” and select page template as “Login” from the list as per below.

Click on “Publish” or “Update” button to publish/update page.
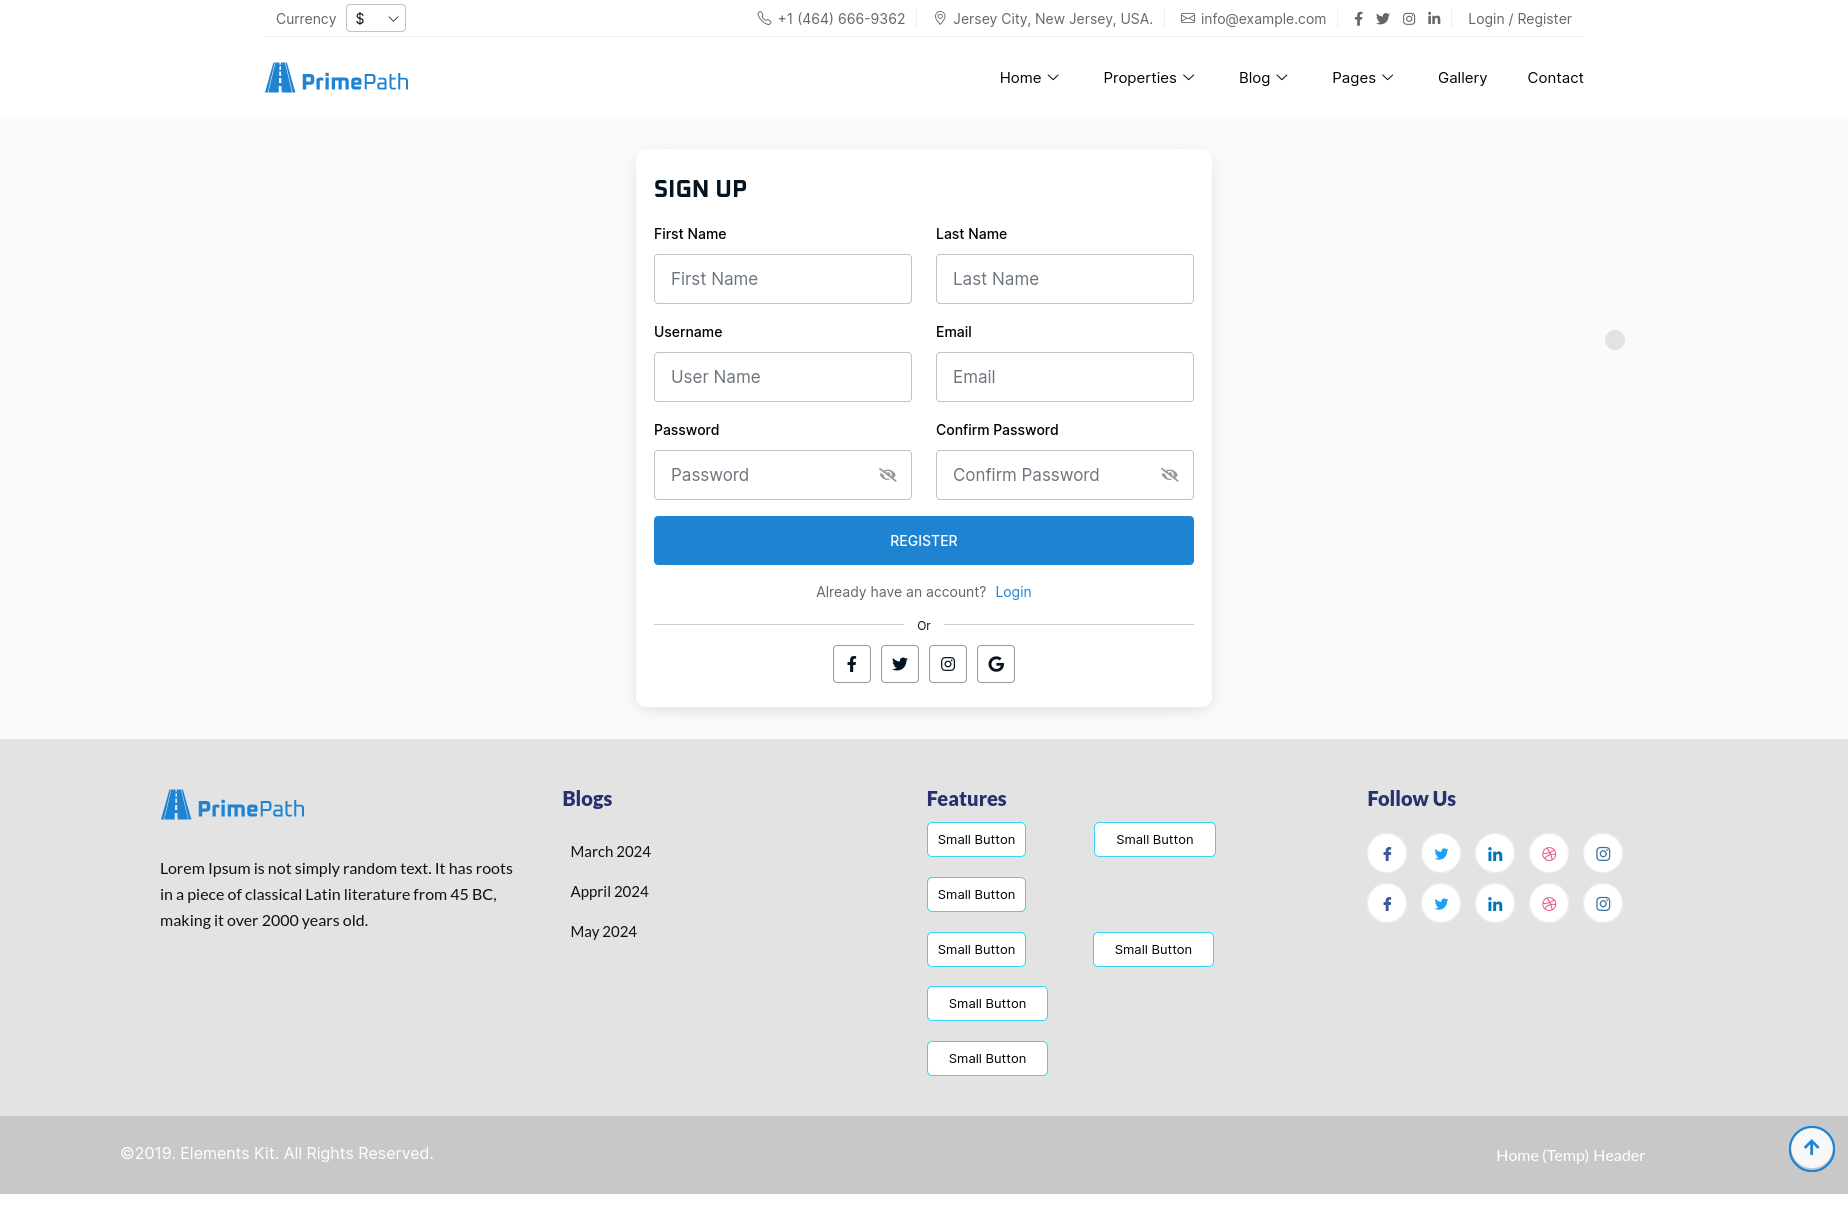
Register
Using this theme, we can create custom register page.
In your WordPress admin, Pages -> Add New
Give title as “Register” and select page template as “Registration” from the list as per below.
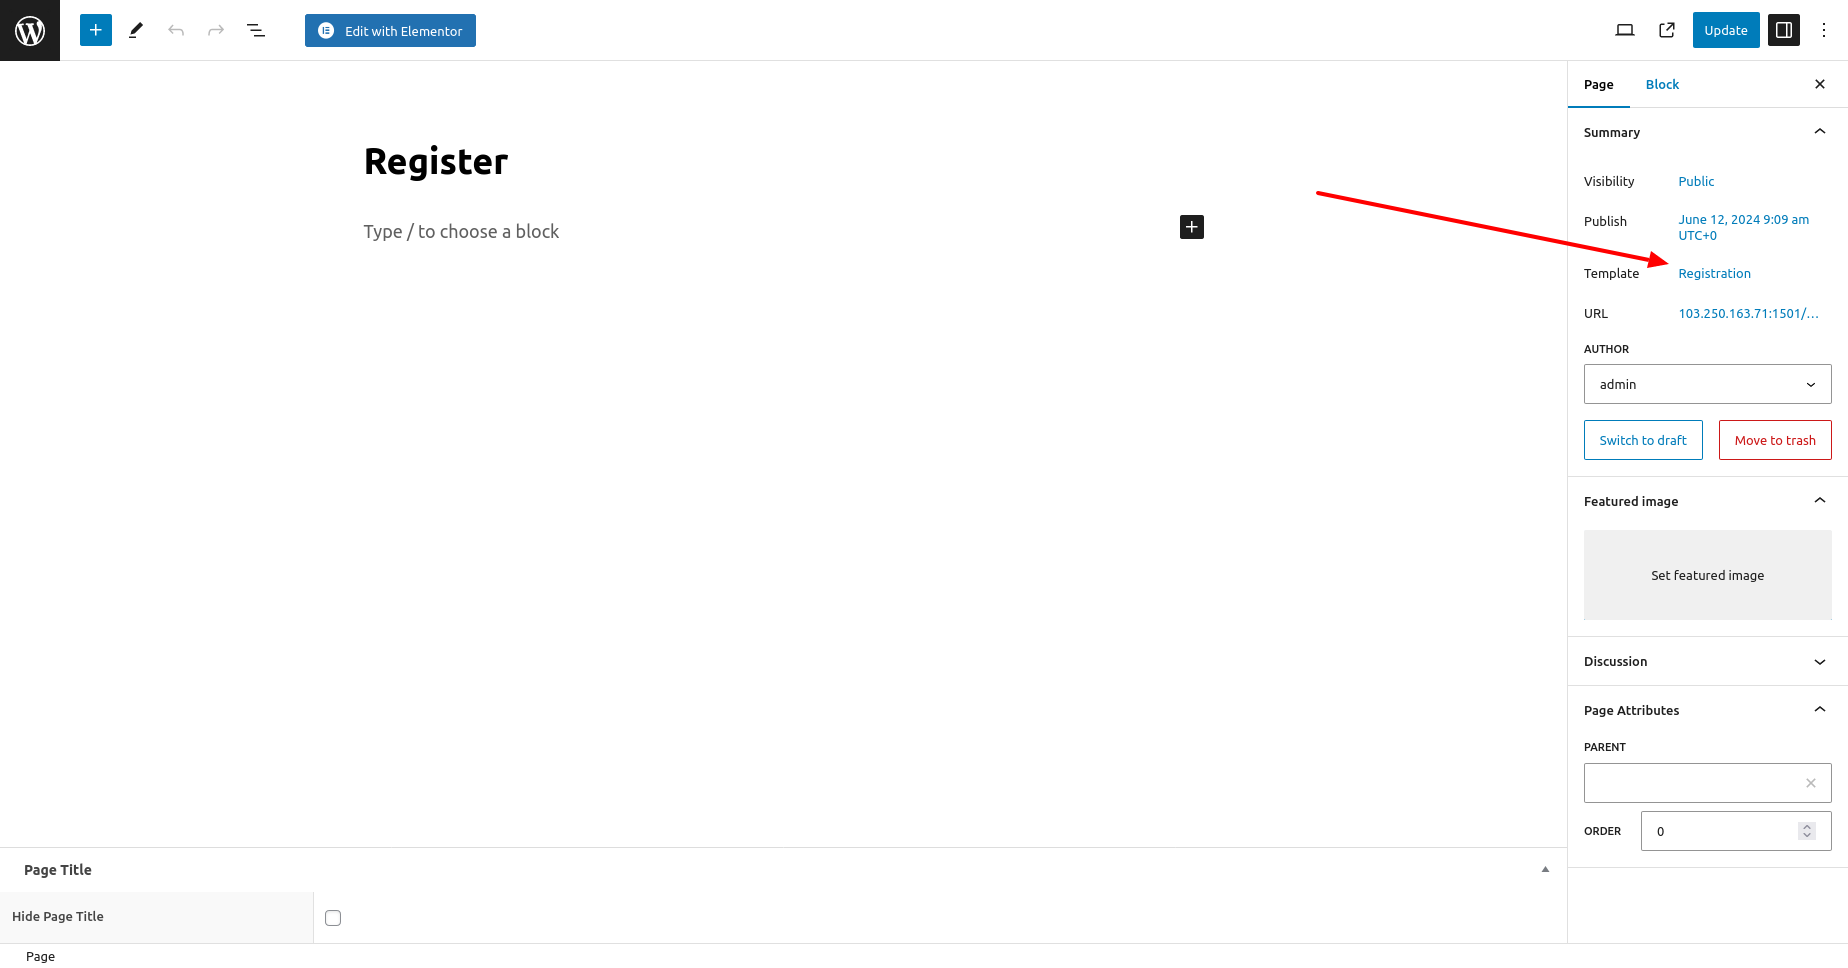
Click on “Publish” or “Update” button to publish/update page.
Elementor Widgets
First step is to create a page for add elementor widgets in it. In your WordPress admin, to Pages -> Add New
Create page with Edit with Elementor option, please ensure that you select the page template as “Default template”
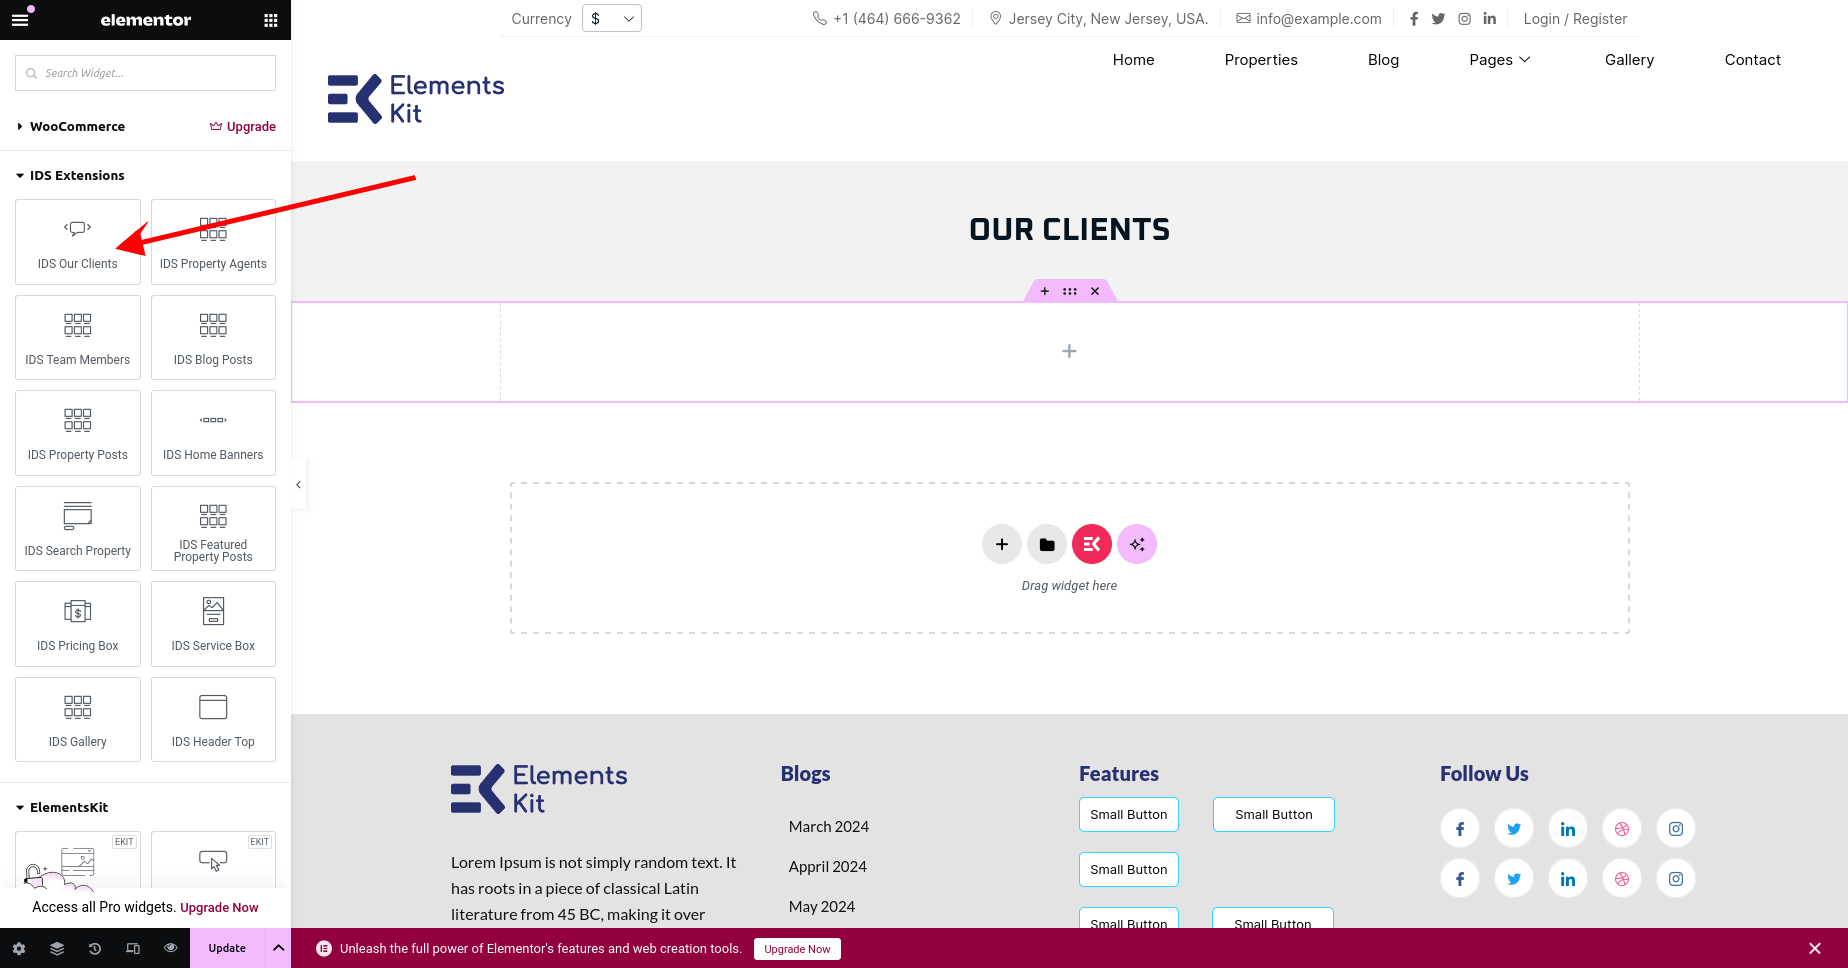
Our Clients
Using thie elementor addon or widget, you can add our clients list in your selected page.
To add our clients list using the Elementor addon or widget, follow these steps:
- Create a New Page: Navigate to Pages, click on “Add New”, and then edit with Elementor.
- Section and Container: Click the plus icon to add a new section, and within that section, add a container.
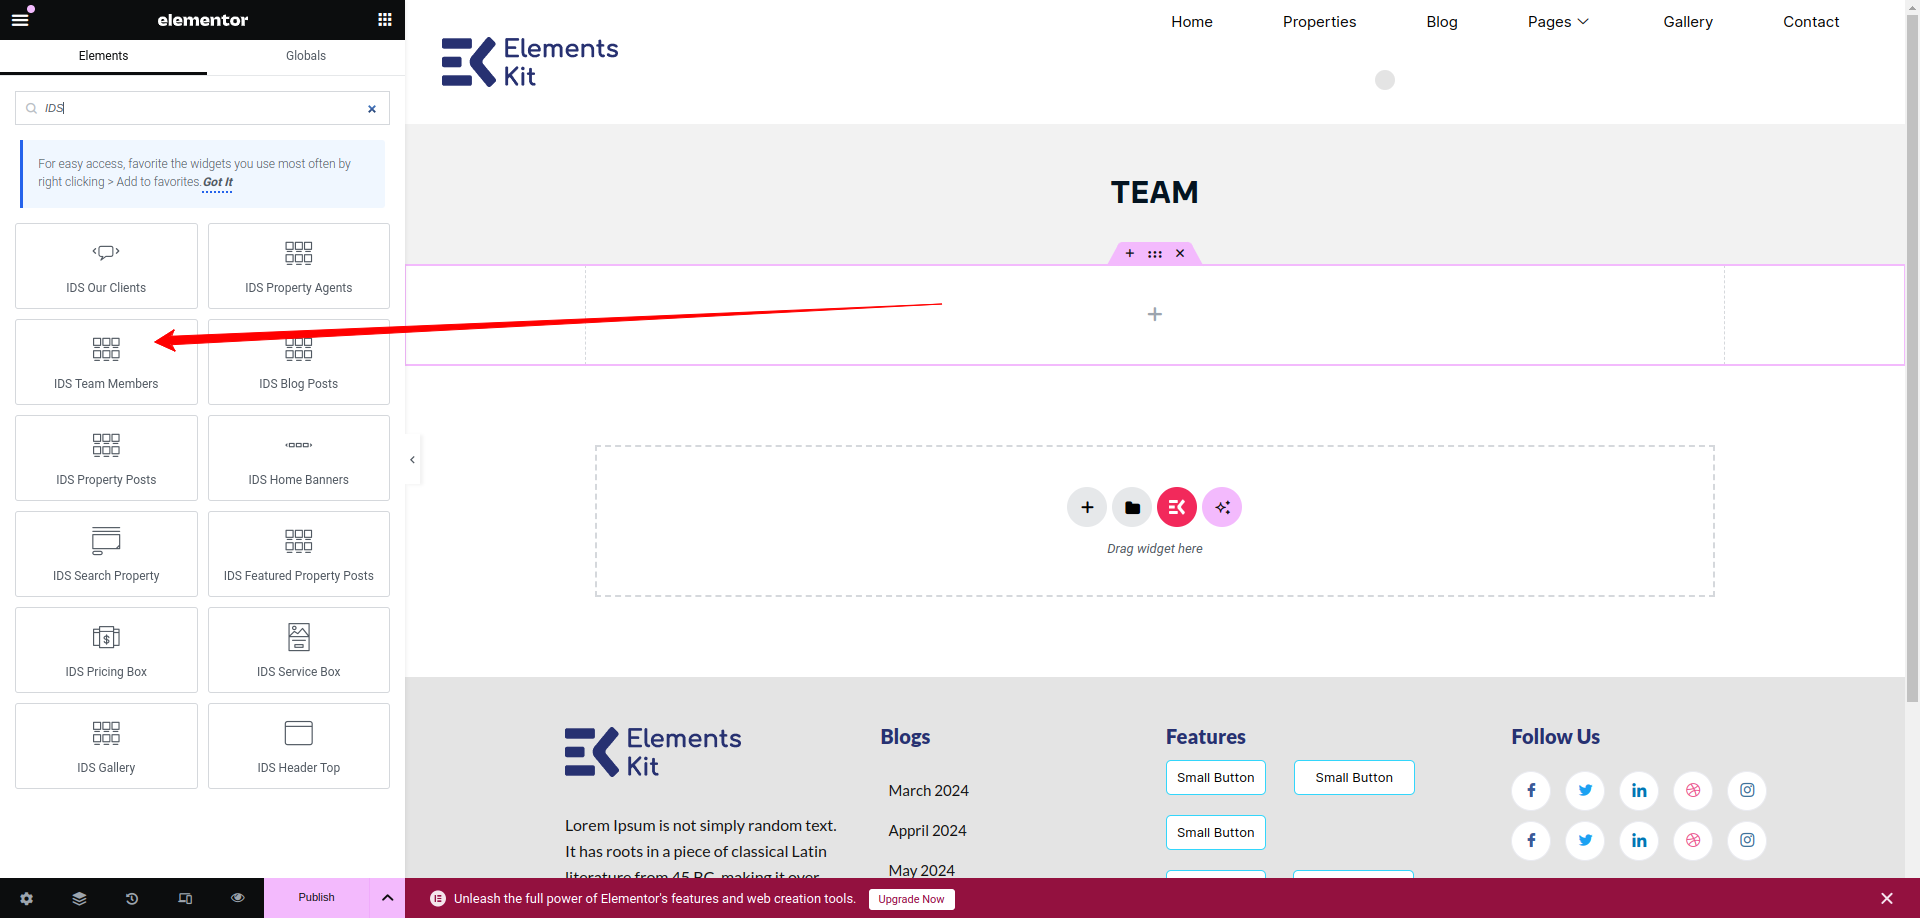
- Insert Widget: In the left sidebar, locate the widget by searching for “IDS” in the search box or find it under the “IDS Extensions” category.
- Drag and Drop “IDS Our Clients” Widget: Drag the widget into the section you created earlier.
After selecting the IDS Our Clients widget, you will find options to configure the settings for your clients section.
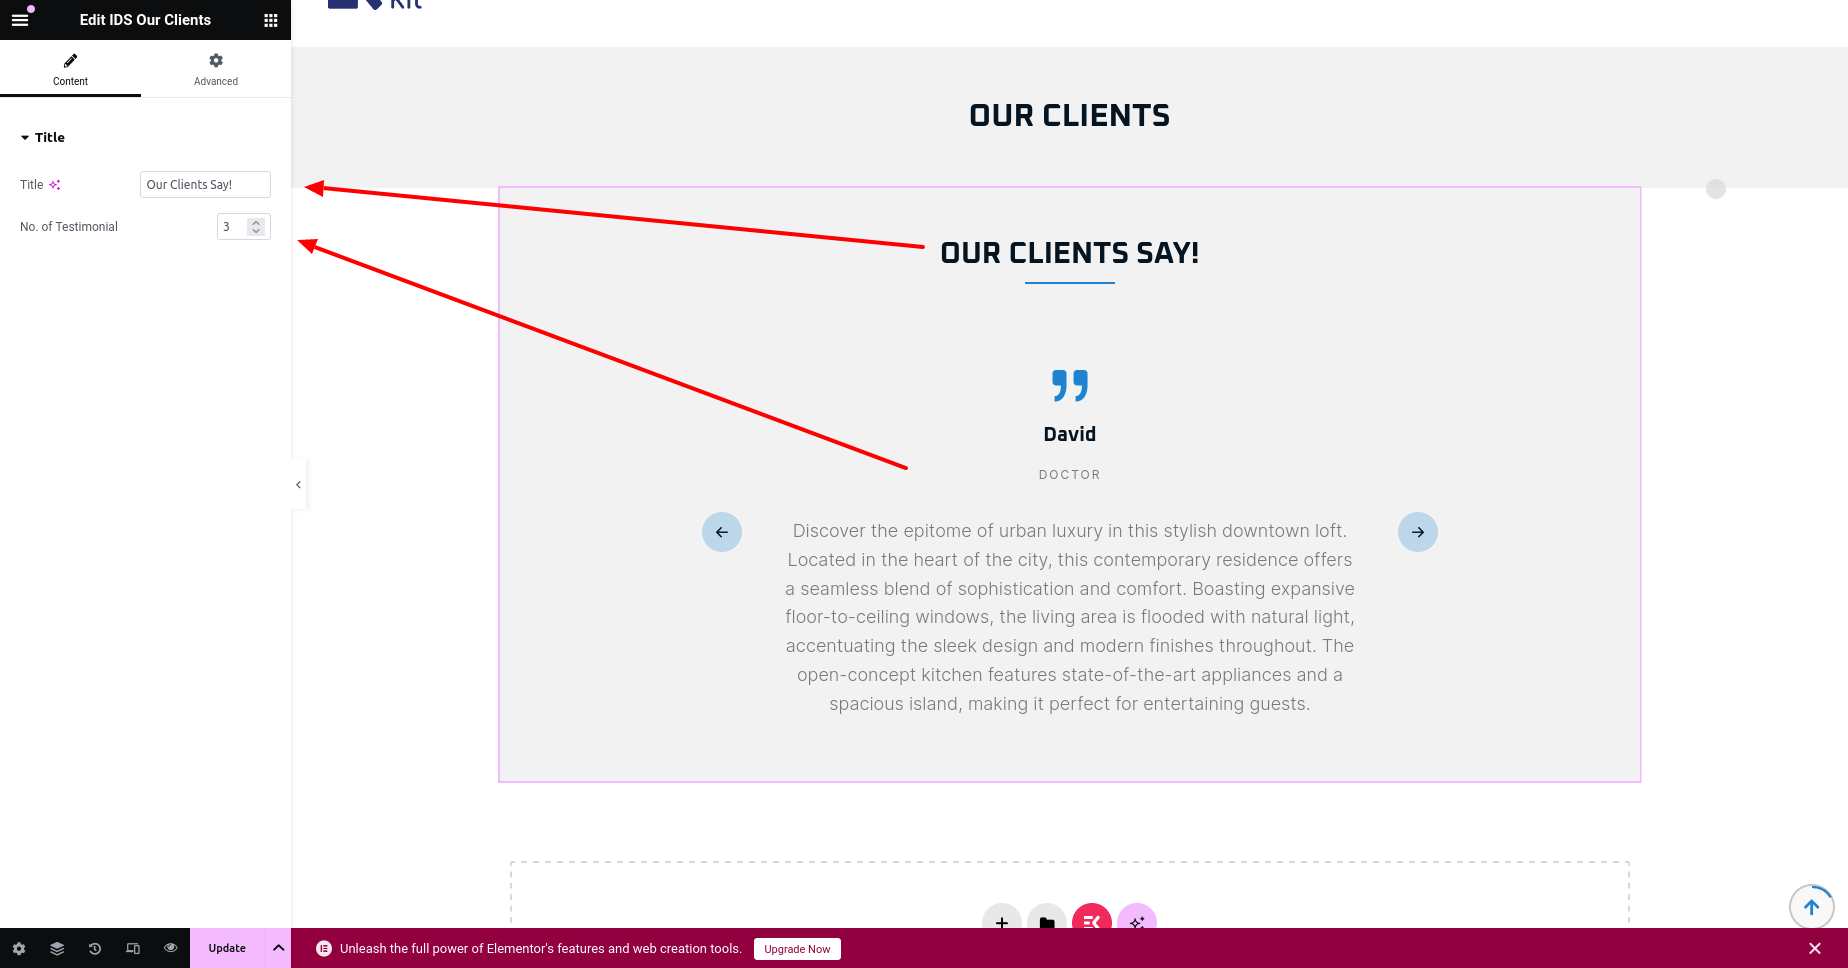
- Title: From here, you can change the title of our clients section as display as header title.
- No. of Testimonial: You can change the no. of testimonials displaying in our clients section
Then update the page and view the page

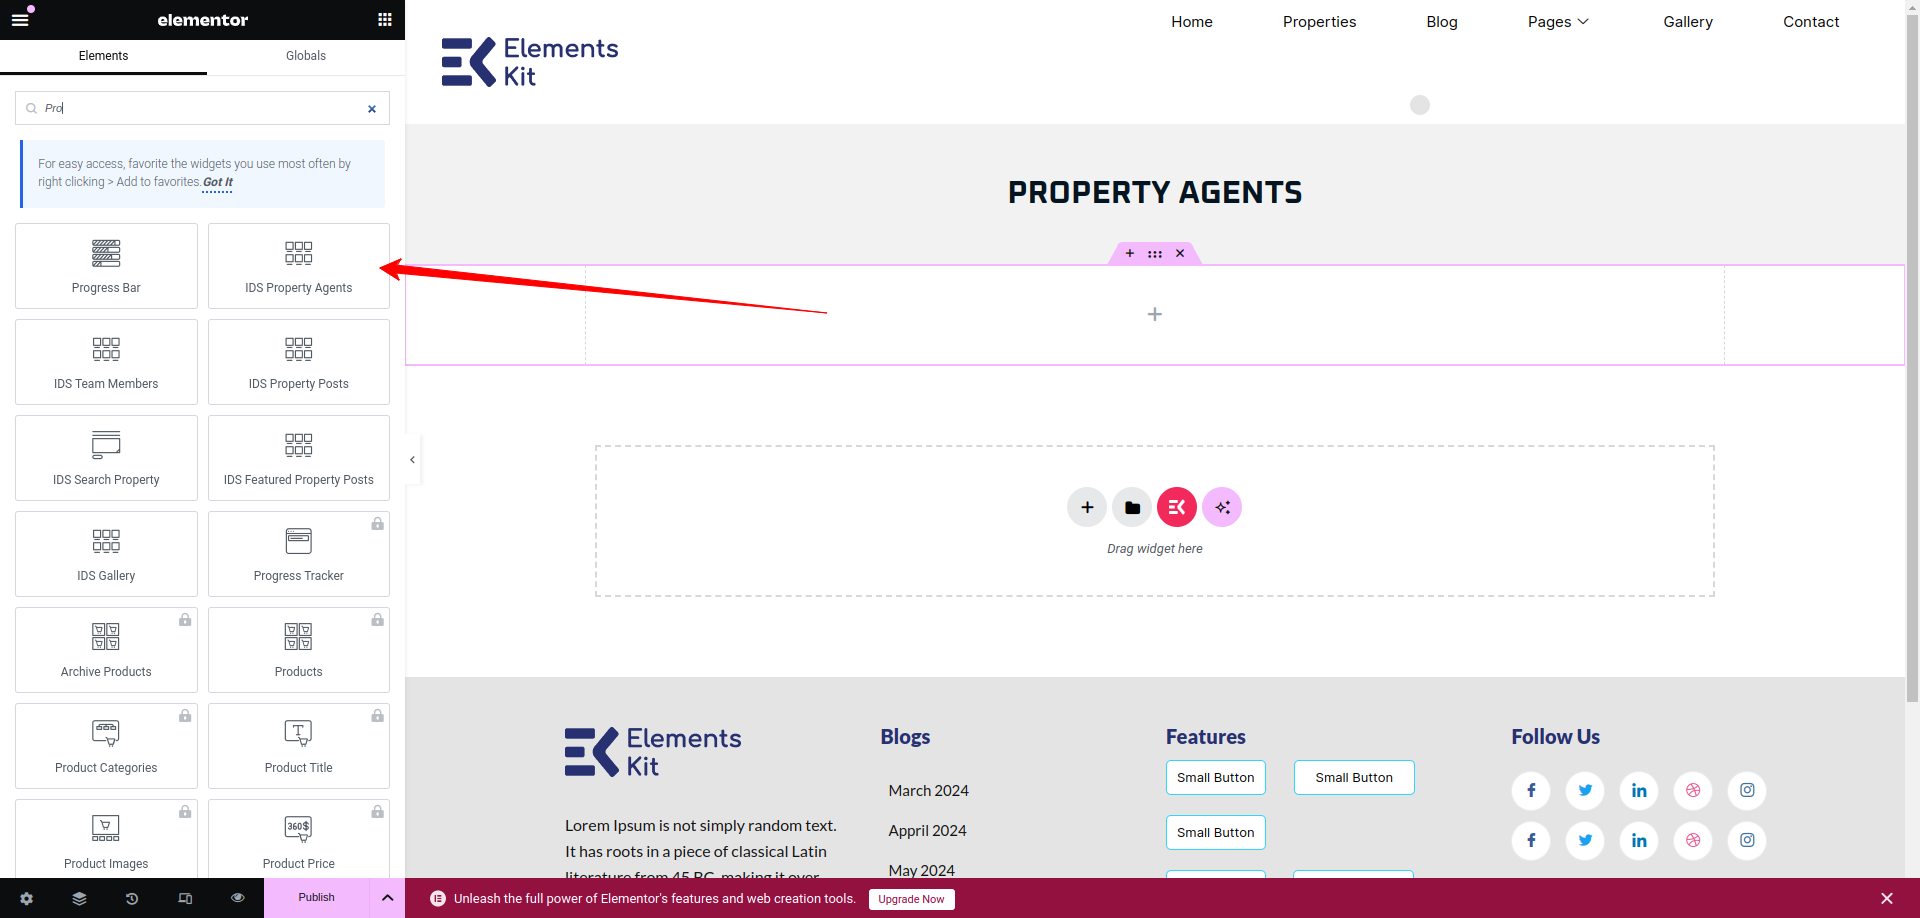
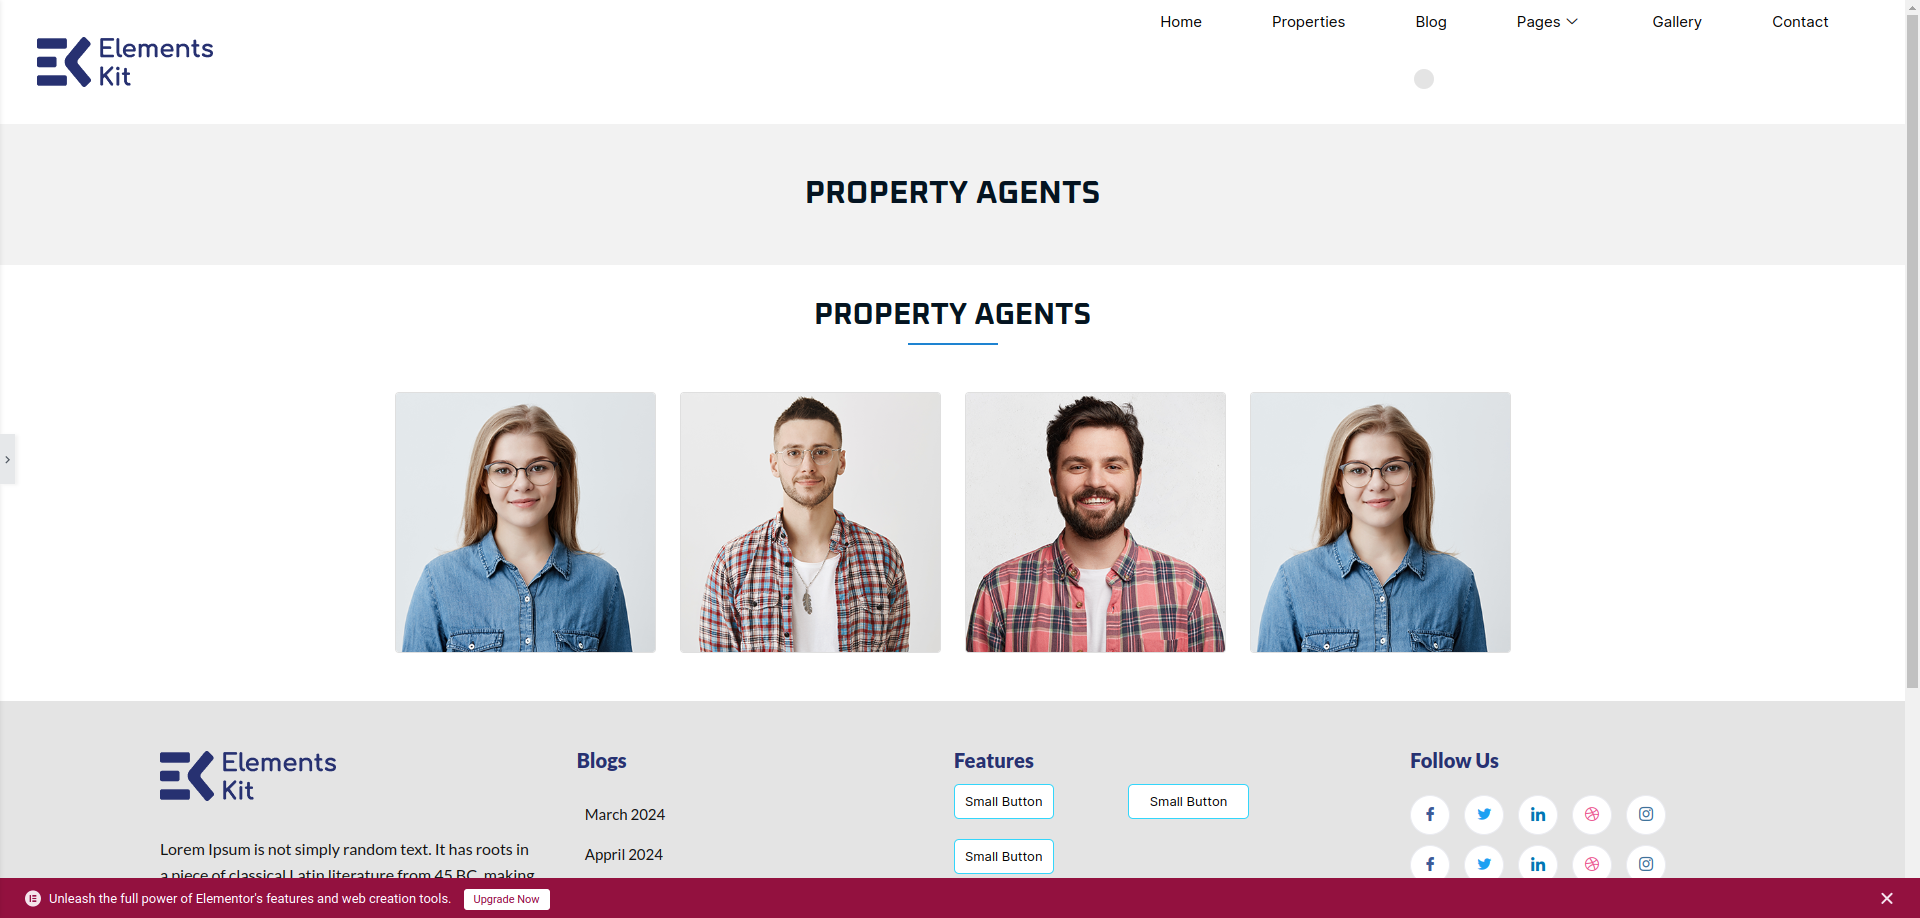
Property Agents
Using thie elementor addon or widget, you can add Property Agents list in your selected page.
To add property agent list using the Elementor addon or widget, follow these steps:
- Create a New Page: Navigate to Pages, click on “Add New”, and then edit with Elementor.
- Section and Container: Click the plus icon to add a new section, and within that section, add a container.
- Insert Widget: In the left sidebar, locate the widget by searching for “IDS” in the search box or find it under the “IDS Extensions” category.
- Drag and Drop “IDS Property Agents” Widget: Drag the widget into the section you created earlier.
After selecting the IDS Property widget, you will find options to configure the settings for your property agent section.
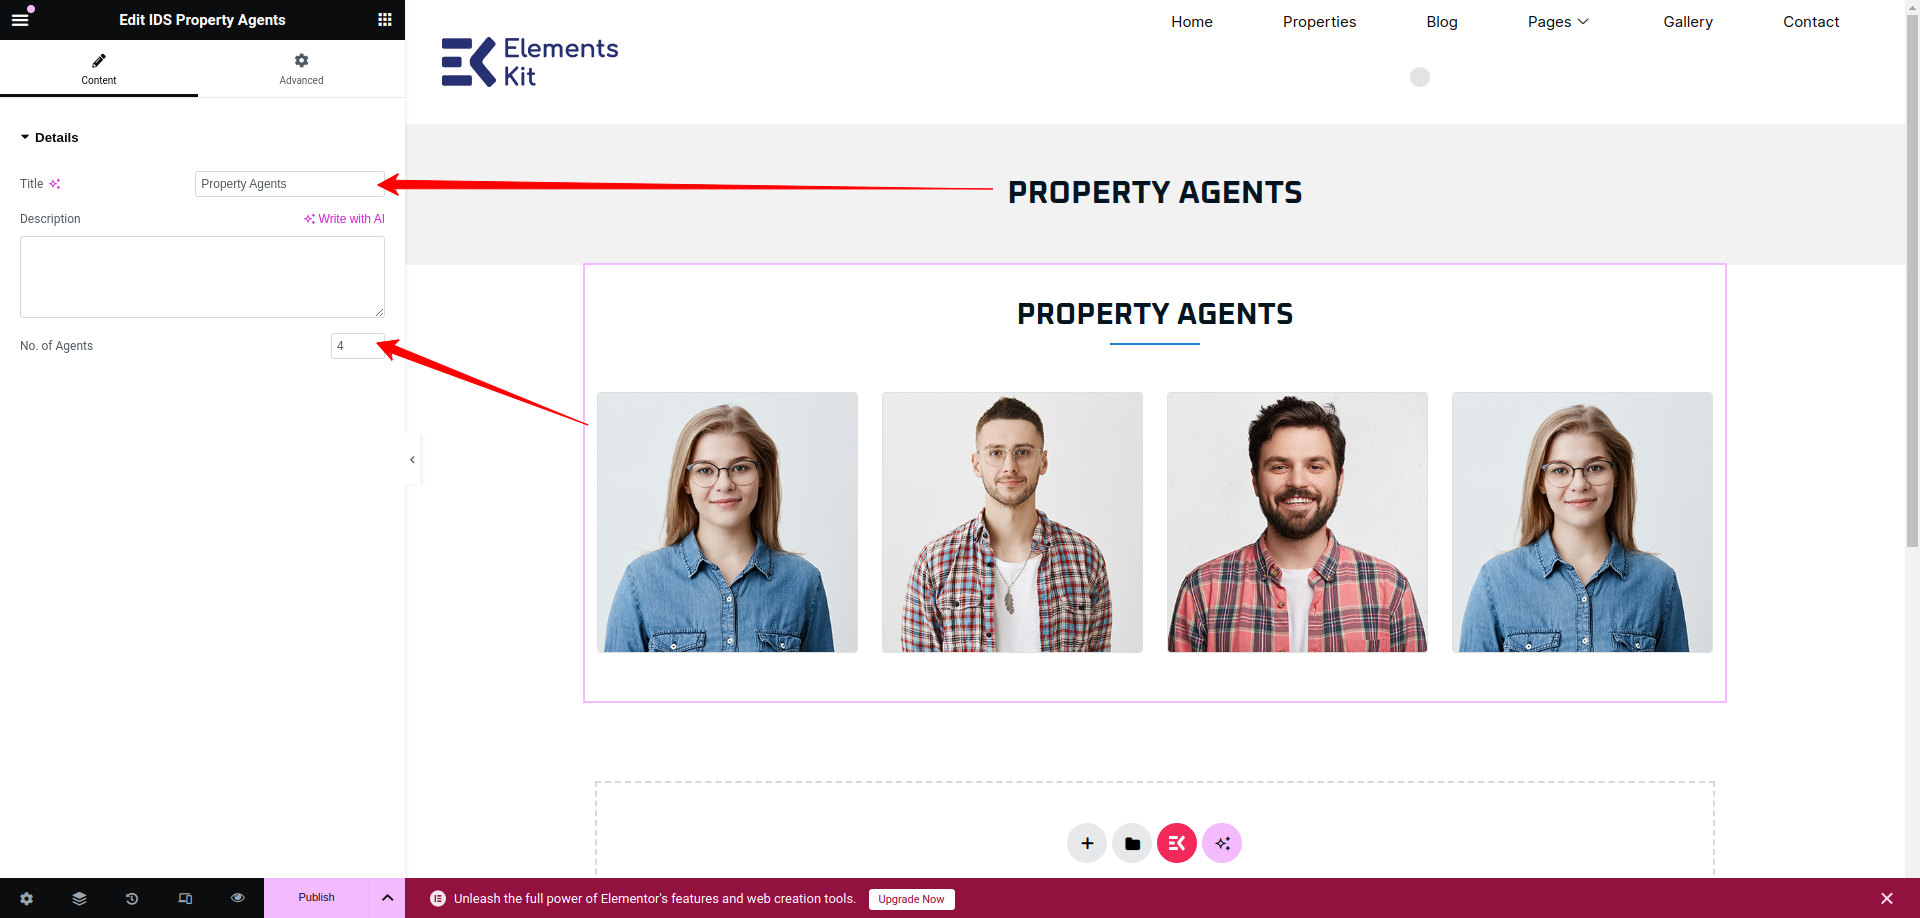
- Title: From here, you can change the title of property agent section as display as header title.
- No. of Testimonial: You can change the no. of testimonials displaying in Property Agent Section.
Then update the page and view the page
Team
Using thie elementor addon or widget, you can add Team Member list in your selected page.
To add team member list using the Elementor addon or widget, follow these steps:
- Create a New Page: Navigate to Pages, click on “Add New”, and then edit with Elementor.
- Section and Container: Click the plus icon to add a new section, and within that section, add a container.
- Insert Widget: In the left sidebar, locate the widget by searching for “IDS” in the search box or find it under the “IDS Extensions” category.
- Drag and Drop “IDS Team Members” Widget: Drag the widget into the section you created earlier.
After selecting the IDS Team Members widget, you will find options to configure the settings for your team members section.
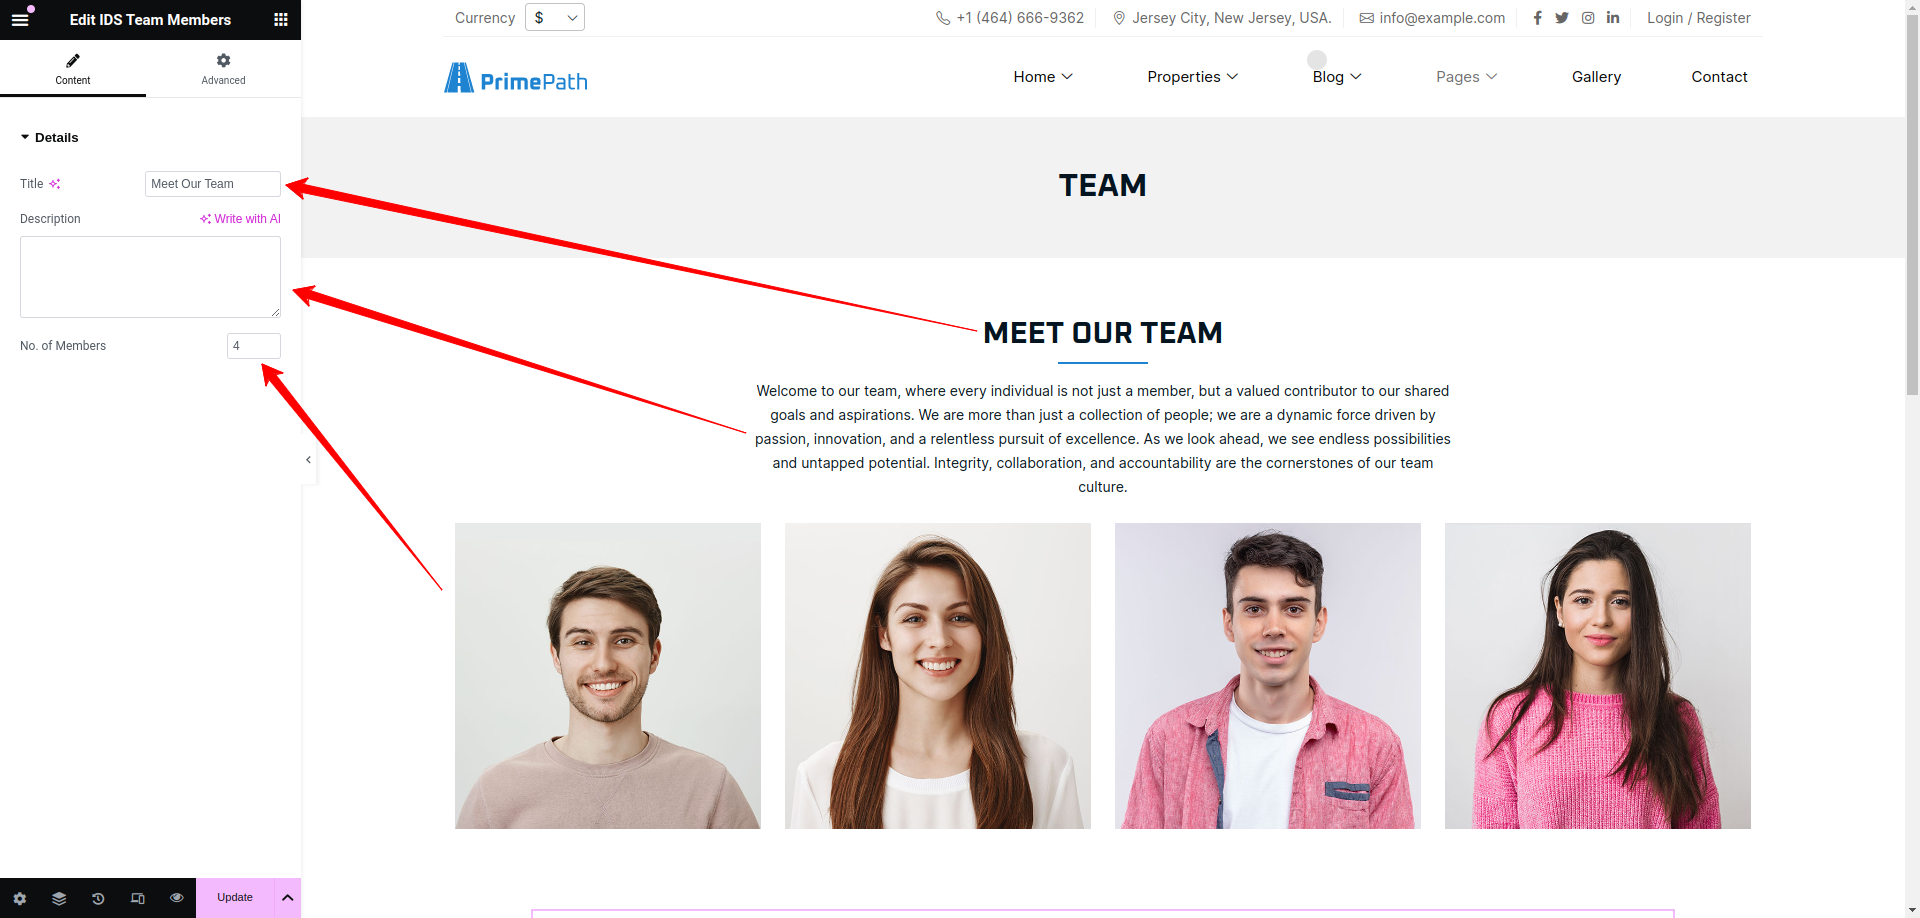
- Title: From here, you can change the title of team members section as display as header title.
- Description: From here, you can change the description of Team members Section.
- No. of Members: You can change the no. of members displaying in Team members Section.
Then update the page and view the page

Blog Post
Using thie elementor addon or widget, you can add Blog Post list in your selected page.
To add blog post list using the Elementor addon or widget, follow these steps:
- Create a New Page: Navigate to Pages, click on “Add New”, and then edit with Elementor.
- Section and Container: Click the plus icon to add a new section, and within that section, add a container.
- Insert Widget: In the left sidebar, locate the widget by searching for “IDS” in the search box or find it under the “IDS Extensions” category.
- Drag and Drop “IDS Blog Post” Widget: Drag the widget into the section you created earlier.
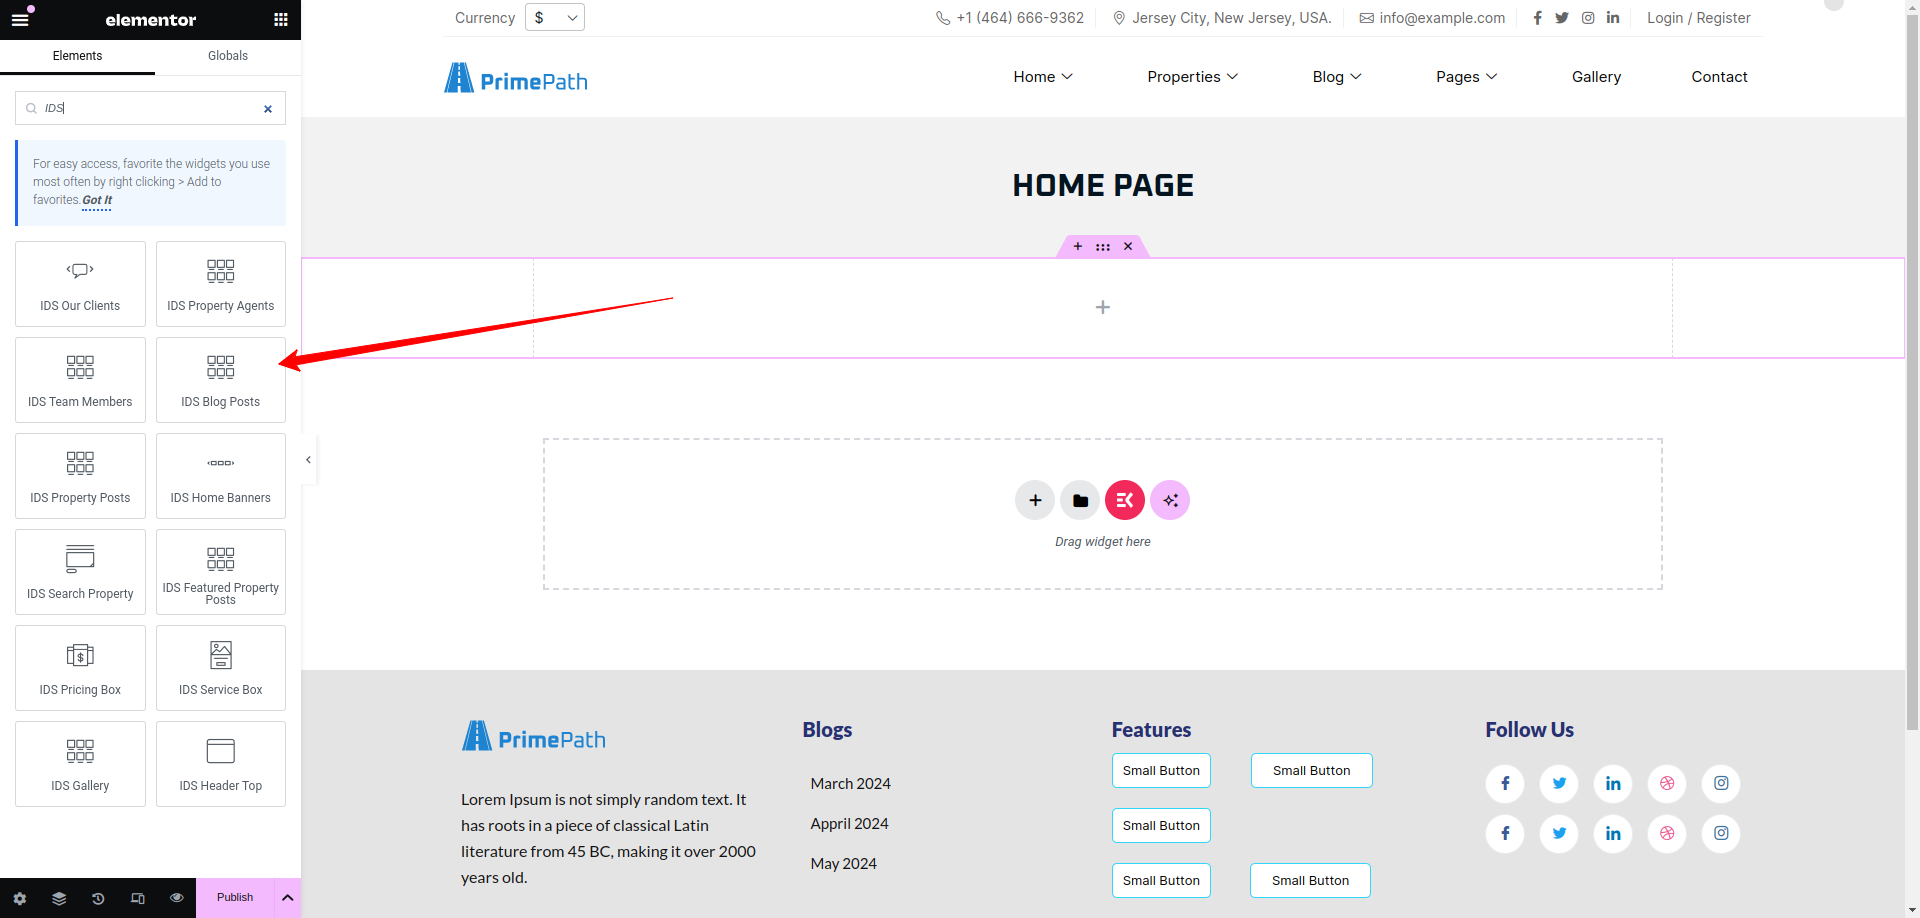
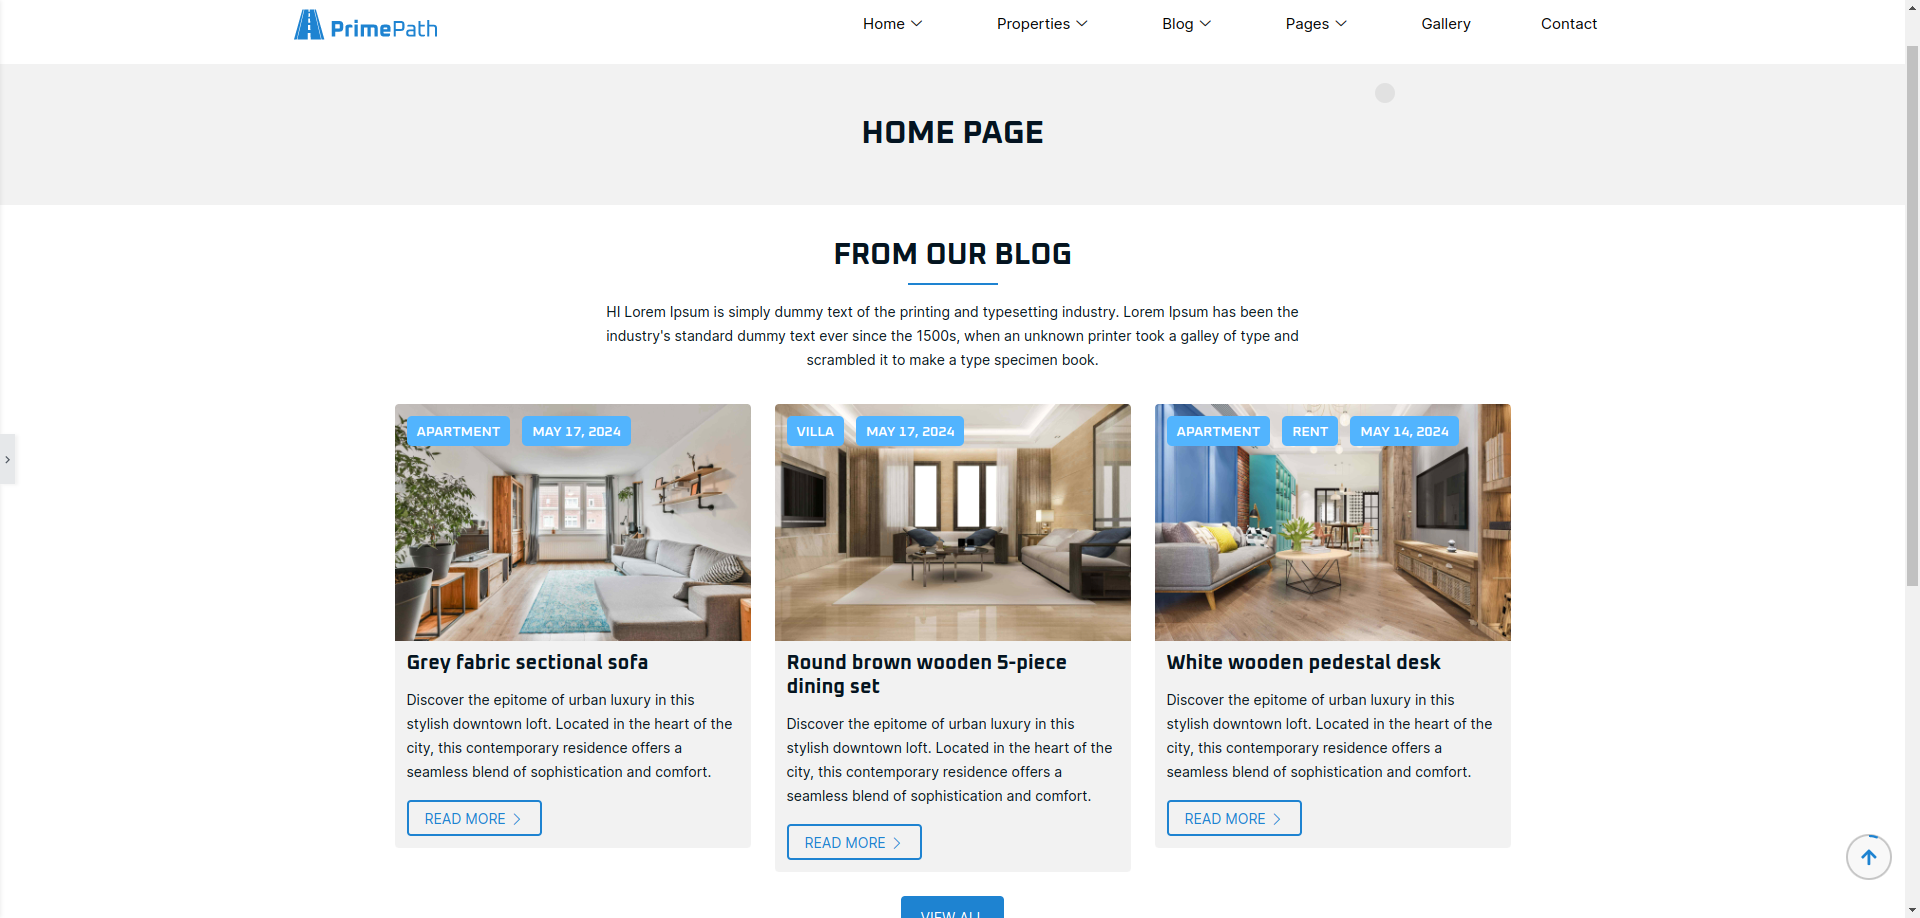
After selecting the IDS Blog Post widget, you will find options to configure the settings for your blog post section.
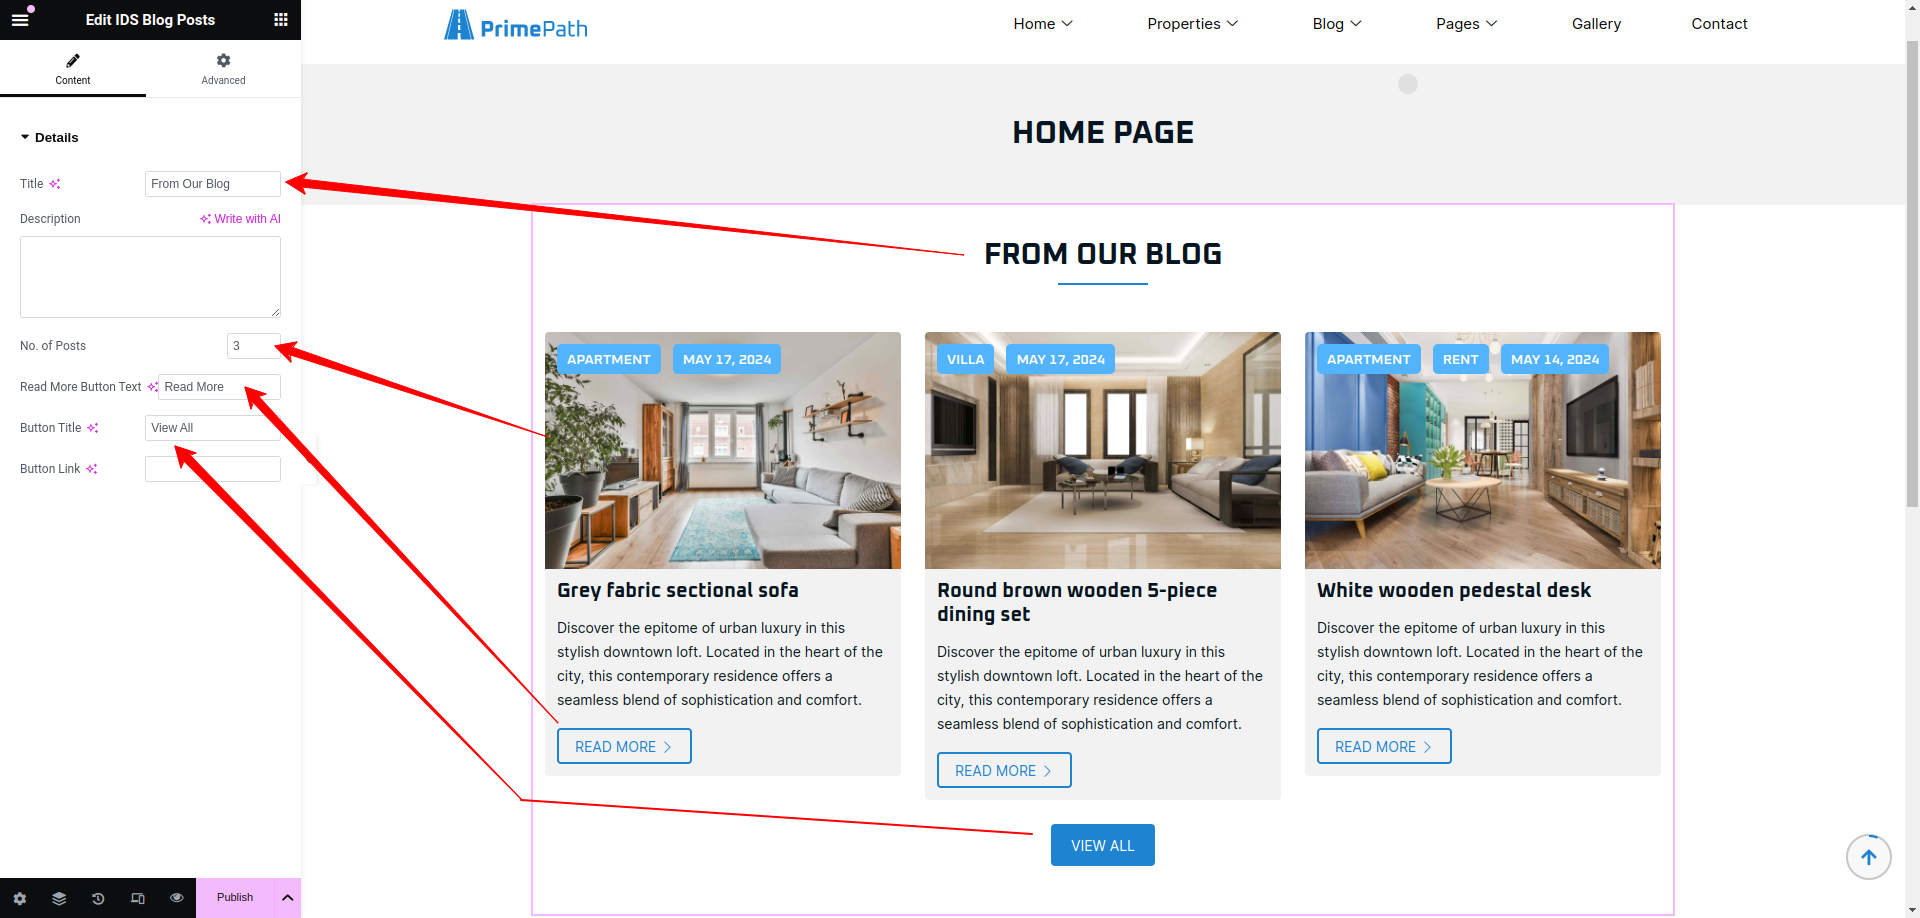
- Title: From here, you can change the title of blog post section as display as header title.
- Description: From here, you can change the description of blog post section which is display under the Header Title.
- No. of Posts: You can change the no. of post displaying in blog post section.
- Read More Button Text: You can change the read more button text displaying in blog post Section.
- Button Title: You can change the button title which is displaying in screenshot.
Then update the page and view the page
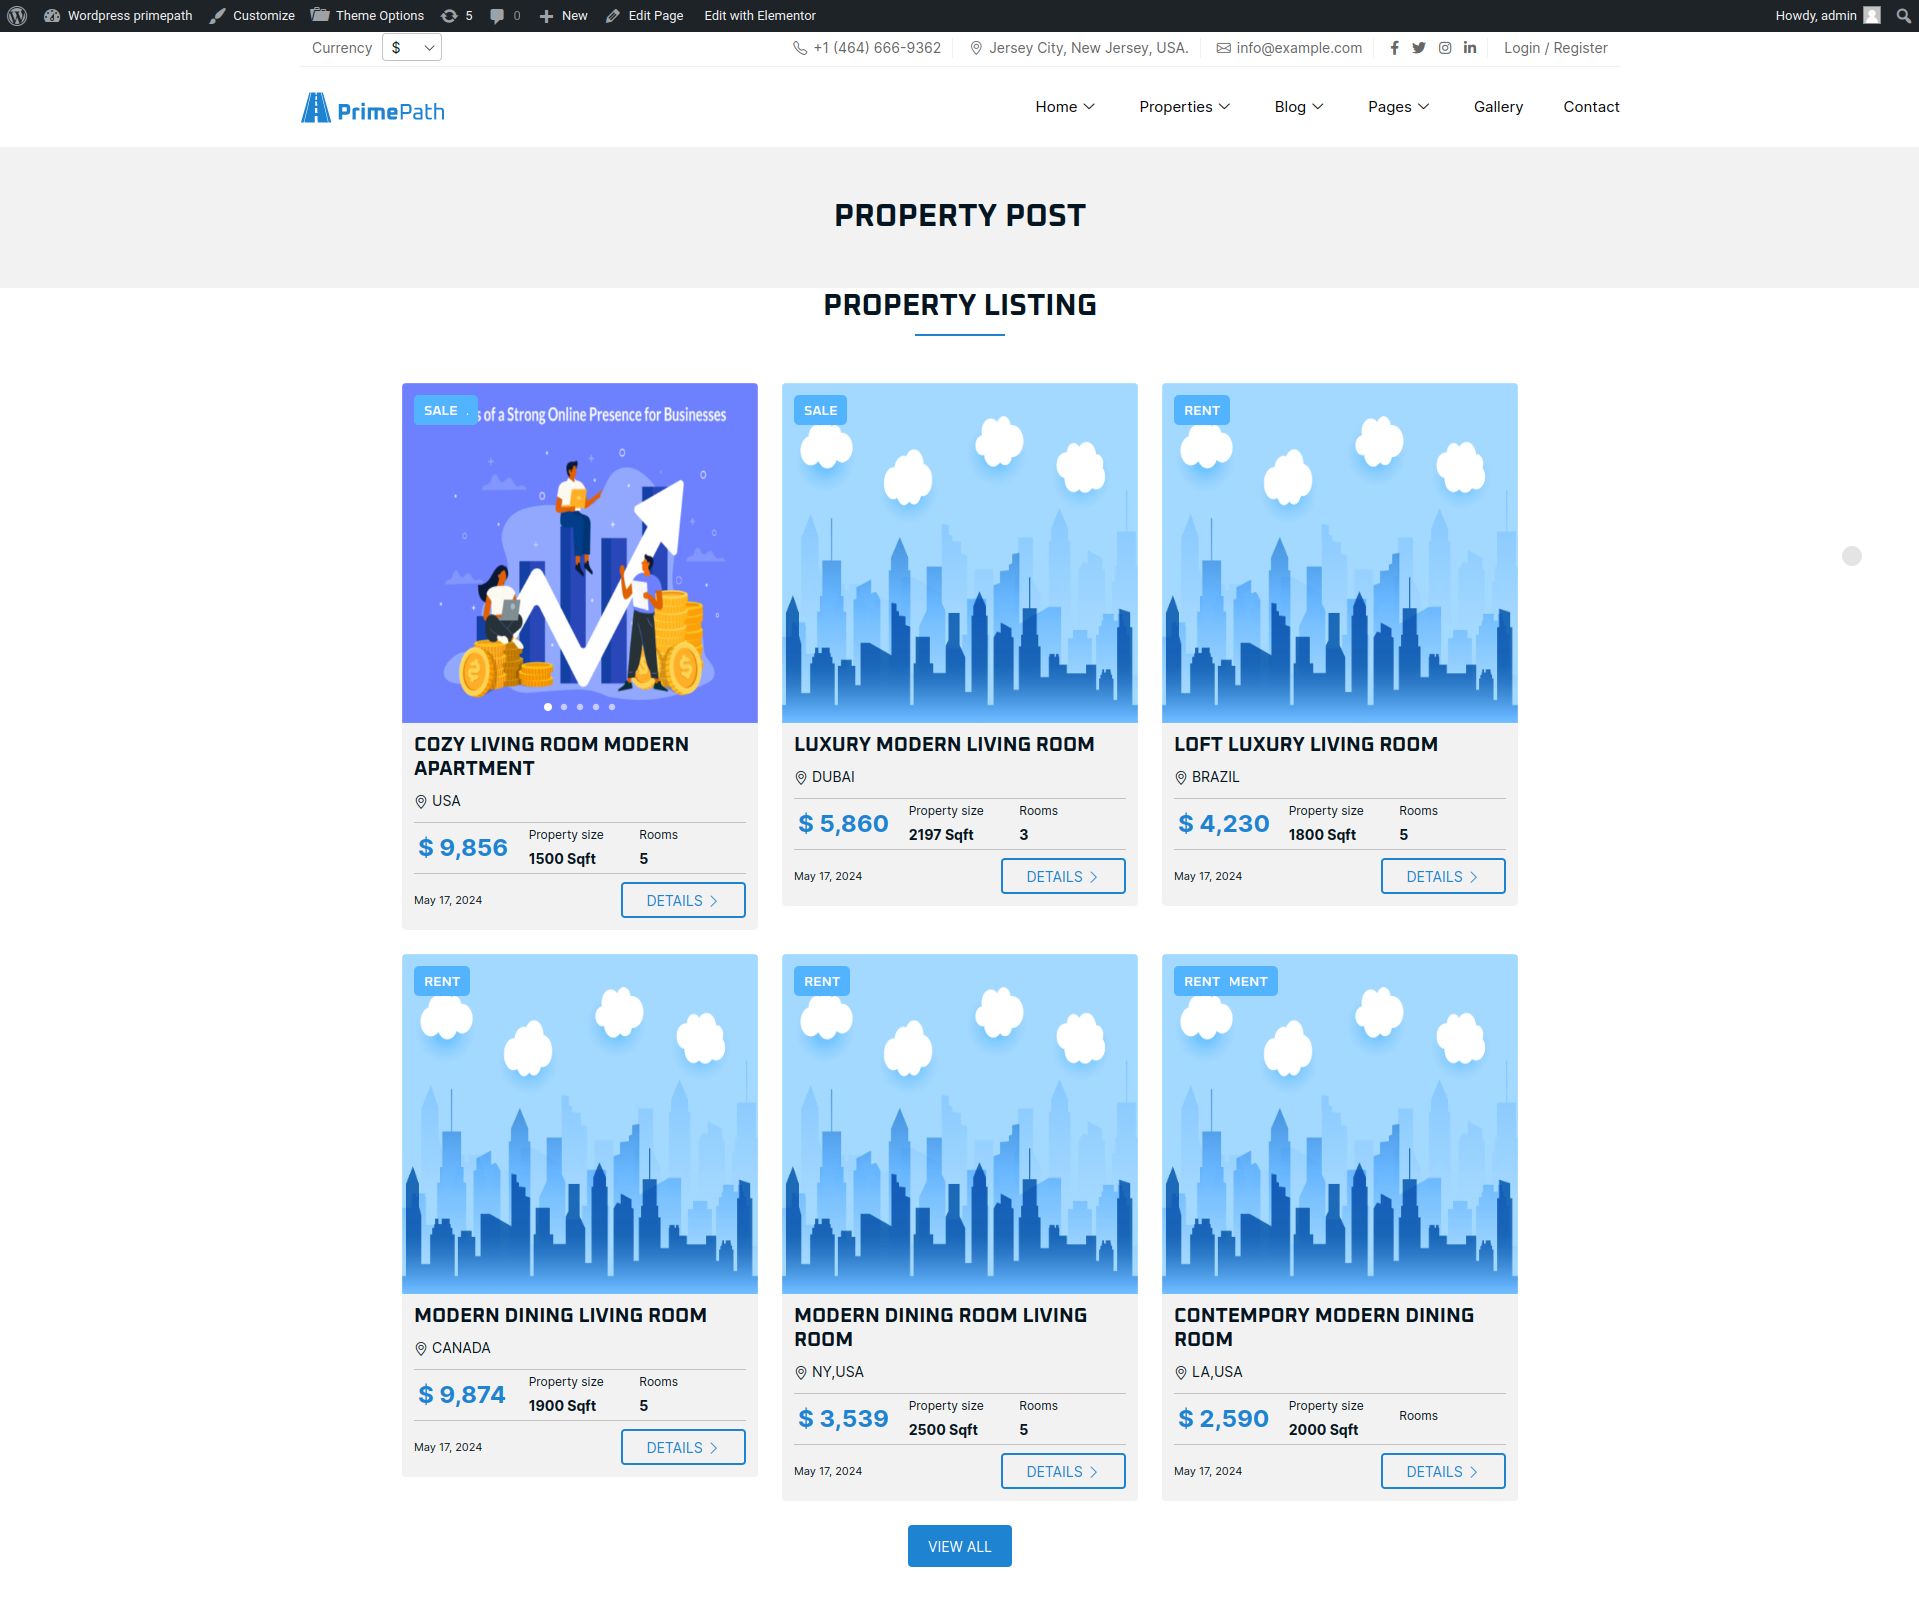
Property Post
Using thie elementor addon or widget, you can add Property Post list in your selected page.
To add property post list using the Elementor addon or widget, follow these steps:
- Create a New Page: Navigate to Pages, click on “Add New”, and then edit with Elementor.
- Section and Container: Click the plus icon to add a new section, and within that section, add a container.
- Insert Widget: In the left sidebar, locate the widget by searching for “IDS” in the search box or find it under the “IDS Extensions” category.
- Drag and Drop “IDS Property Posts” Widget: Drag the widget into the section you created earlier.
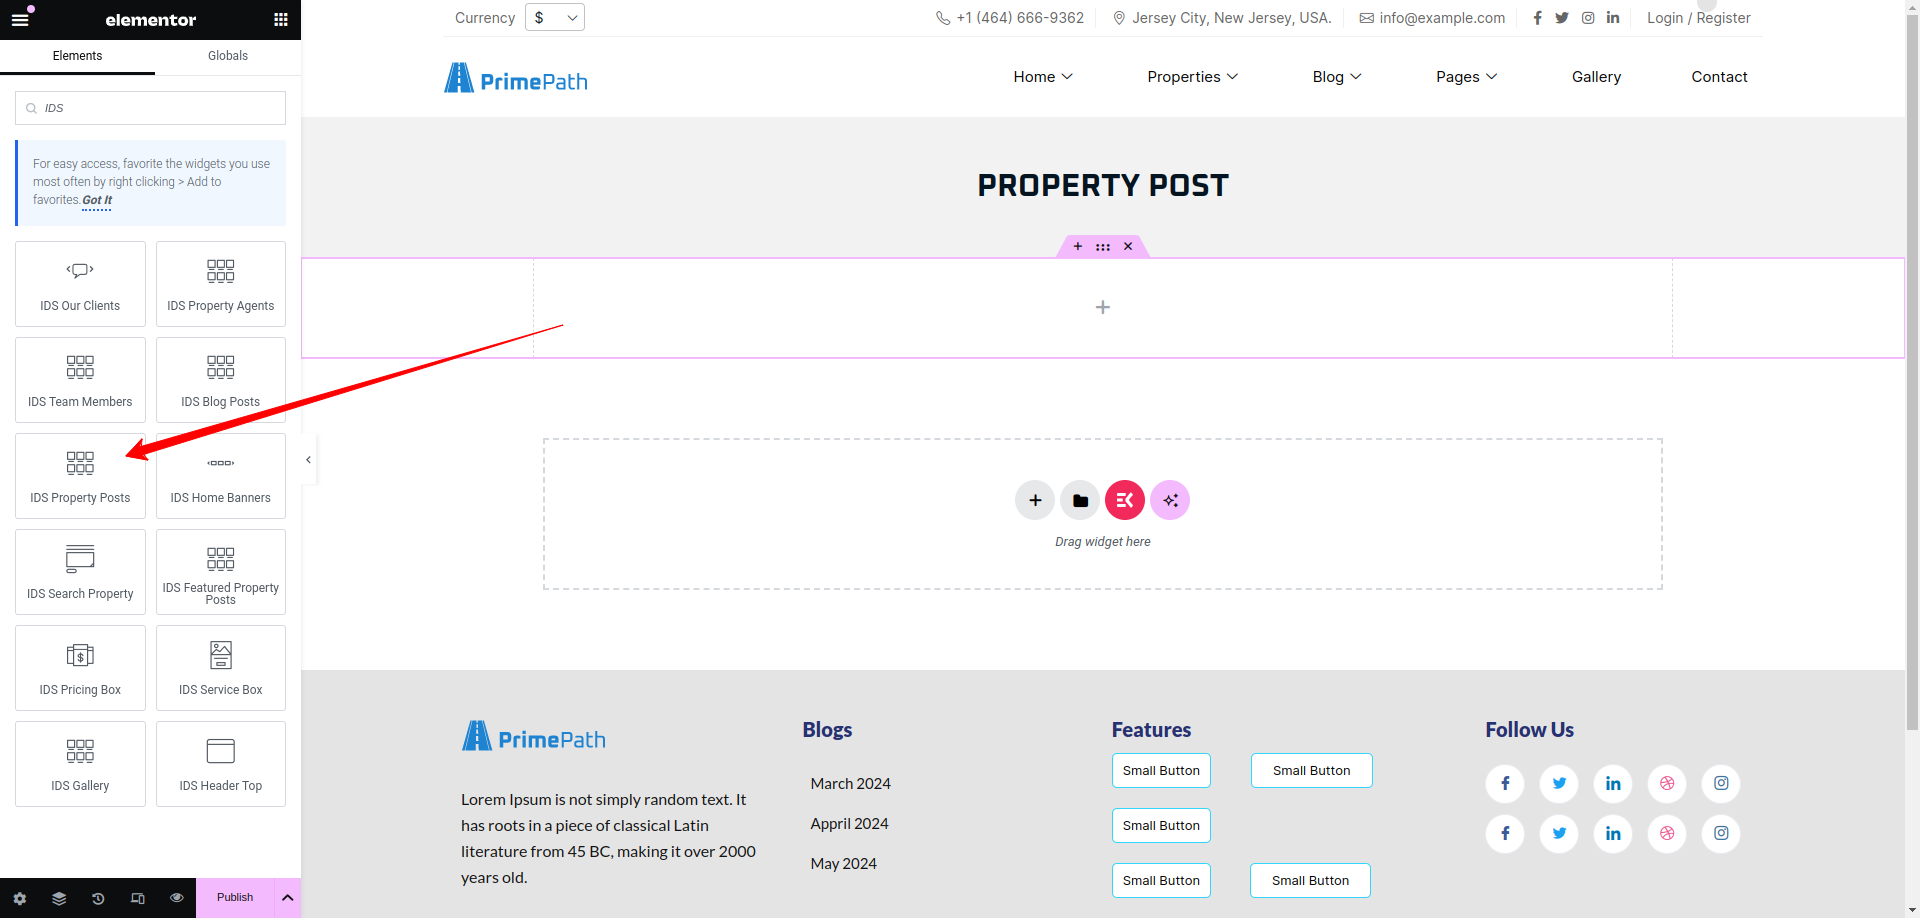
After selecting the IDS Property Posts widget, you will find options to configure the settings for your property posts section.
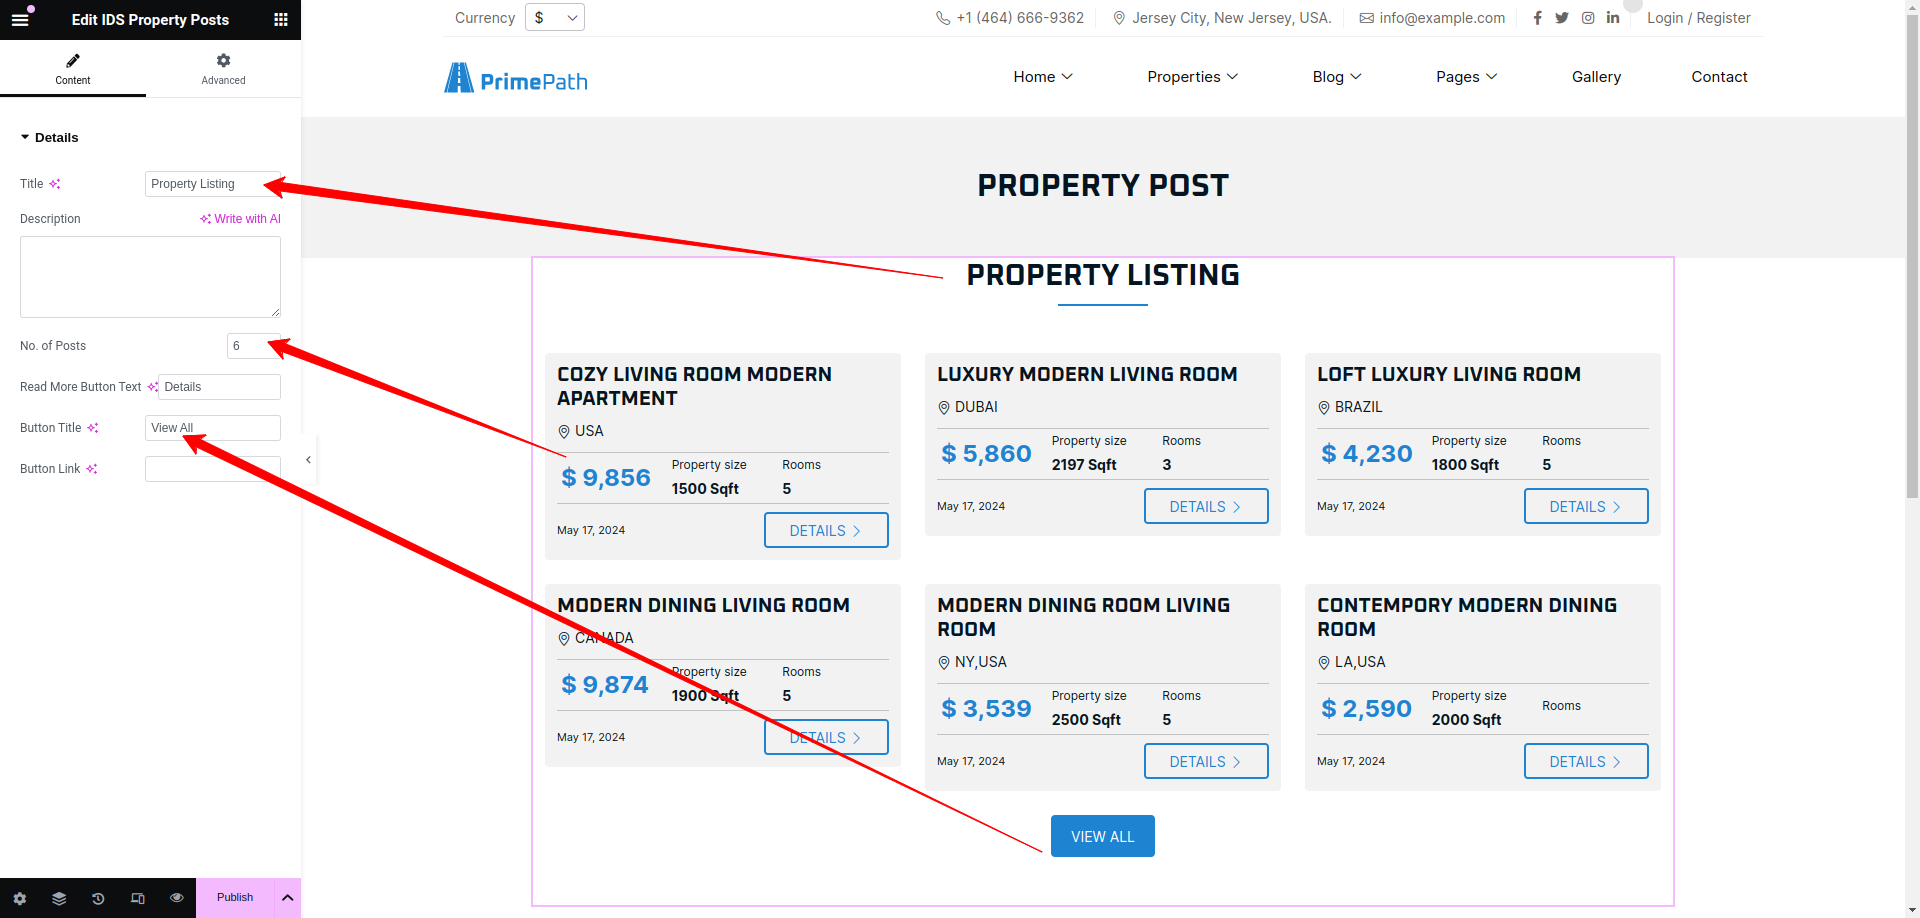
- Title: From here, you can change the title of property post section as display as header title.
- Description: From here, you can change the description of property post section which is display under the Header Title.
- No. of Posts: You can change the no. of post displaying in property post section.
- Read More Button Text: You can change the Read more button text displaying in property post section.
- Button Title: You can change the Button title which is displaying in screenshot.
Then update the page and view the page
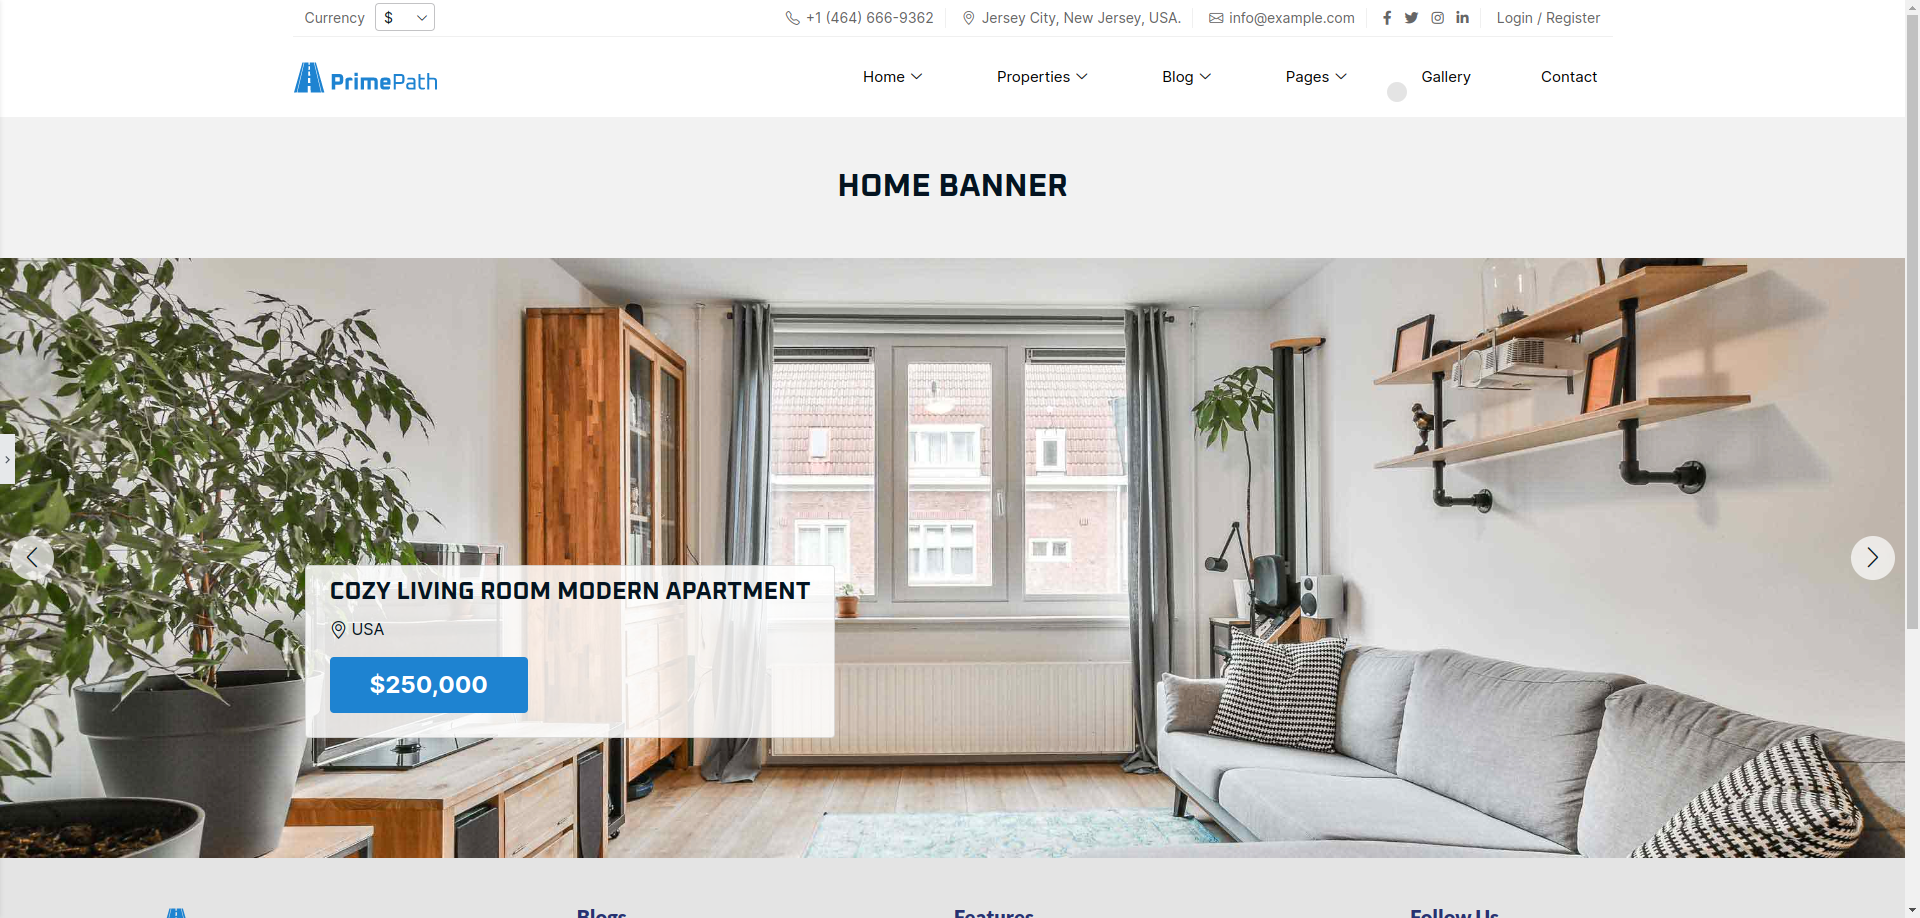
Home Banner
Using thie elementor addon or widget, you can add Home Banner in your selected page.
To add Home Banner using the Elementor addon or widget, follow these steps:
- Create a New Page: Navigate to Pages, click on “Add New”, and then edit with Elementor.
- Section and Container: Click the plus icon to add a new section, and within that section, add a container.
- Insert Widget: In the left sidebar, locate the widget by searching for “IDS” in the search box or find it under the “IDS Extensions” category.
- Drag and Drop “IDS Home Banners” Widget: Drag the widget into the section you created earlier.

After selecting the IDS Home Banner widget, you will find options to configure the settings for your home banner section.

- Banner Style: From here, you can change the style of banners.
- No. of Banner: You can change the no. of banner displaying in slideshow.
Then update the page and view the page
Search Property Box
Using thie elementor addon or widget, you can search the properties in your selected page.
To add Search Property Box using the Elementor addon or widget, follow these steps:
- Create a New Page: Navigate to Pages, click on “Add New”, and then edit with Elementor.
- Section and Container: Click the plus icon to add a new section, and within that section, add a container.
- Insert Widget: In the left sidebar, locate the widget by searching for “IDS” in the search box or find it under the “IDS Extensions” category.
- Drag and Drop “IDS Search Property” Widget: Drag the widget into the section you created earlier.
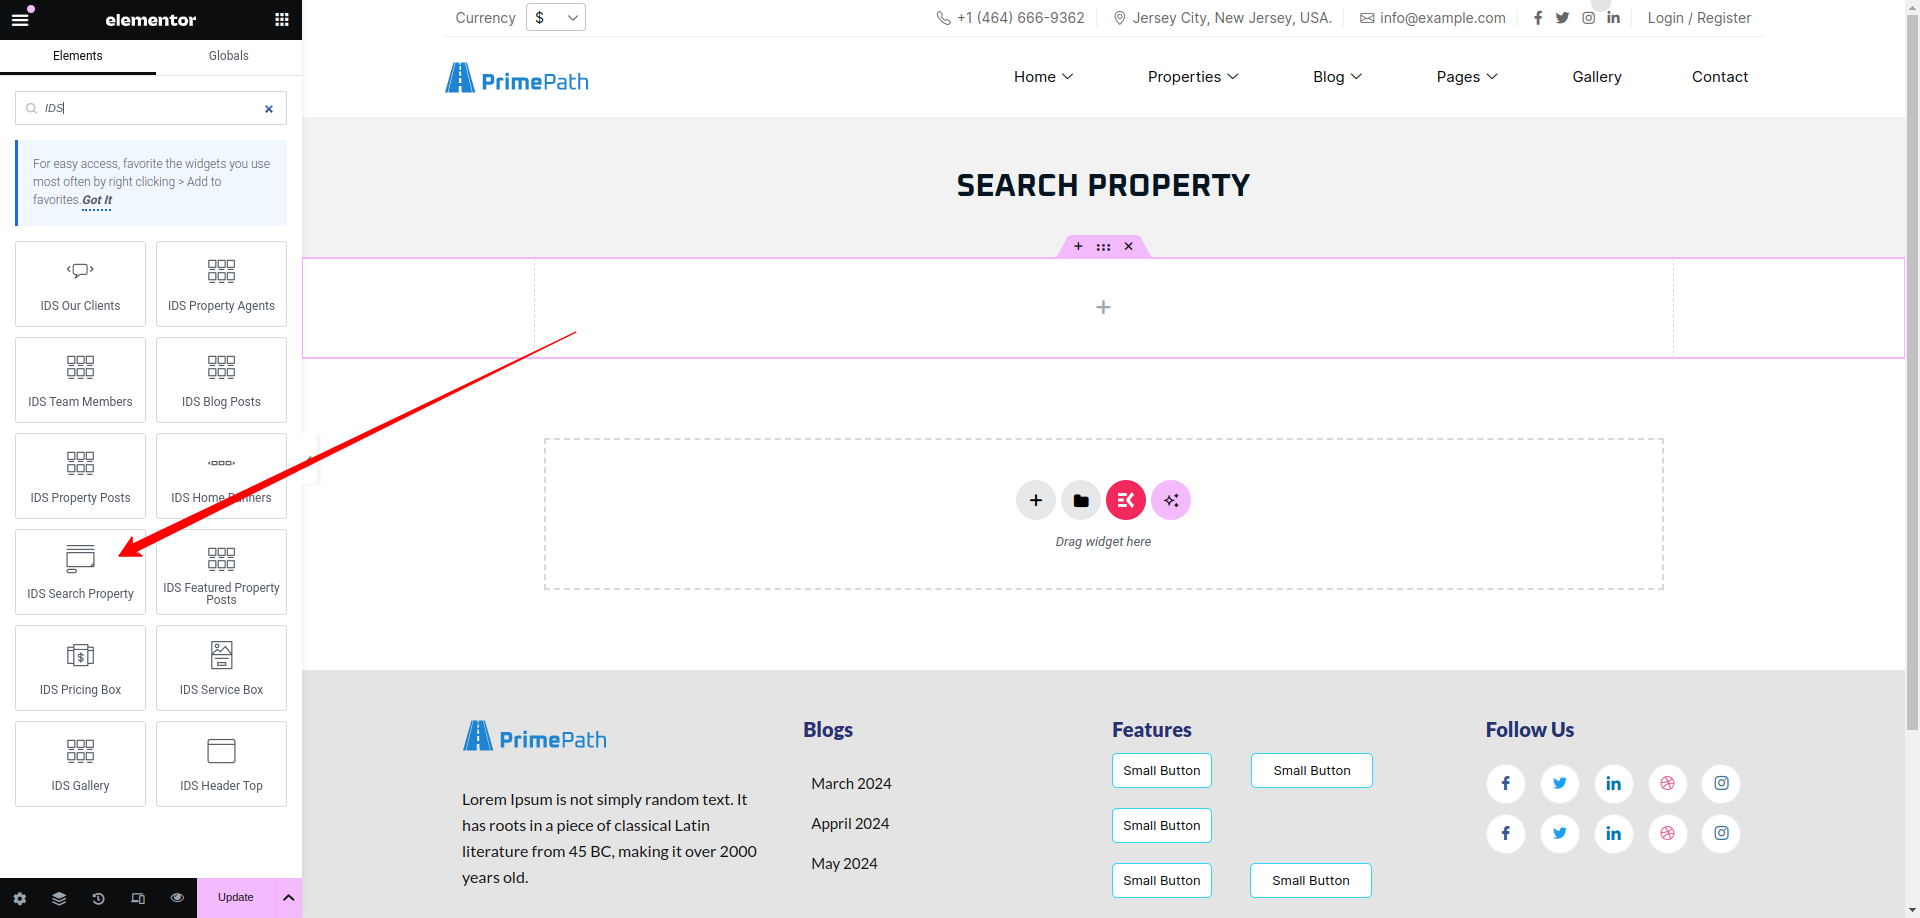
After selecting the IDS Search Property widget, you will find options to configure the settings for your home banner section.

- Title: From here, you can change the title of th box.
- Button Text: You can change the text of the button.
Then update the page and view the page

Featured Property Post
Using thie elementor addon or widget, you can add Featured Properties post list in your selected page.
To add Search box using the Elementor addon or widget, follow these steps:
- Create a New Page: Navigate to Pages, click on “Add New”, and then edit with Elementor.
- Section and Container: Click the plus icon to add a new section, and within that section, add a container.
- Insert Widget: In the left sidebar, locate the widget by searching for “IDS” in the search box or find it under the “IDS Extensions” category.
- Drag and Drop “IDS Featured Property Post” Widget: Drag the widget into the section you created earlier.
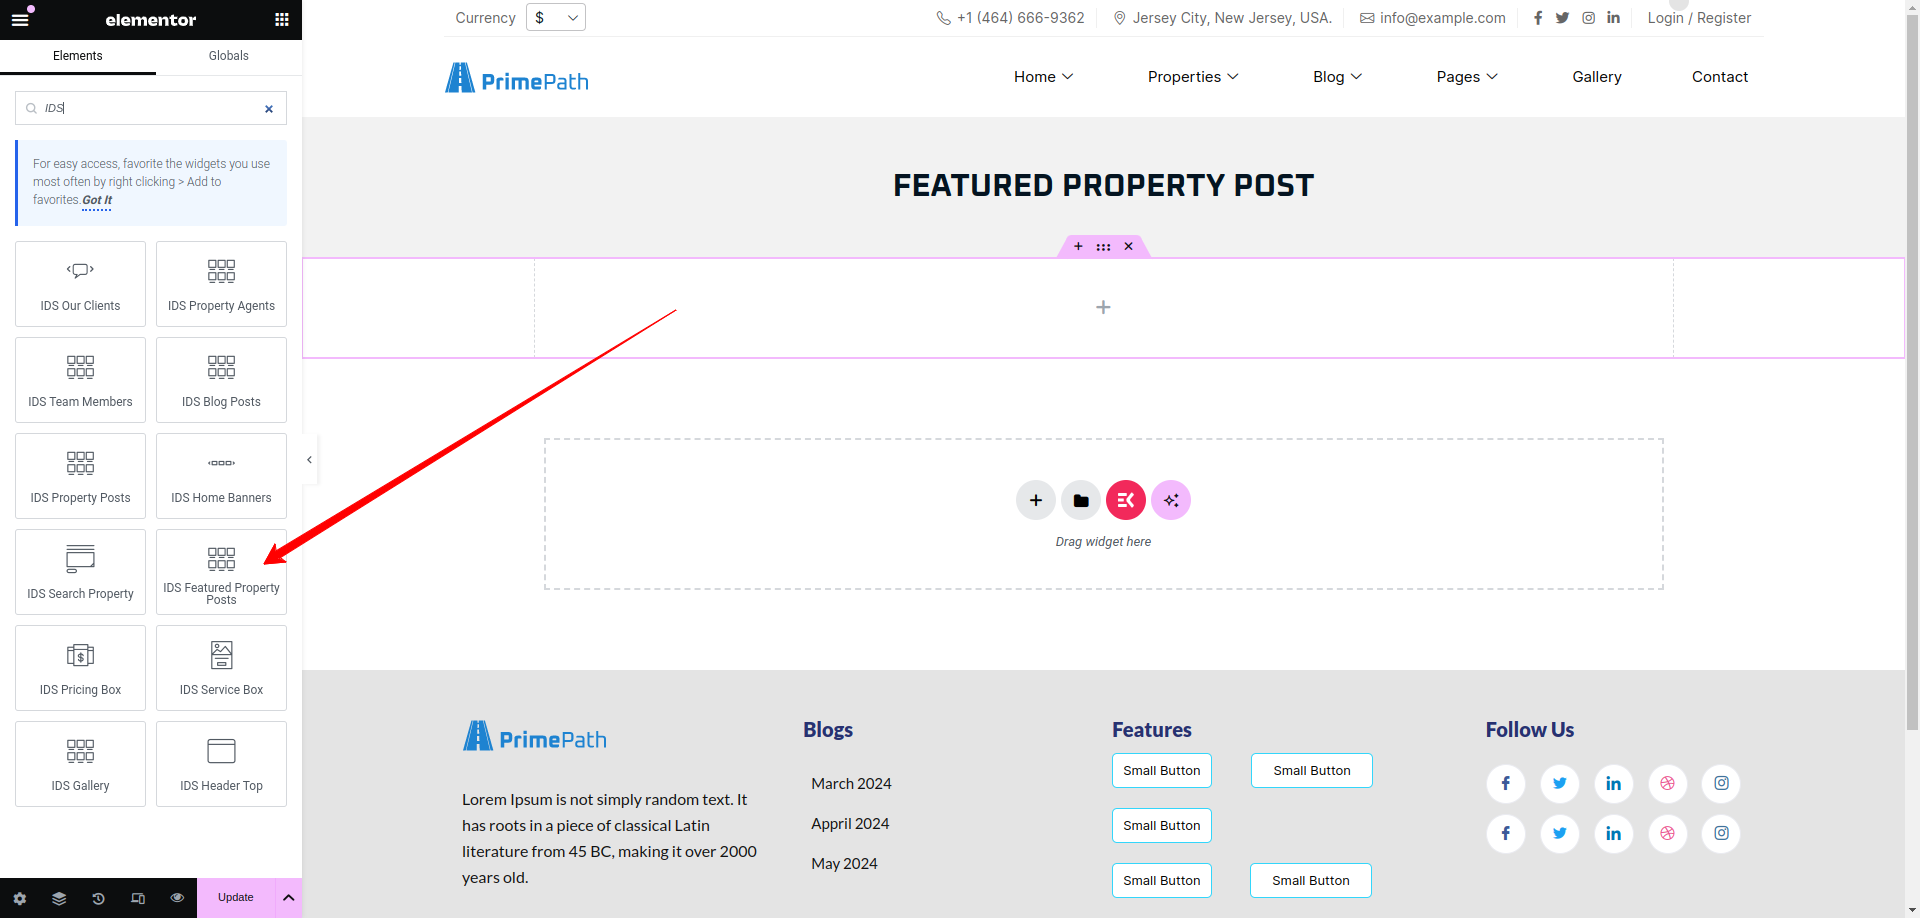
After selecting the IDS Featured Property Post widget, you will find options to configure the settings for your featured property post section.

- Title: From here, you can change the title of the box.
- No. of Posts: Here, you can change the number of posts displayed.
- Button Text: You can change the text of the button.
Then update the page and view the page

Pricing Box
Using thie elementor addon or widget, you can add Pricing Box in your selected page.
To add Pricing Box using the Elementor addon or widget, follow these steps:
- Create a New Page: Navigate to Pages, click on “Add New”, and then edit with Elementor.
- Section and Container: Click the plus icon to add a new section, and within that section, add a container.
- Insert Widget: In the left sidebar, locate the widget by searching for “IDS” in the search box or find it under the “IDS Extensions” category.
- Drag and Drop “IDS Pricing Box” Widget: Drag the widget into the section you created earlier.

After selecting the IDS Pricing Box widget, you will find options to configure the settings for your pricing box section.

- Title: From here, you can change the title of the pricing box.
- Currency: Here, you can change the currency of the pricing box displayed.
- Price: You can change the price of the pricing box.
- Content: You can change the content of the pricing box.
Then update the page and view the page
Service Box
Using thie elementor addon or widget, you can add Service Box in your selected page.
To add Service Box using the Elementor addon or widget, follow these steps:
- Create a New Page: Navigate to Pages, click on “Add New”, and then edit with Elementor.
- Section and Container: Click the plus icon to add a new section, and within that section, add a container.
- Insert Widget: In the left sidebar, locate the widget by searching for “IDS” in the search box or find it under the “IDS Extensions” category.
- Drag and Drop “IDS Service Box” Widget: Drag the widget into the section you created earlier.
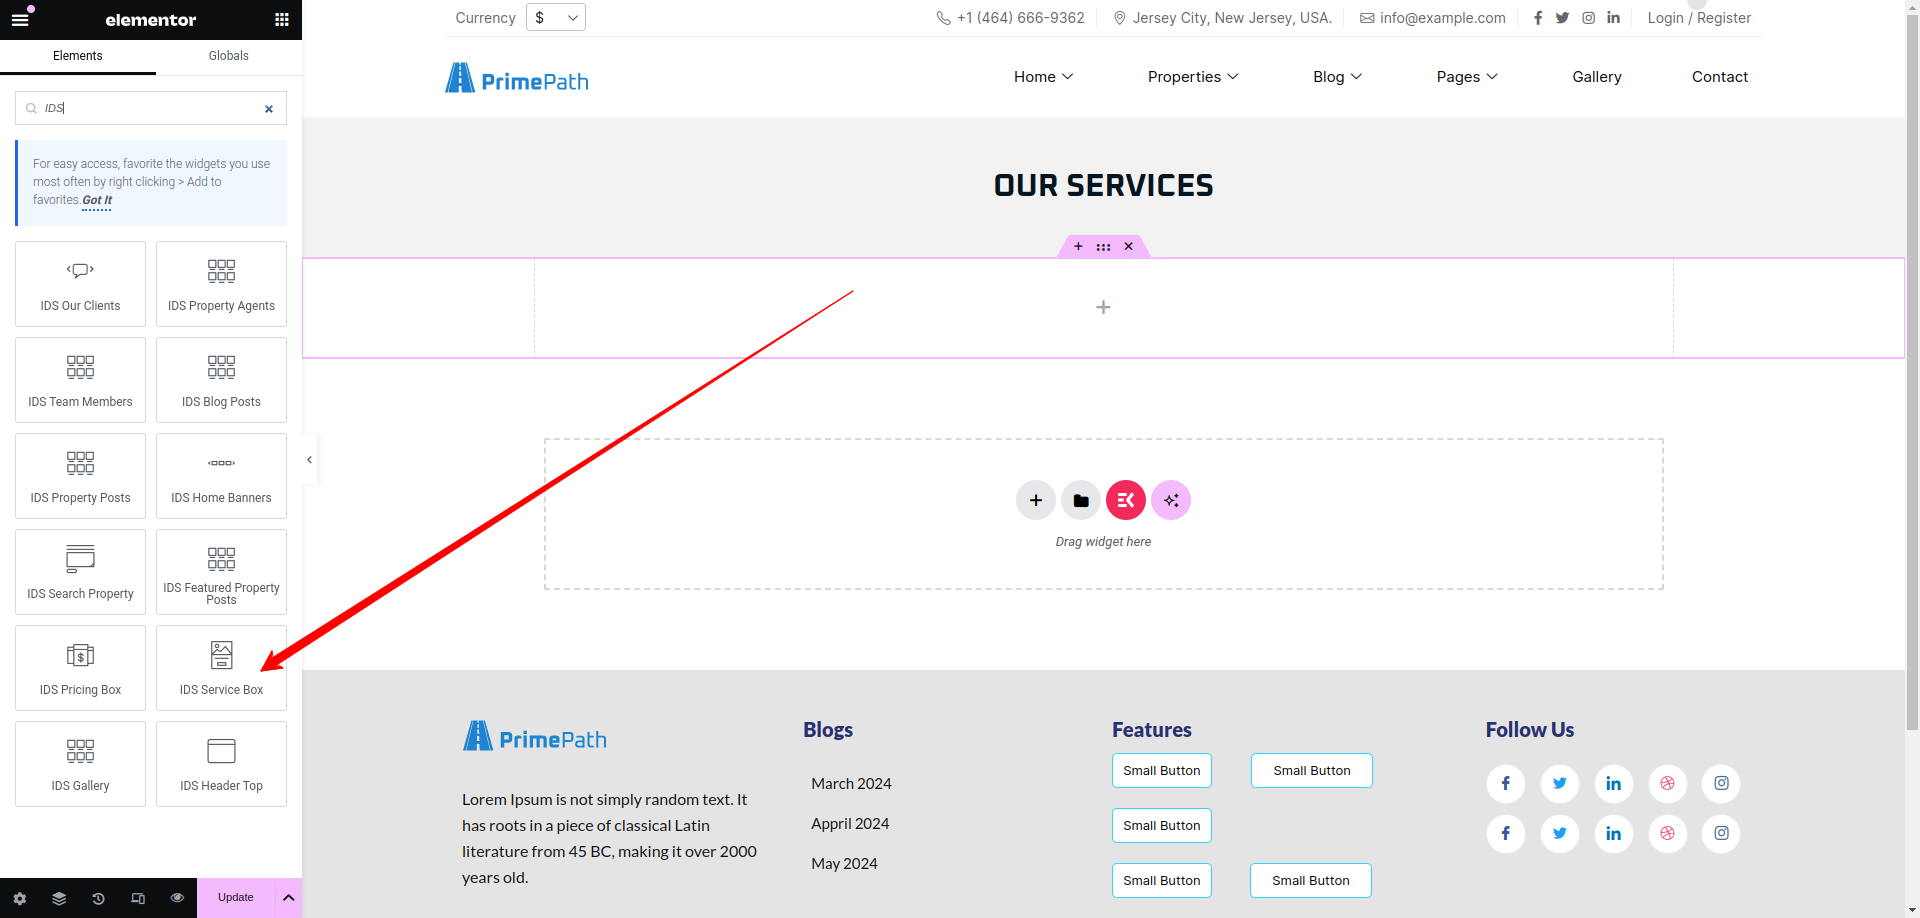
After selecting the IDS Service Box Widget, you will find options to configure the settings for your service box section.
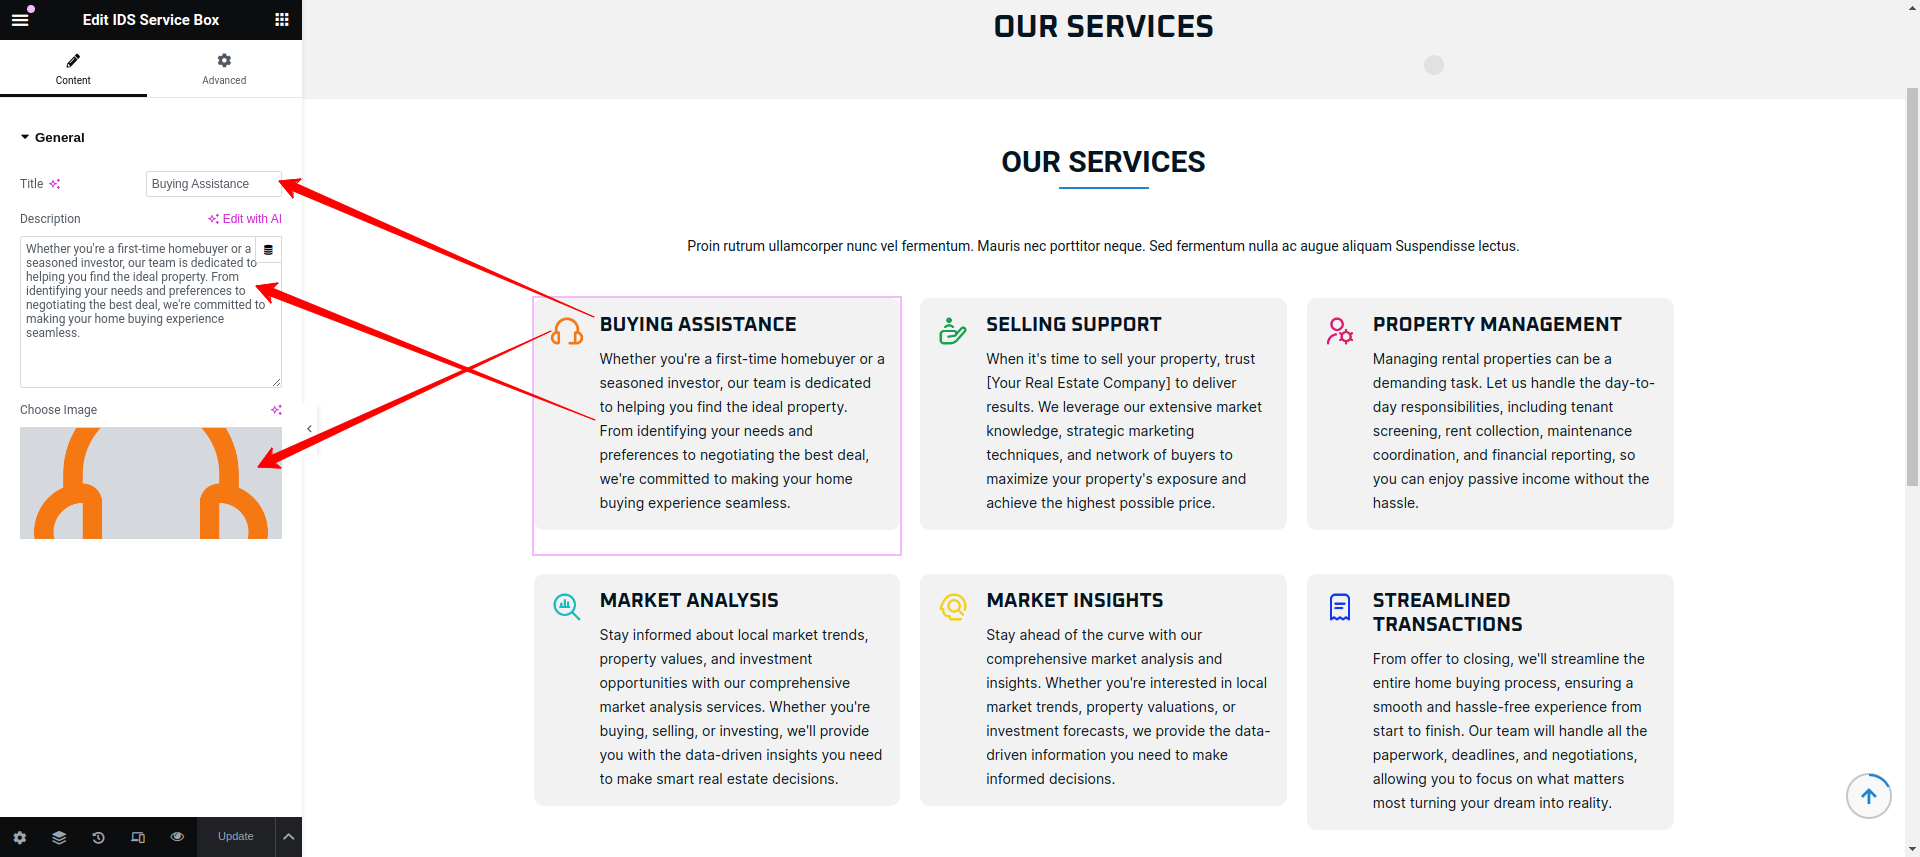
- Title: From here, you can change the title of the perticular service box.
- Description: Here, you can change the description of the perticular service box displayed.
- Choose Image: You can change the icon image of the service box.
Then update the page and view the page
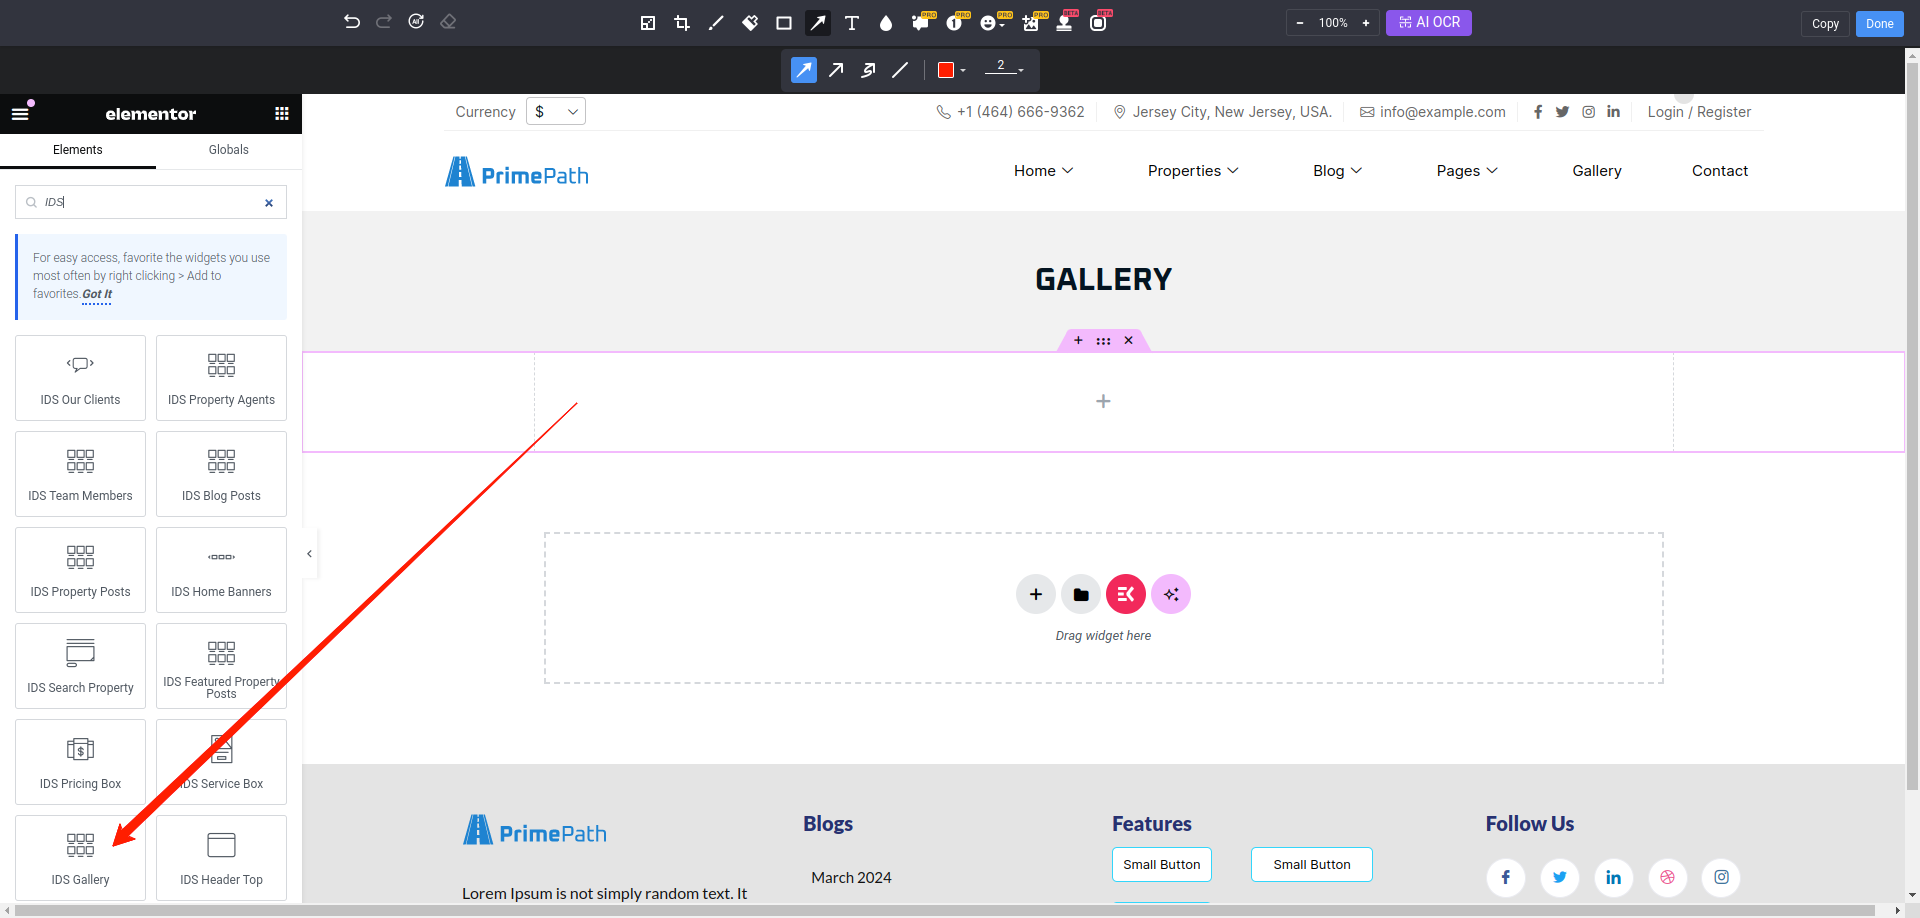
Gallery
Using thie elementor addon or widget, you can add Gallery images in your selected page.
To add Gallery Photos using the Elementor addon or widget, follow these steps:
- Create a New Page: Navigate to Pages, click on “Add New”, and then edit with Elementor.
- Section and Container: Click the plus icon to add a new section, and within that section, add a container.
- Insert Widget: In the left sidebar, locate the widget by searching for “IDS” in the search box or find it under the “IDS Extensions” category.
- Drag and Drop “IDS Gallery” Widget: Drag the widget into the section you created earlier.
After selecting the IDS Gallery widget, you will find options to configure the settings for your gallery section.
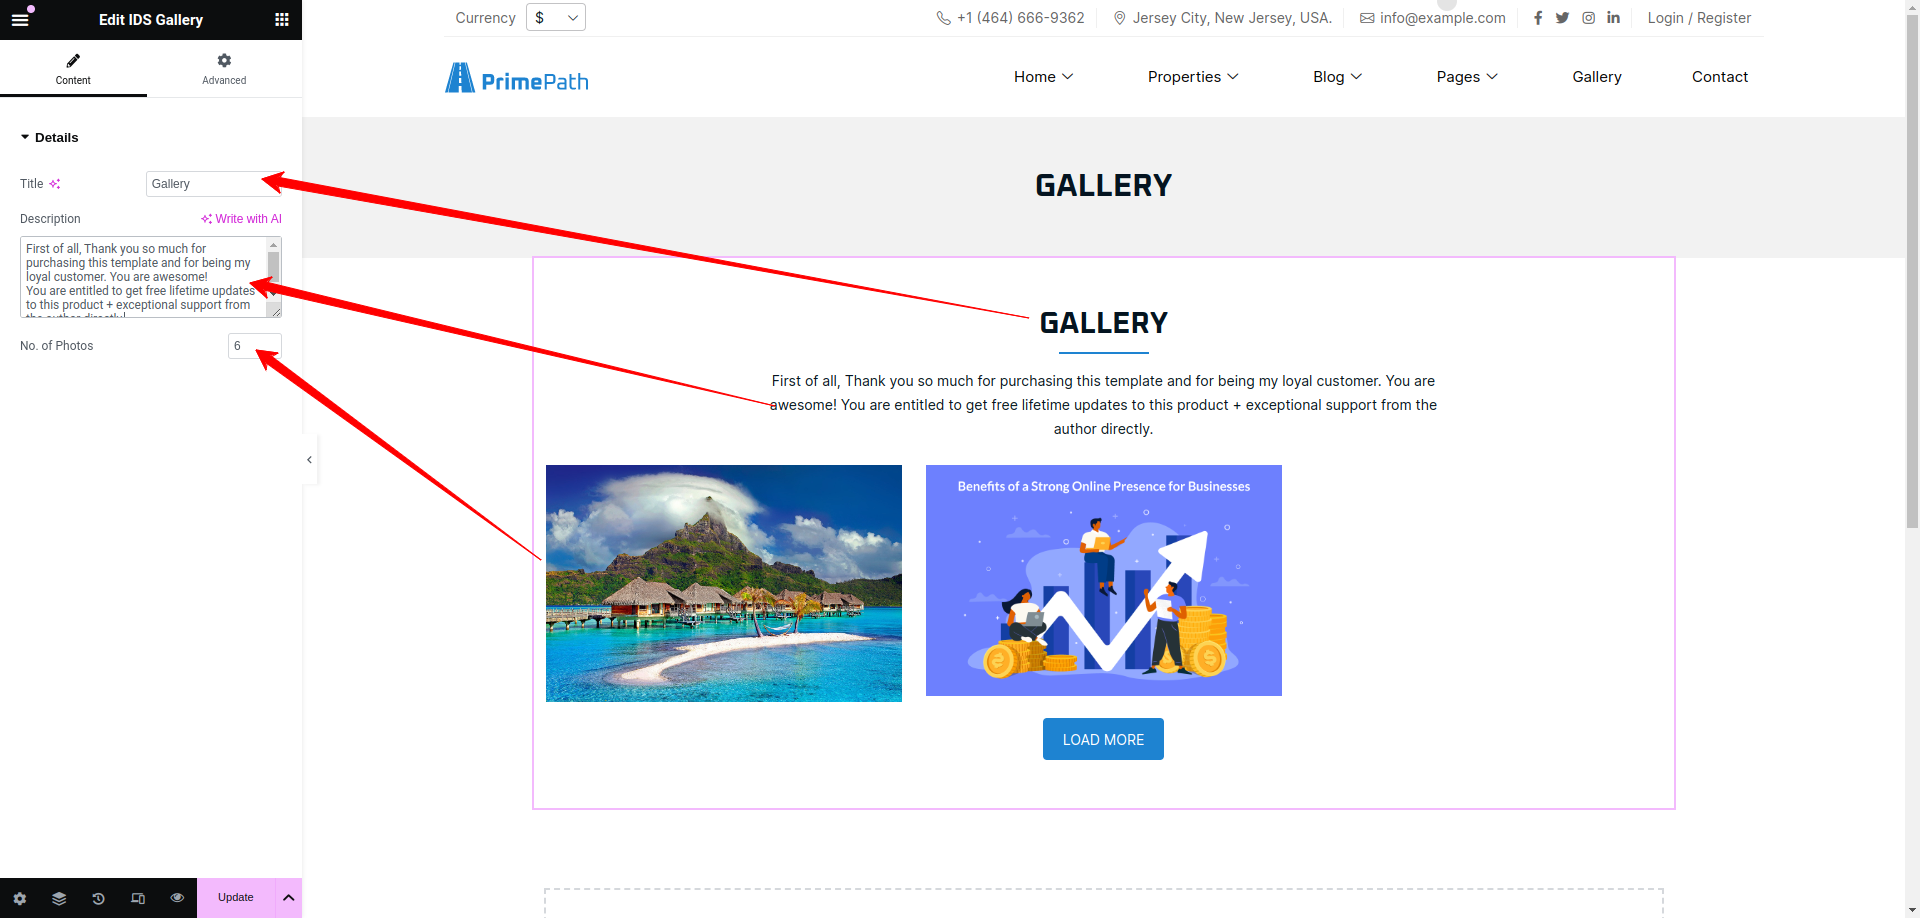
- Title: From here, you can change the title of the gallery section.
- Description: Here, you can add the description of the gallery section.
- No. of photos: You can change the no. of photos.
Then update the page and view the page

Header Top
Using thie elementor addon or widget, you can add Top Header.
To add Header using the Elementor addon or widget, follow these steps:
- go to Admin Panel -> Elements Kit -> Header
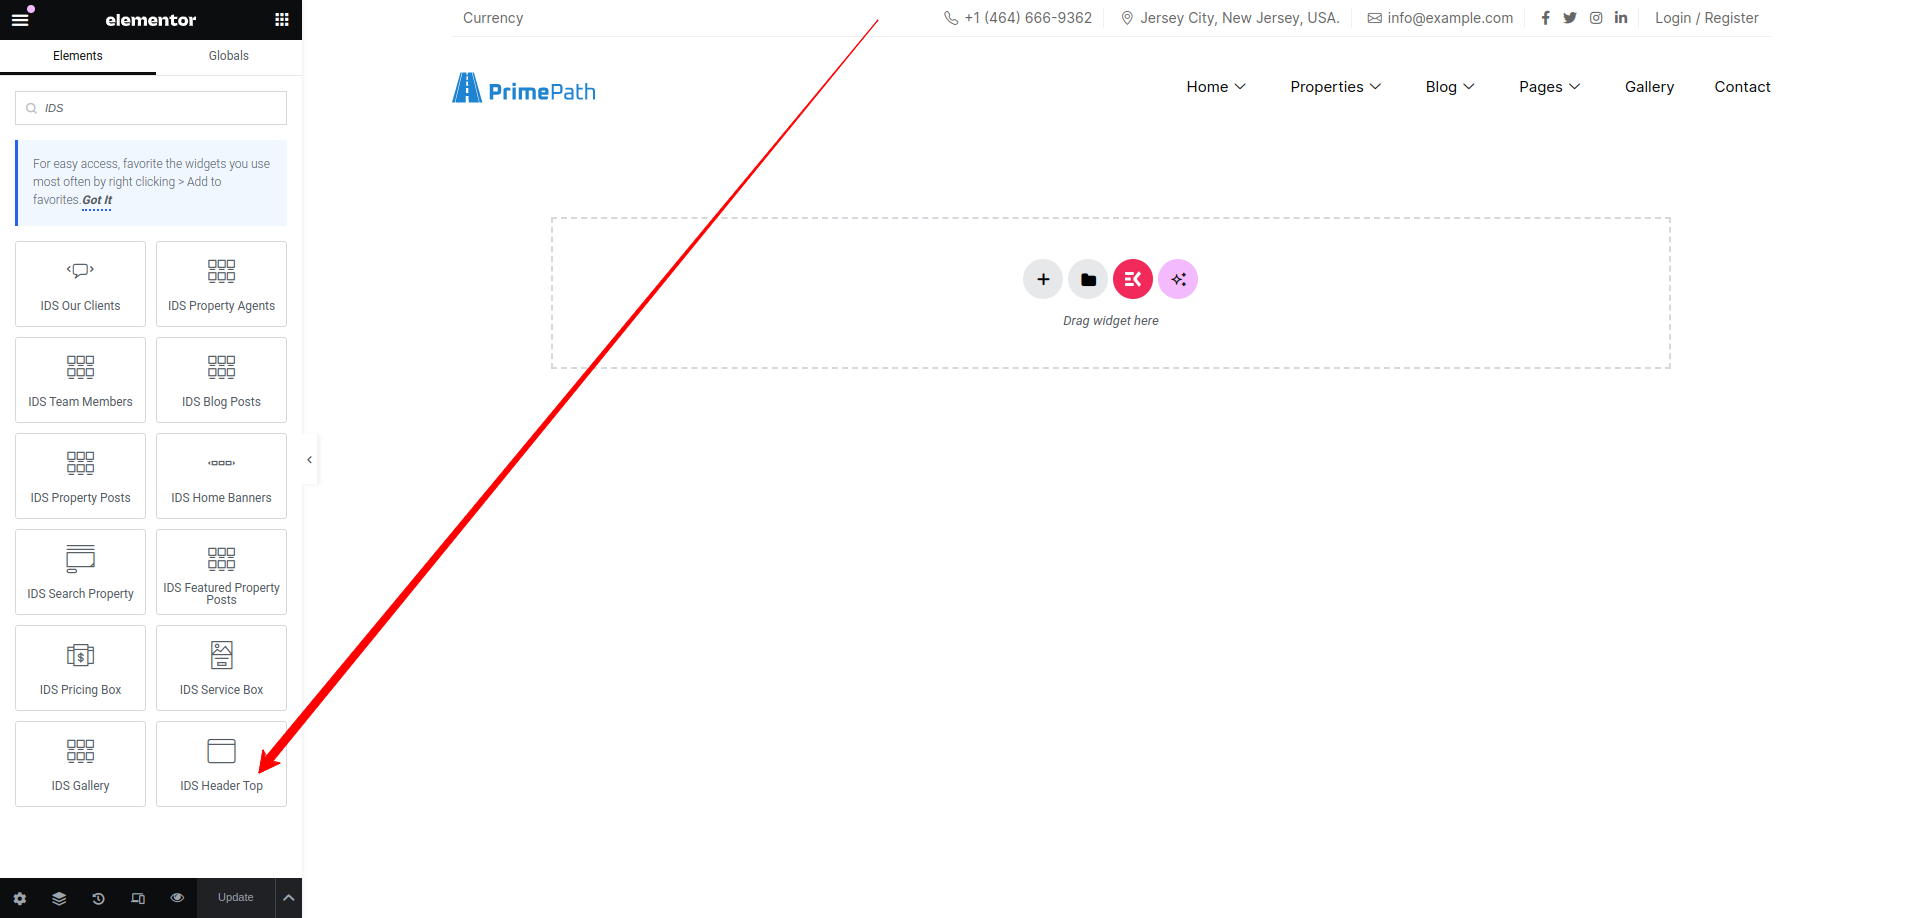
After selecting the IDS Header widget, you will find options to configure the settings for your header section.

- Hide Currency: From here, you can hide the currency.
- Contact Number: Here, you can add the contact number.
- Address: You can add the address.
- Email: You can add the email.
- Login Page Link: You can add the login link.
Then update the page and view the page
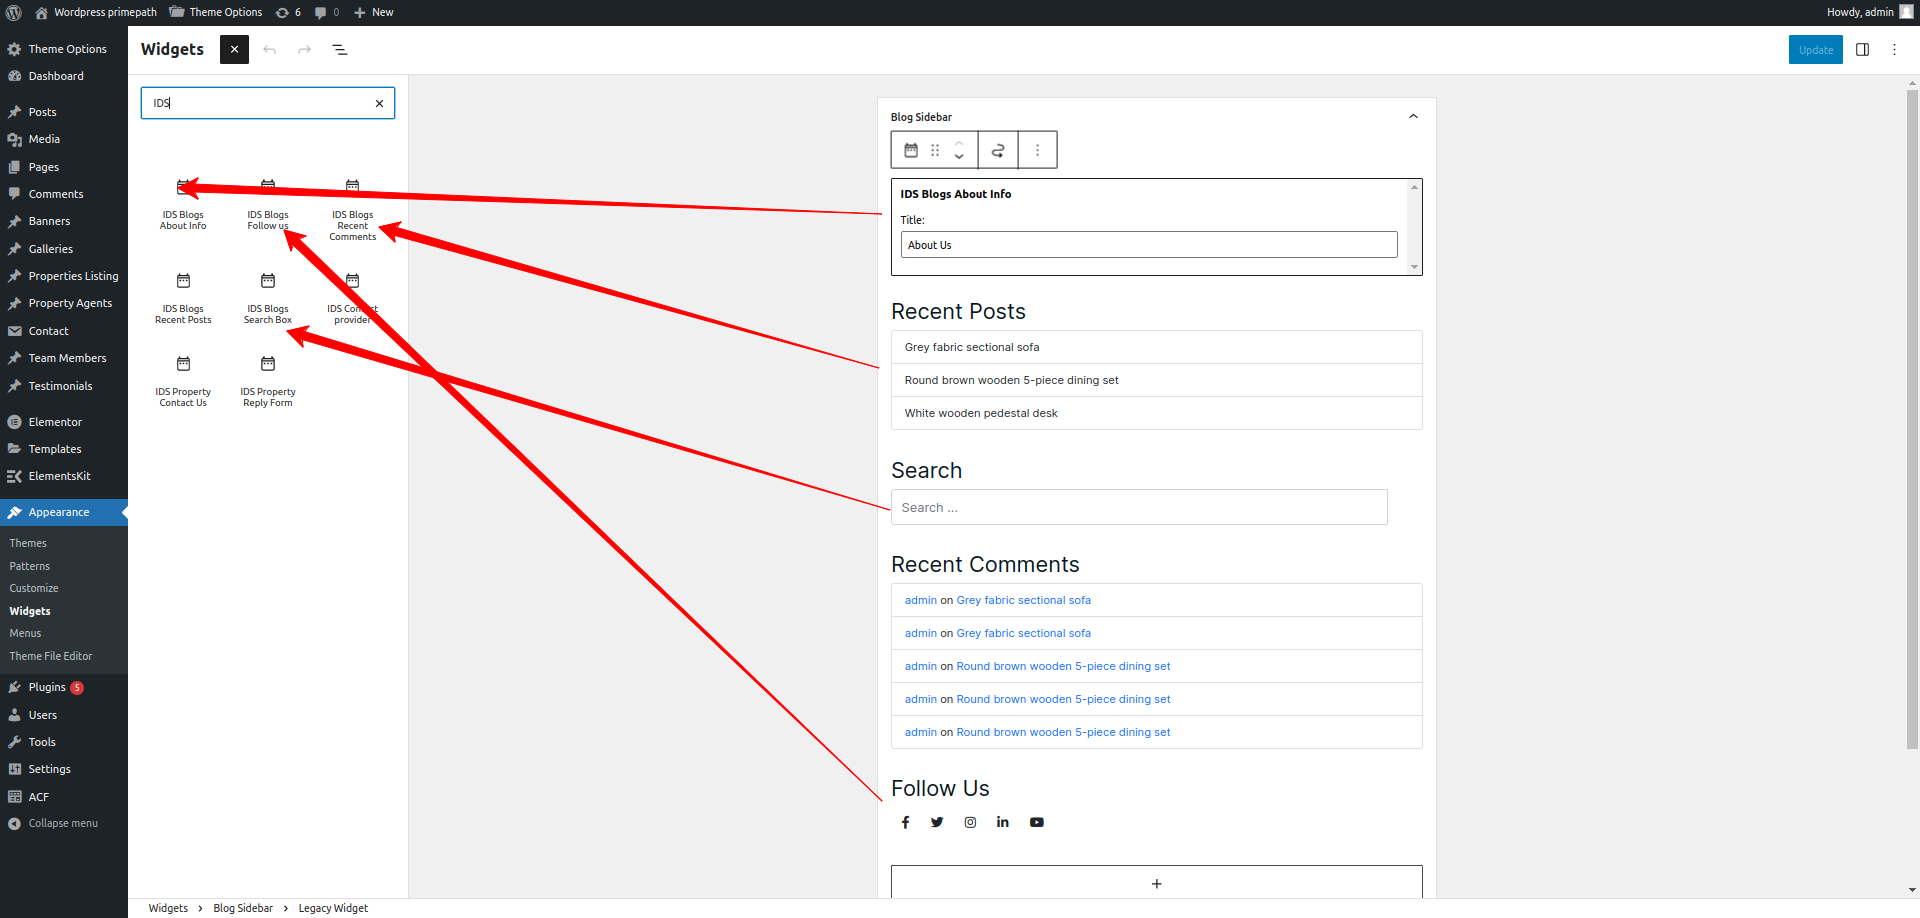
Theme Wp Widgets
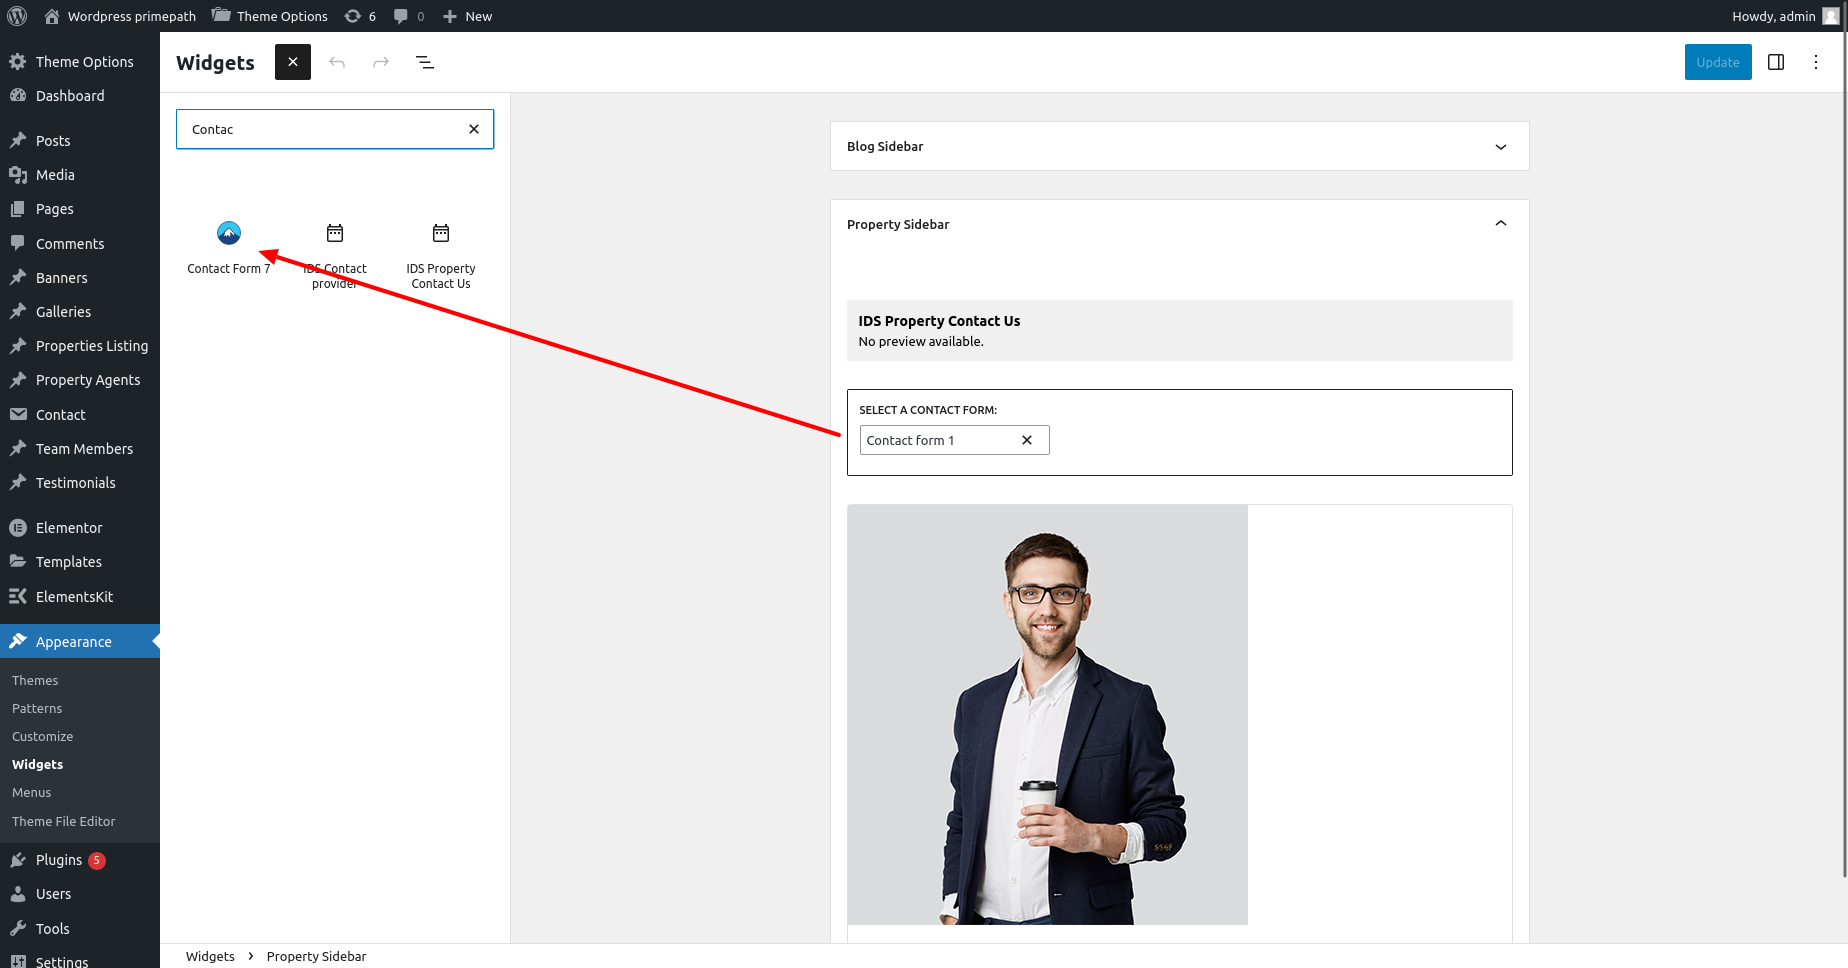
To Access theme widgets, go to Appearance->Widgets.Now you can see three widget sidebars, which are as follows:
Blog Sidebar
In the blog sidebar, you can see many widgets provided in screenshot. You can add different widgets by clicking on the ‘+’ button. After adding all widgets, you can see them on all sidebar widgets in blog detail page.
Property Sidebar
In the Property sidebar, you can see many widgets provided in screenshot. You can add different widgets by clicking on the ‘+’ button. After adding all widgets, you can see them on all sidebar widgets in Property detail page.
Inactive Widgets
There are some inactive widgets such as Recent Posts, Recent Comments, Archives, Categories, etc. You can add different widgets by clicking on the ‘+’ button. All these widgets will be displayed on the Blog Detail page.
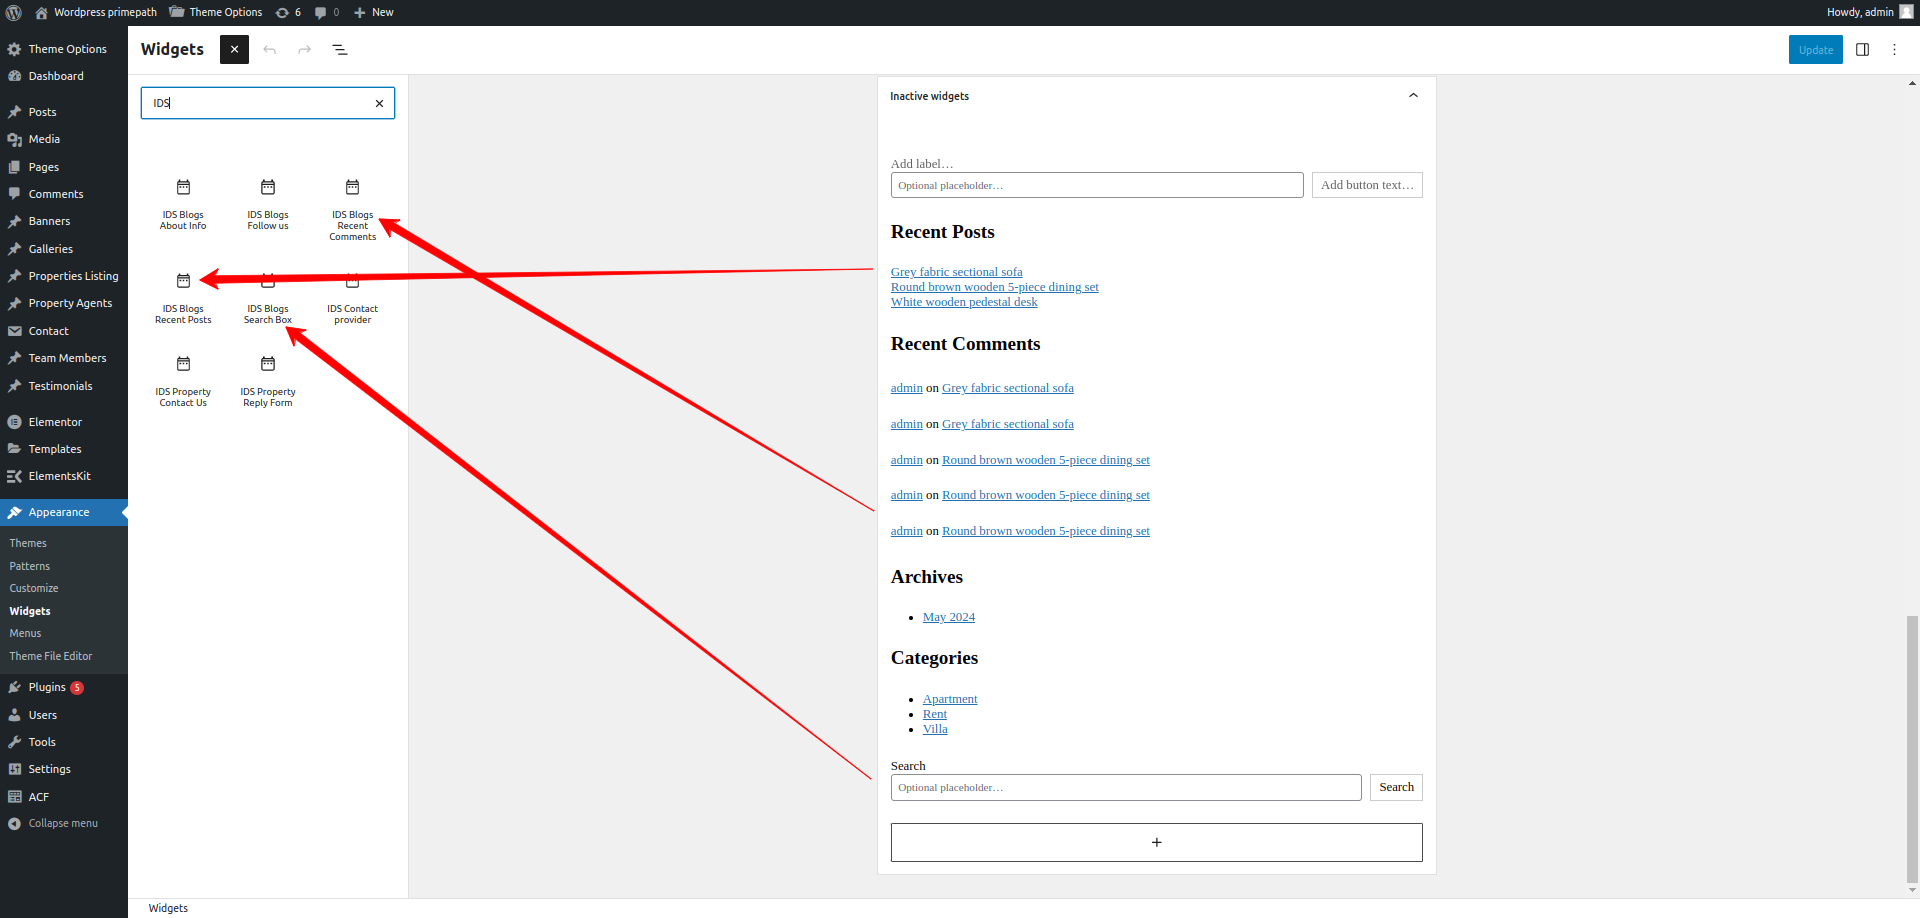
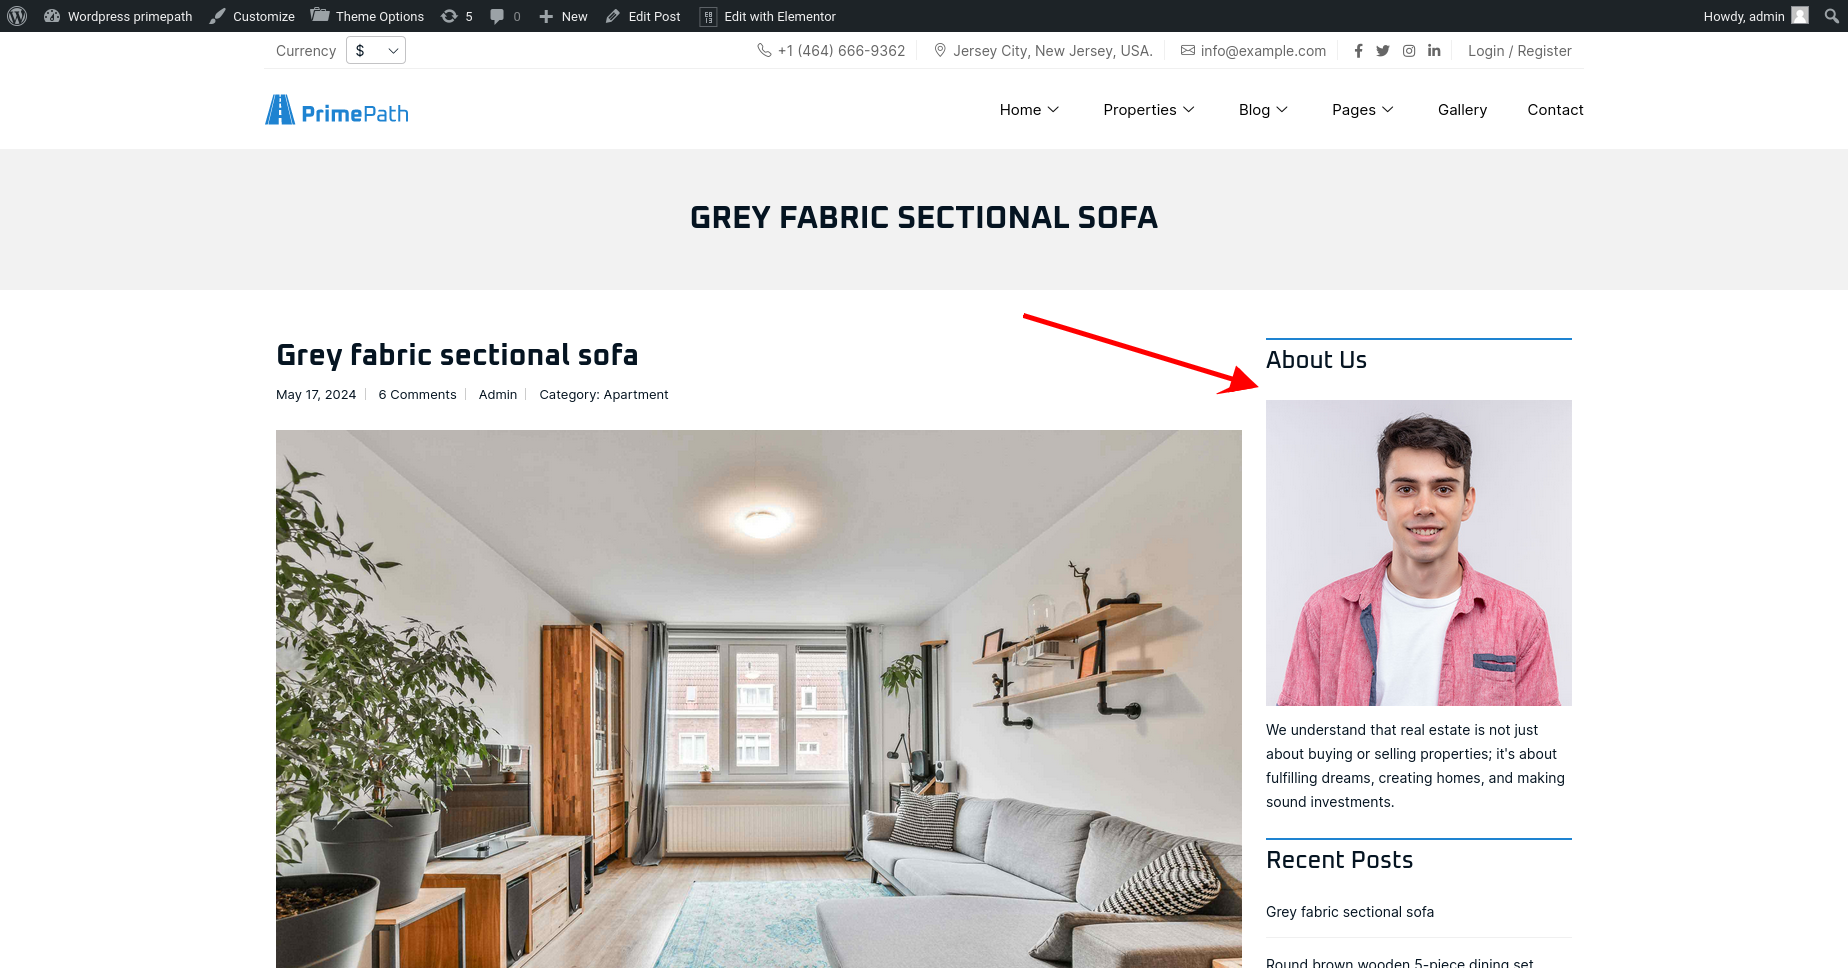
Blogs About Info
Using this widget, we can add About Info section box in the sidebar area of blog list page and blog post detail page.
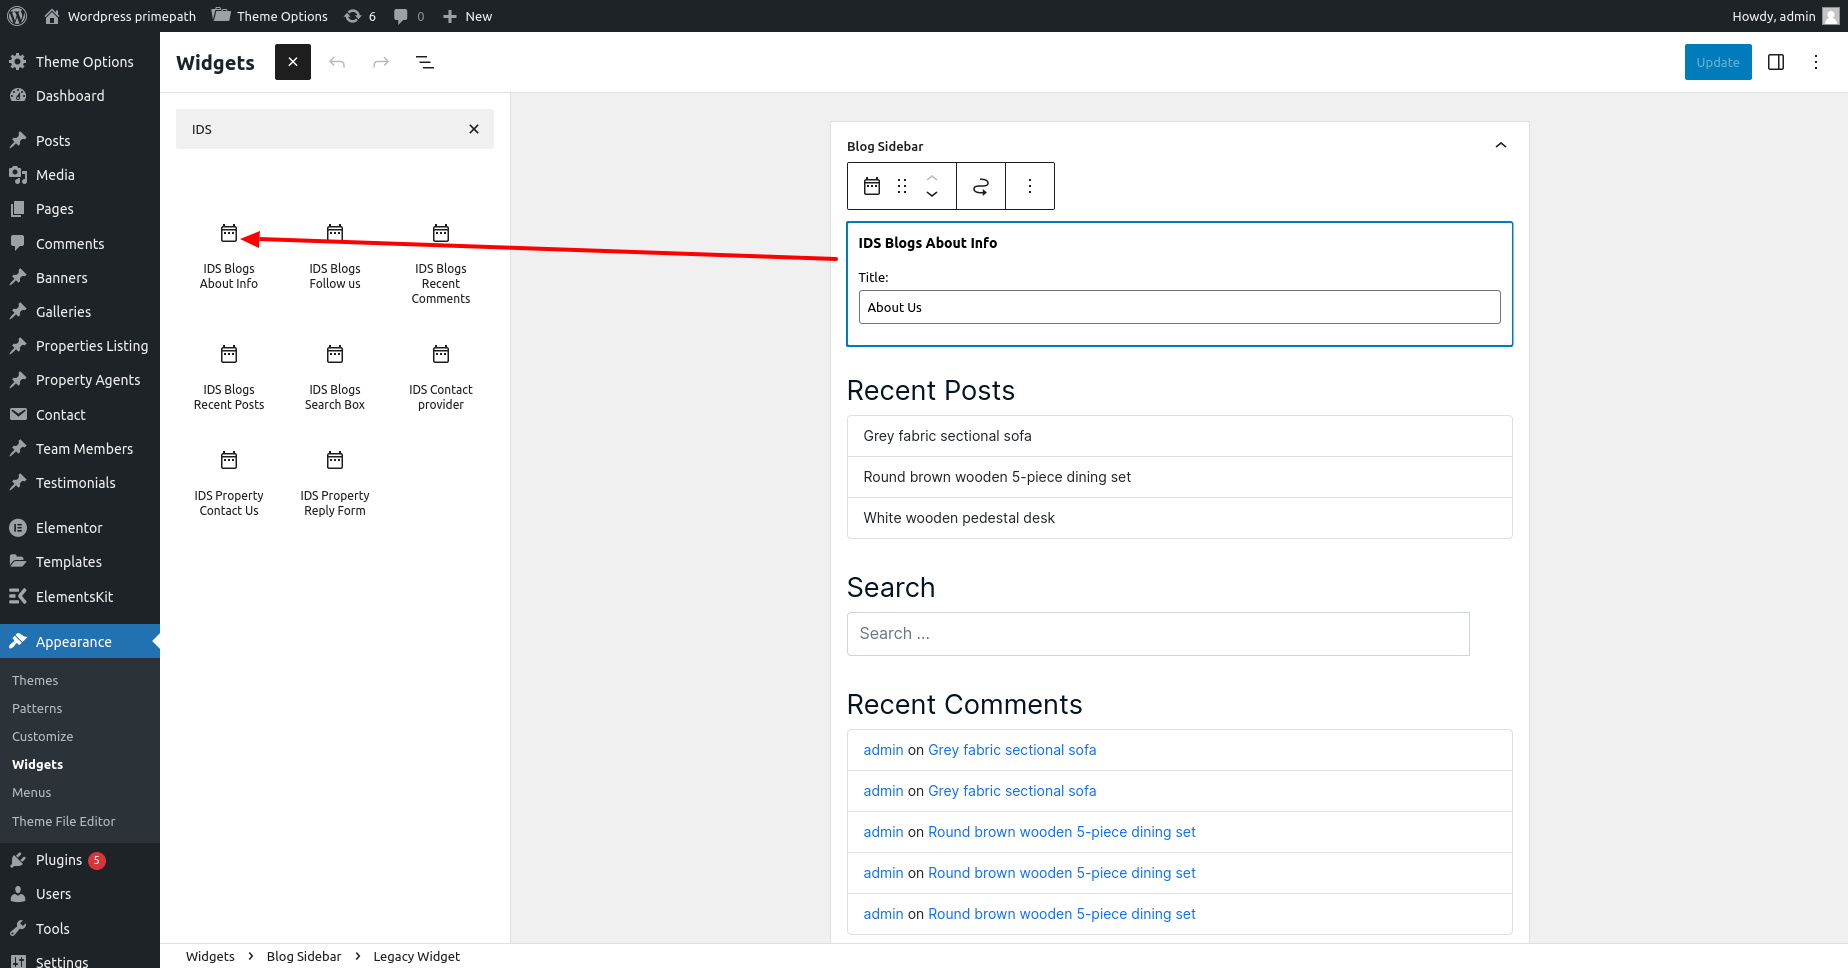
We can also cusotmize the title of the About Info section by clicking on that widget
After update widget, this widget will display as like below with information about posted author of post.
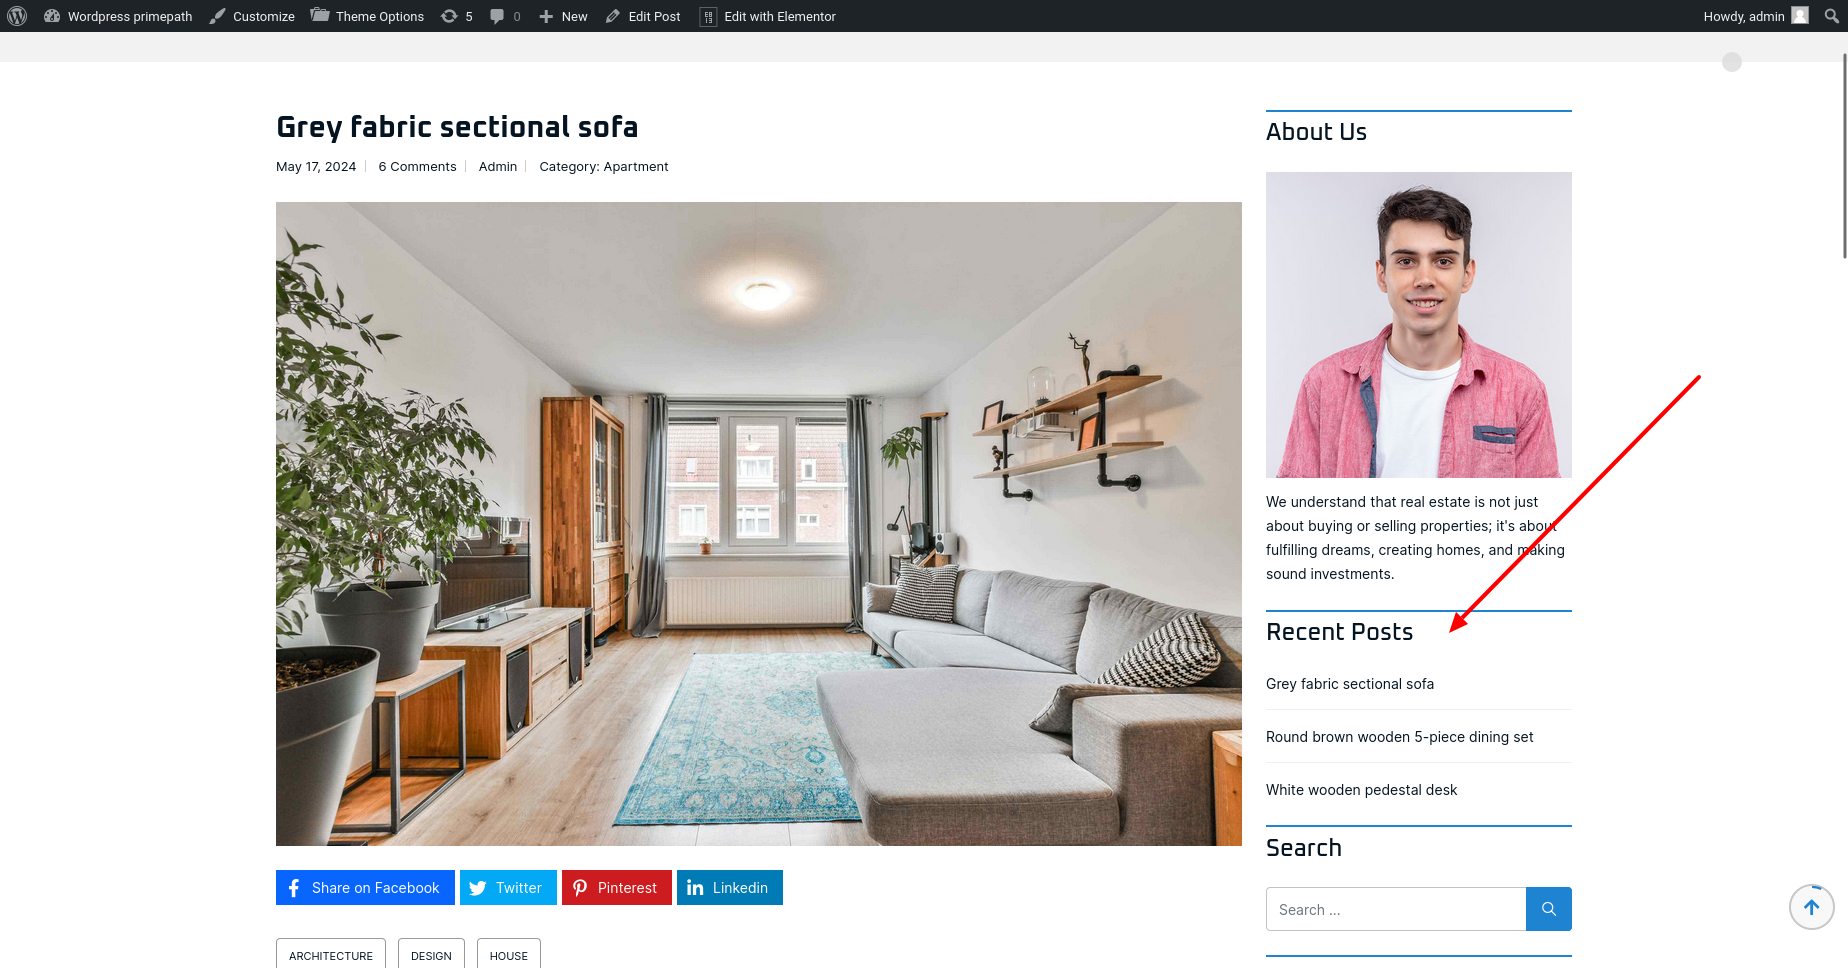
Blogs Recent Posts
Using this widget, we can add number of recent posts in the sidebar area of blog list page and blog post detail page.
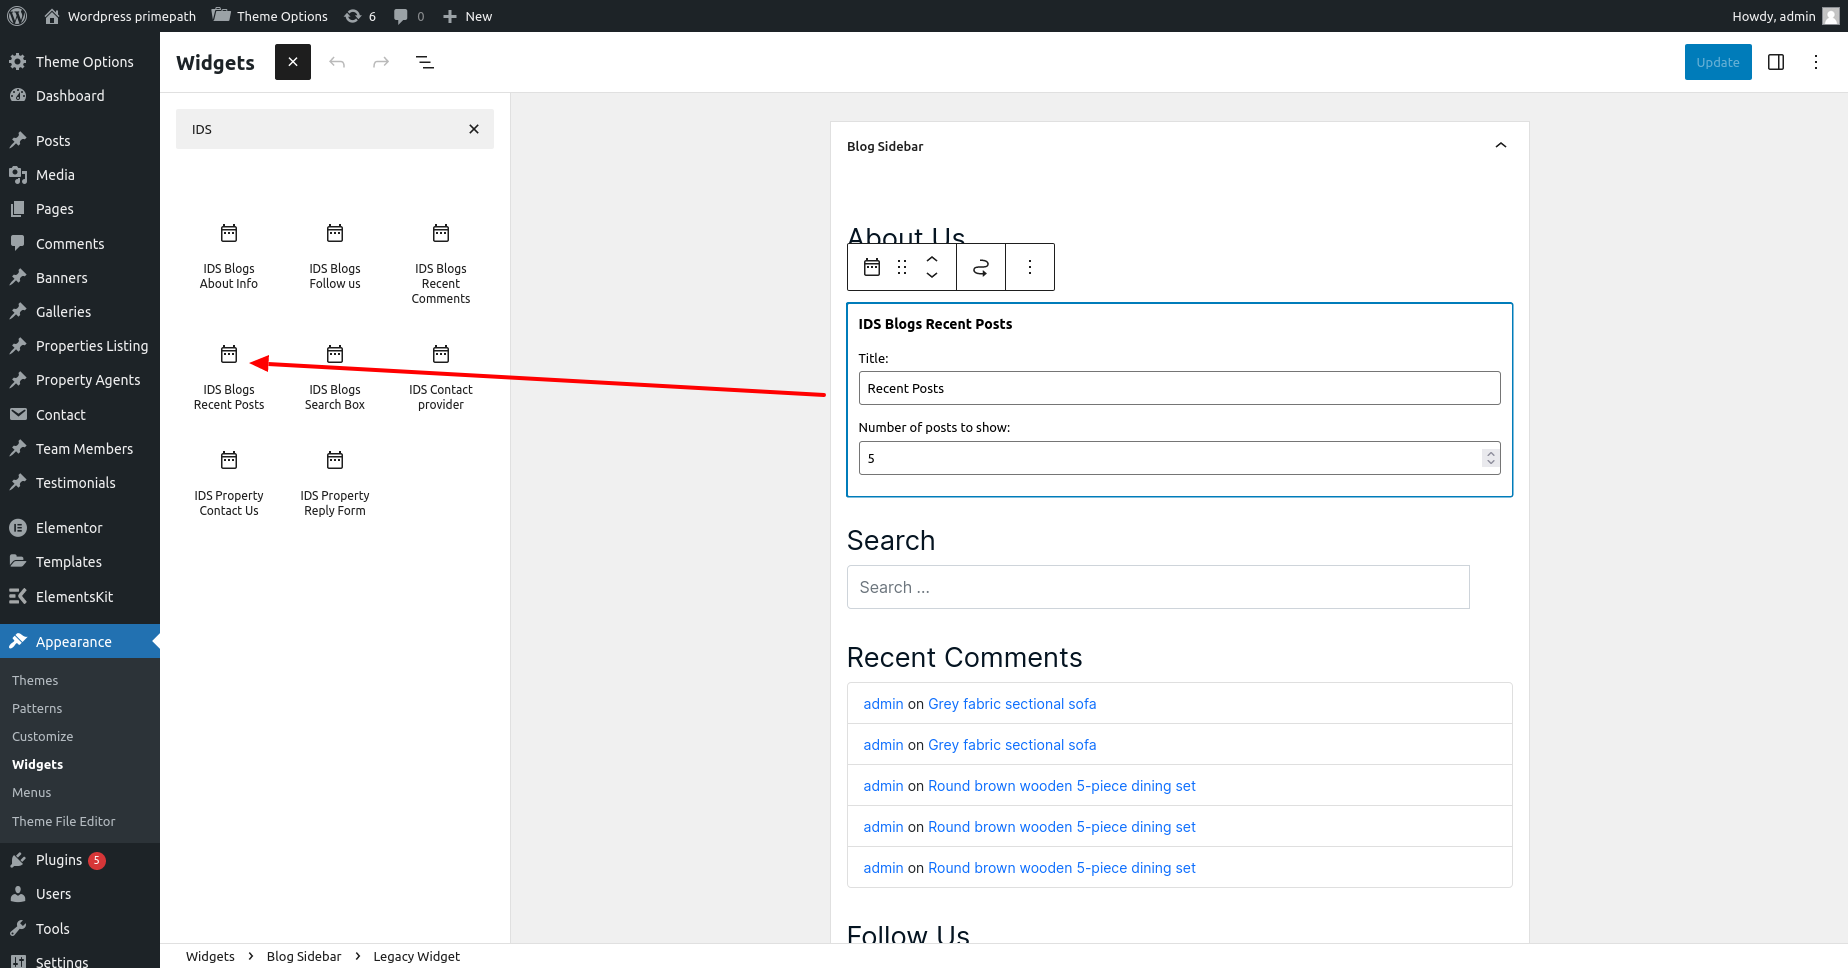
We can also cusotmize the title of the section and how many posts we want to display as recent posts by clicking on that widget.
After update widget, this widget will display as like below with recent posts.
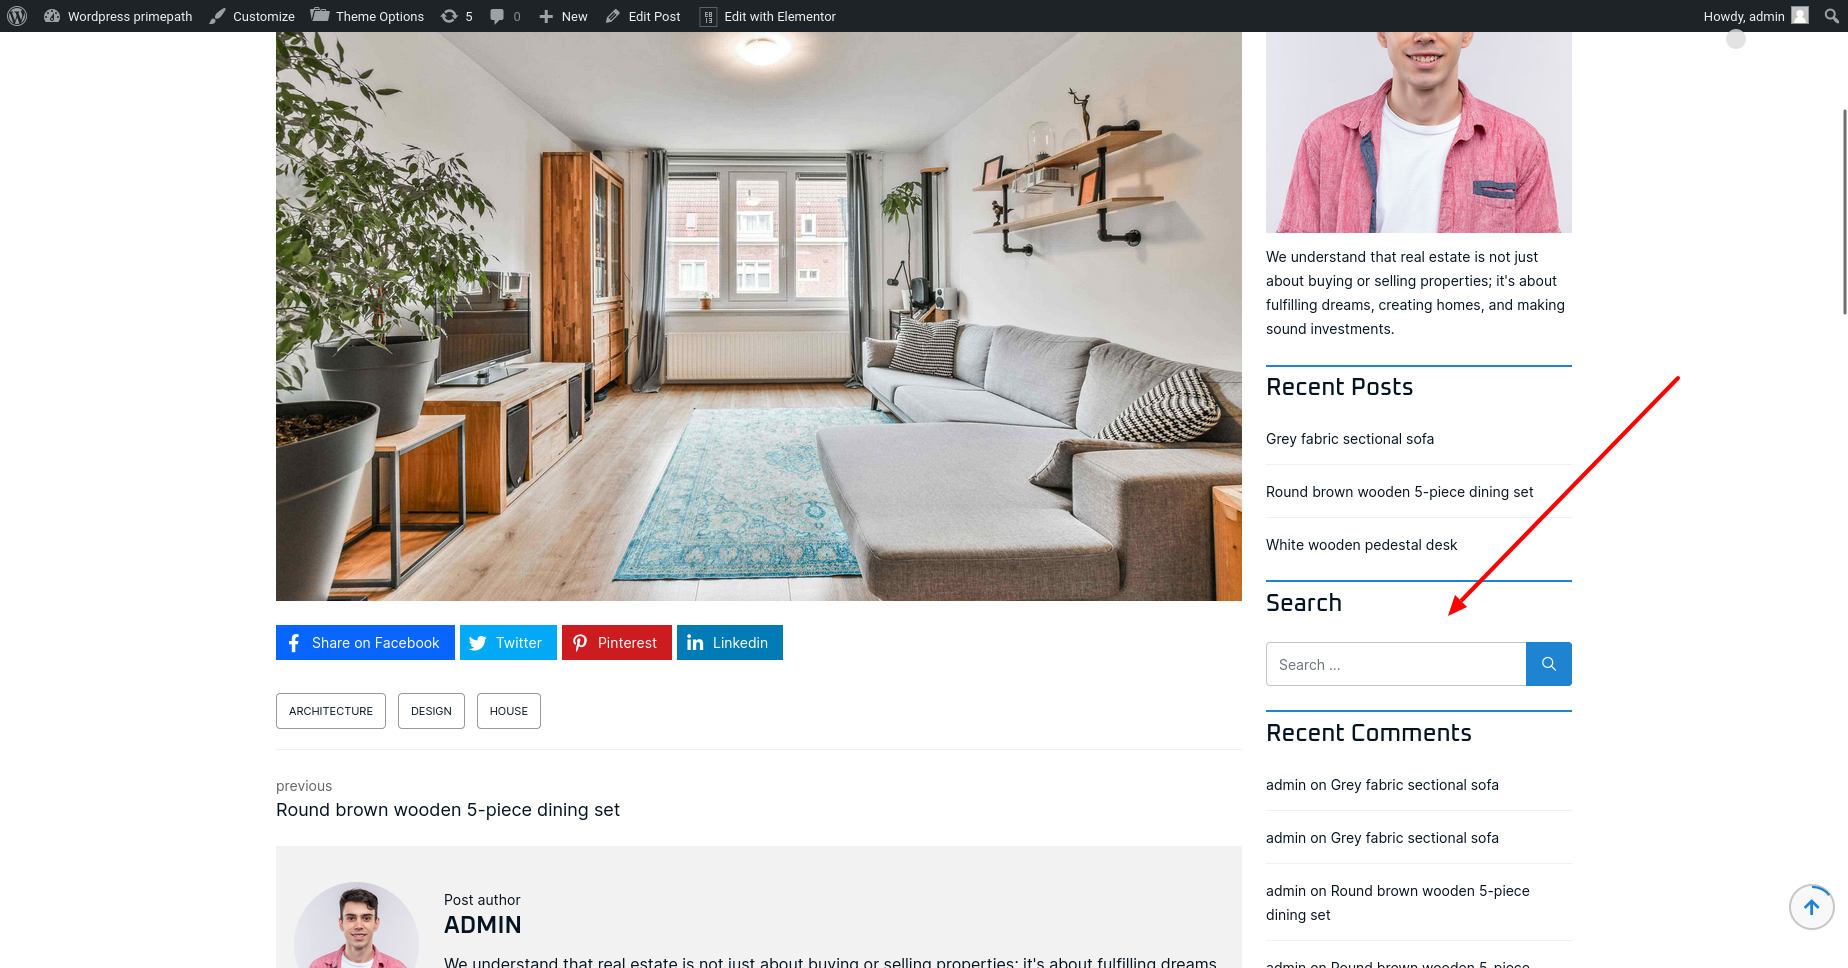
Blogs Search Box
Using this widget, we can add search box form in the sidebar area of blog list page and blog post detail page.

We can also cusotmize the title of the section by clicking on that widget.
After update widget, this widget will display as like below with search box and you can type any keyword for search posts related to keyword.
Blogs Recent Comments
Using this widget, we can add number of recent comments of posts in the sidebar area of blog list page and blog post detail page.
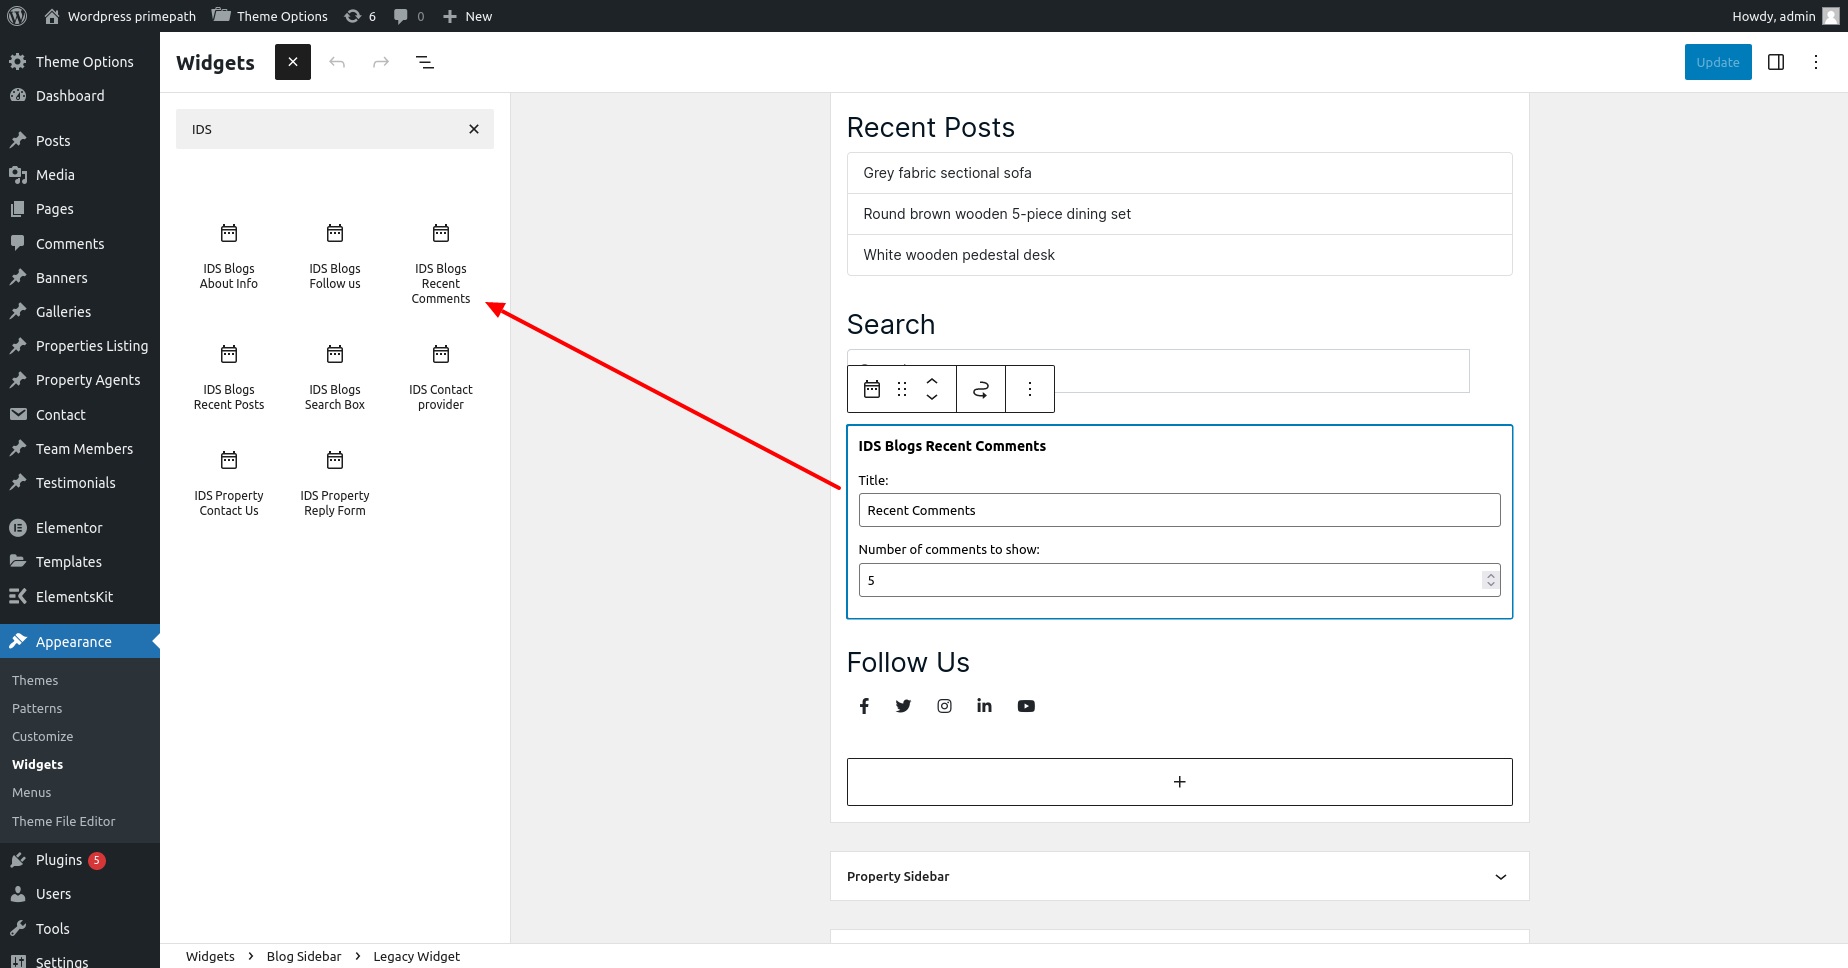
We can also cusotmize the title of the section by clicking on that widget.
After update widget, this widget will display as like below with recent comments.
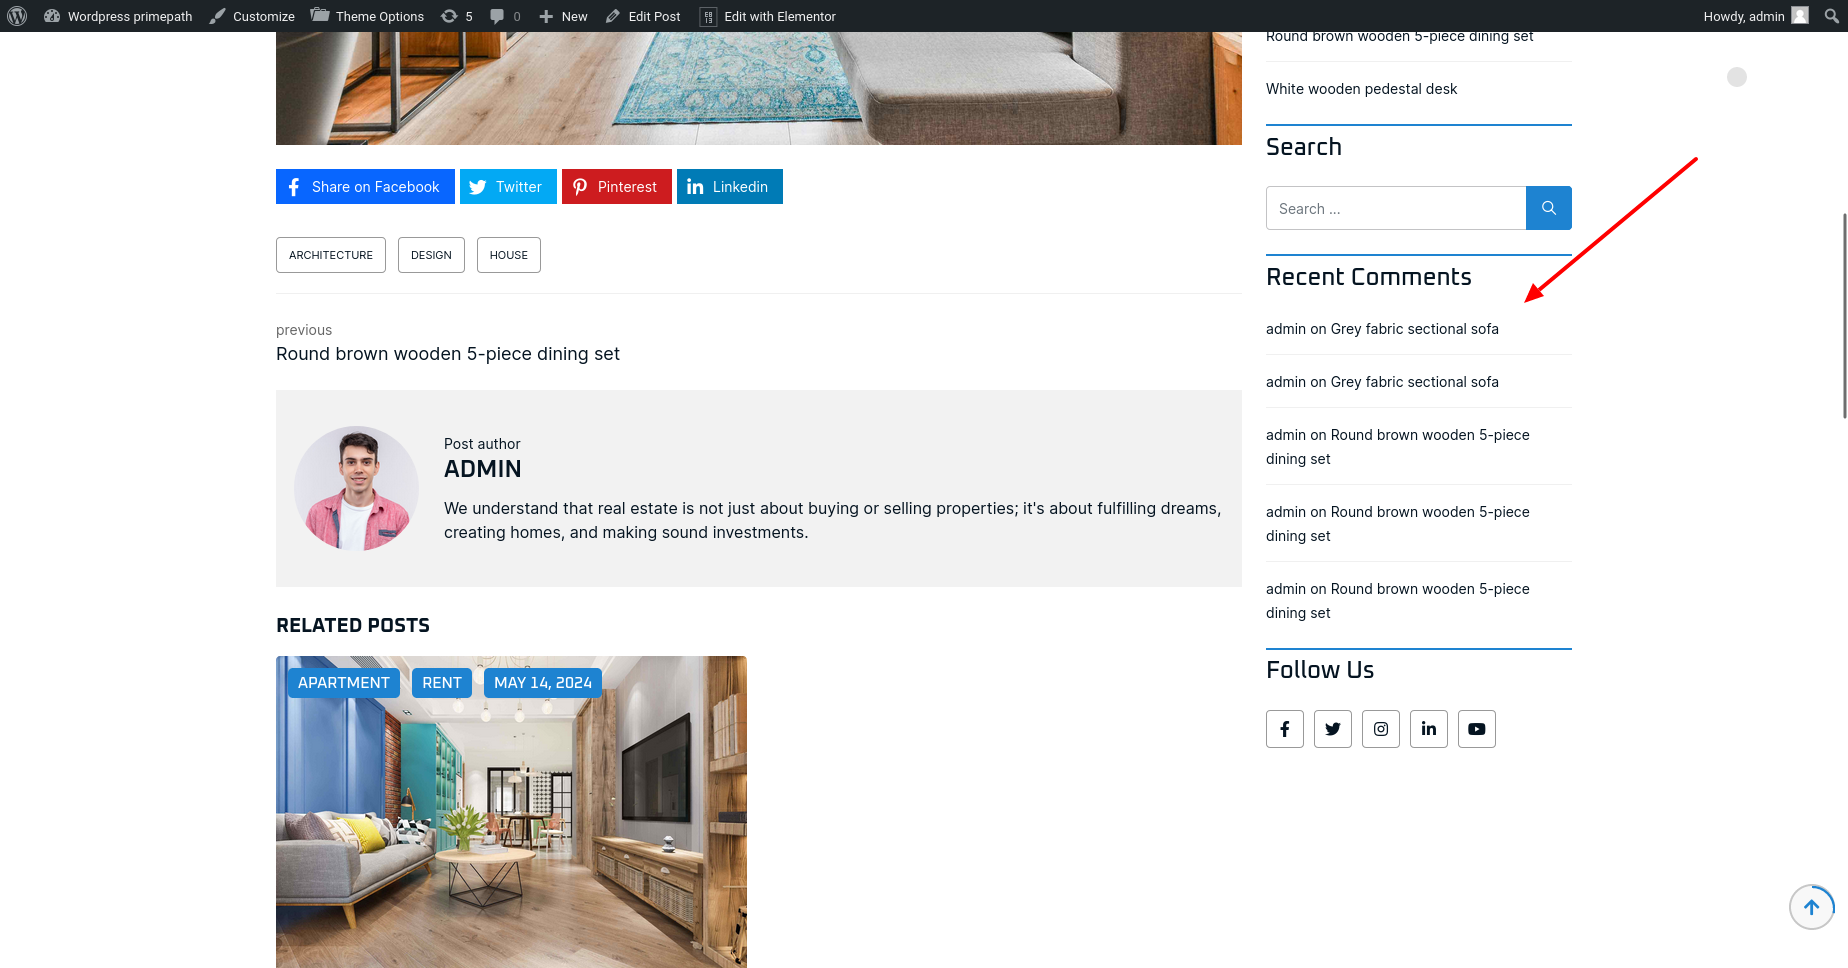
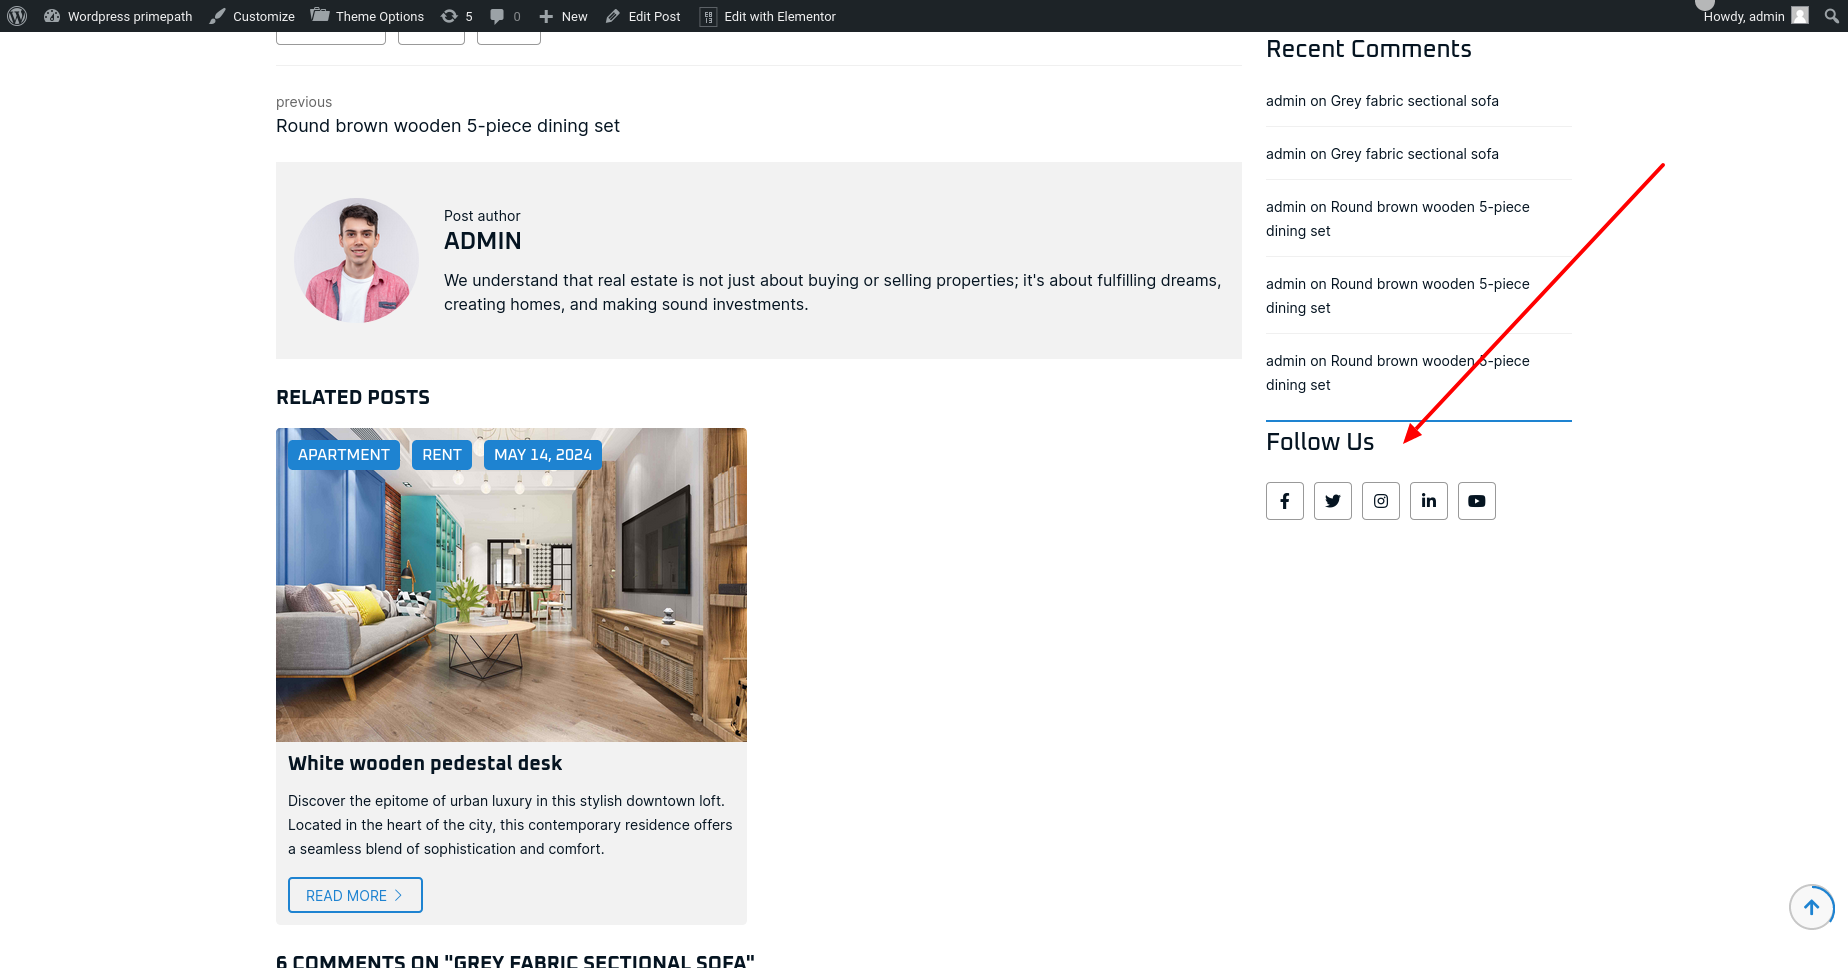
Blogs Follow Us
Using this widget, we can add follows us social section in the sidebar area of blog list page and blog post detail page.
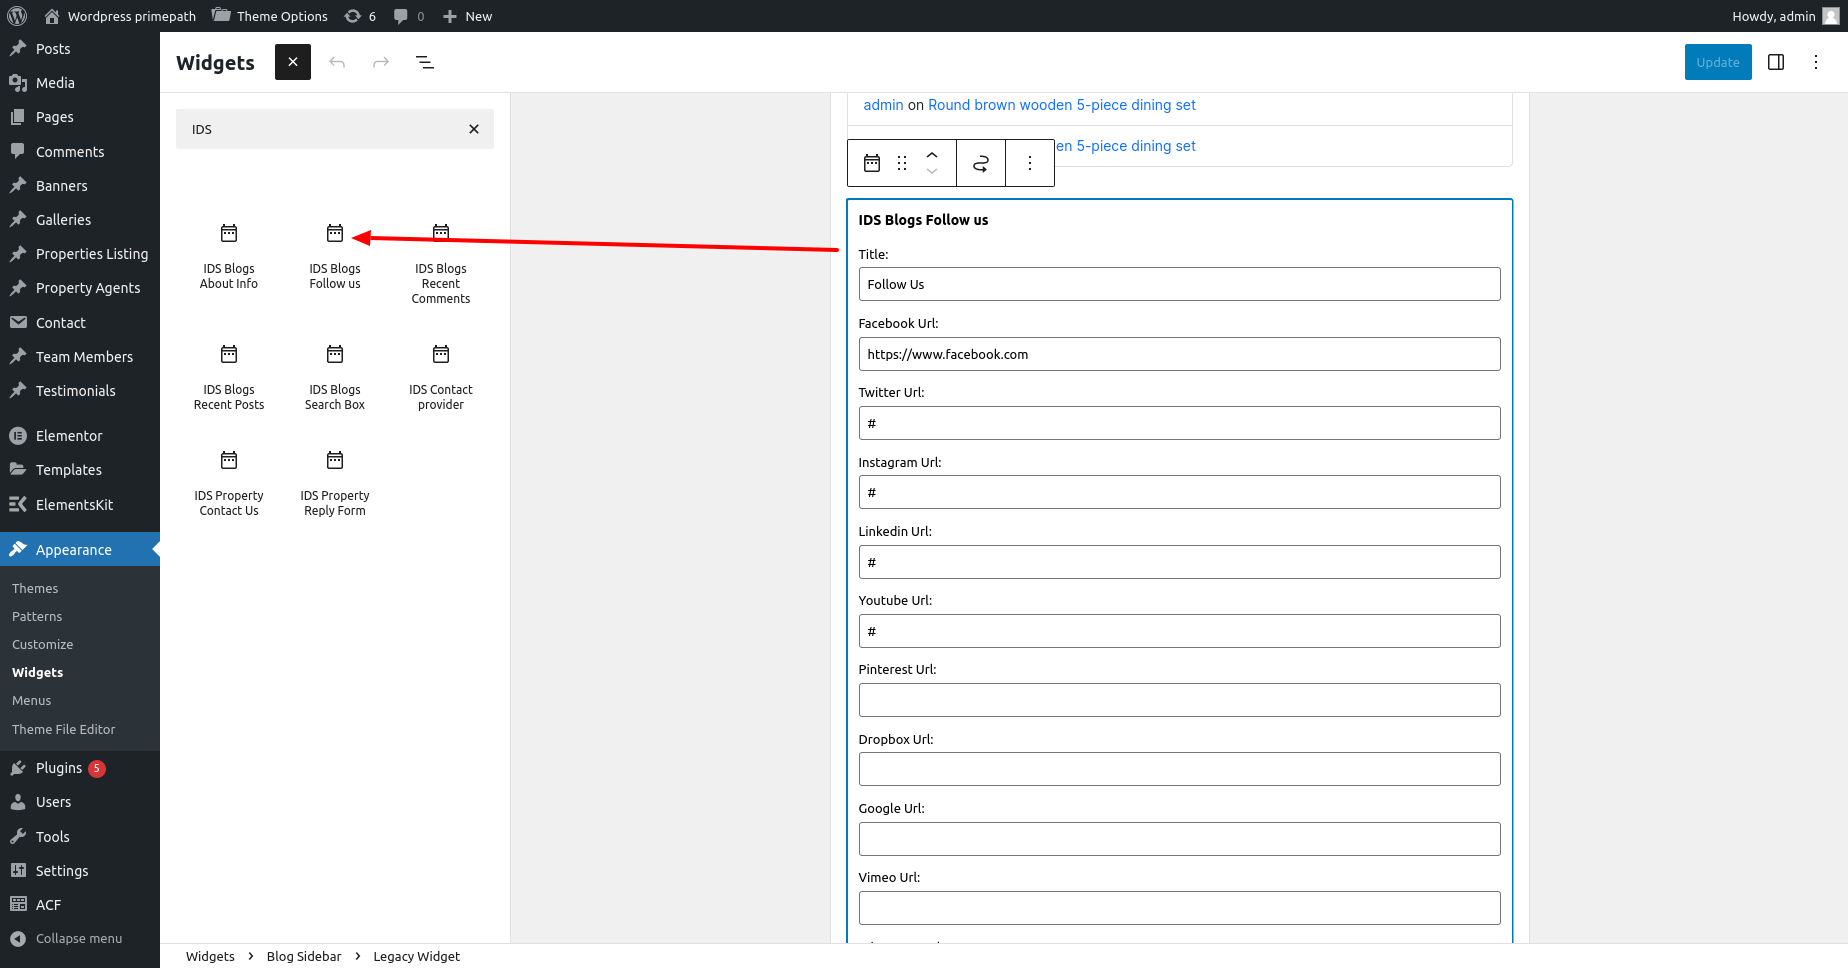
We can also cusotmize the title of the section by clicking on that widget.
After update widget, this widget will display as like below with follow us icons.
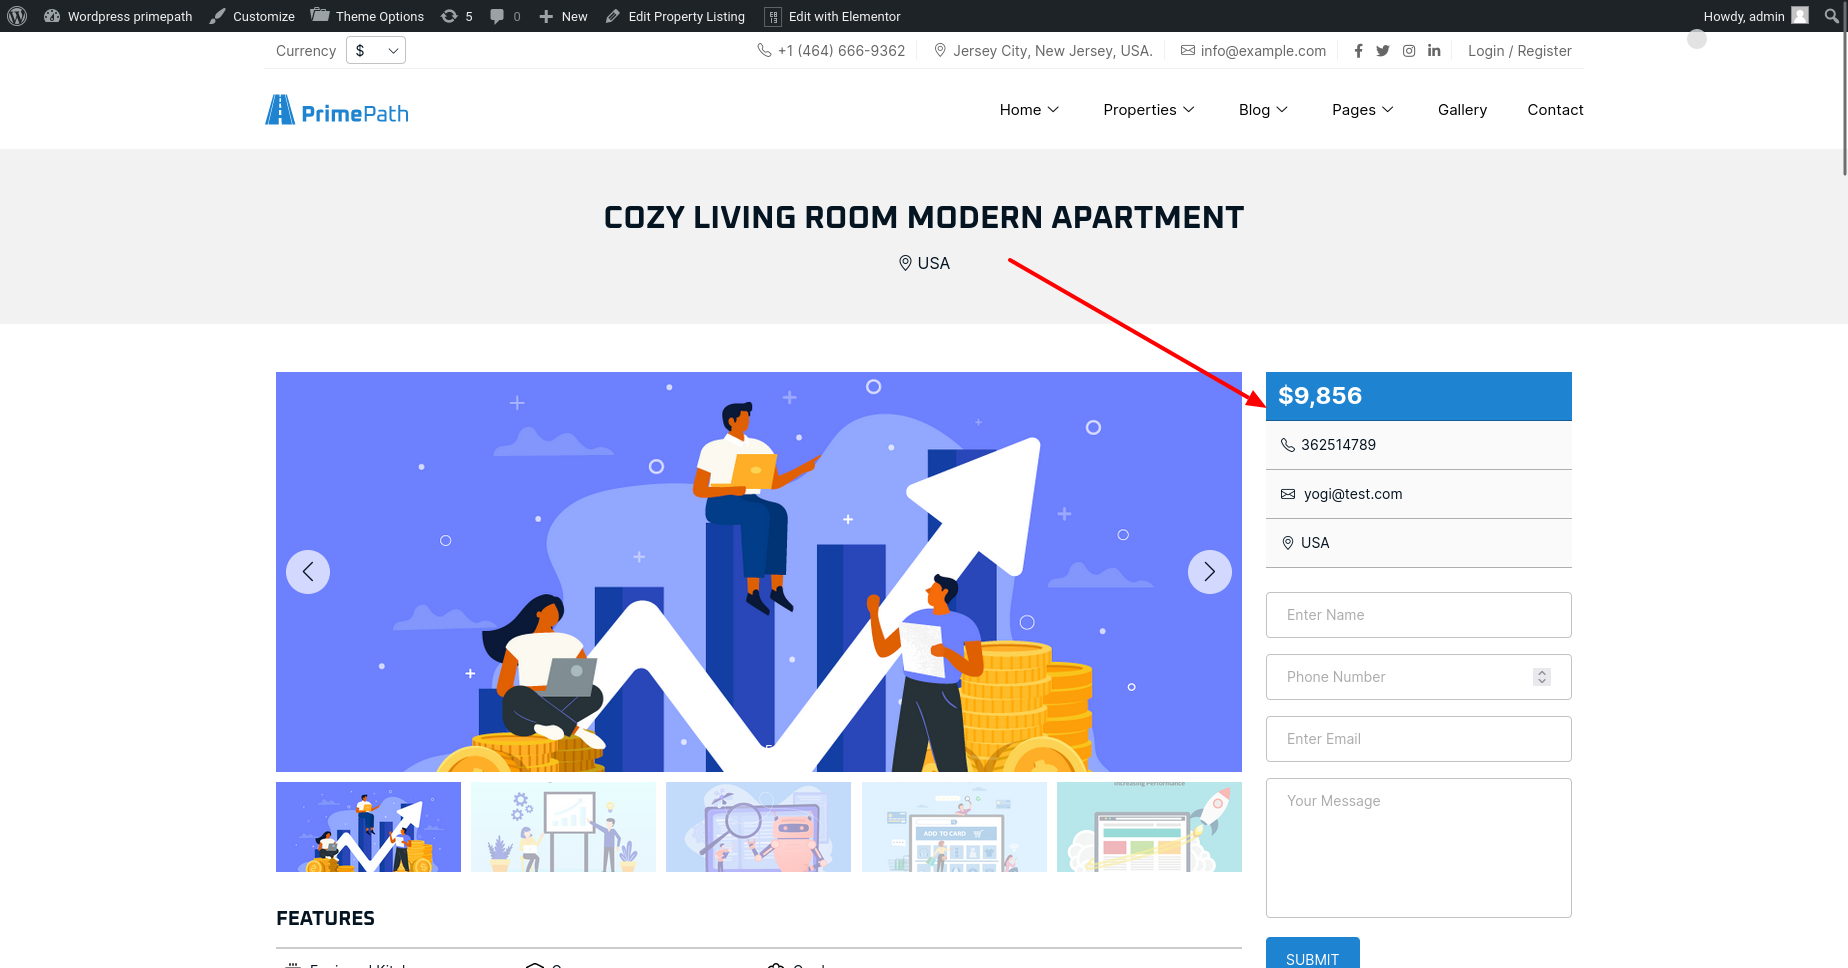
Property Contact Us
Using this widget, we can price and contact information section in the sidebar area of property detail page.
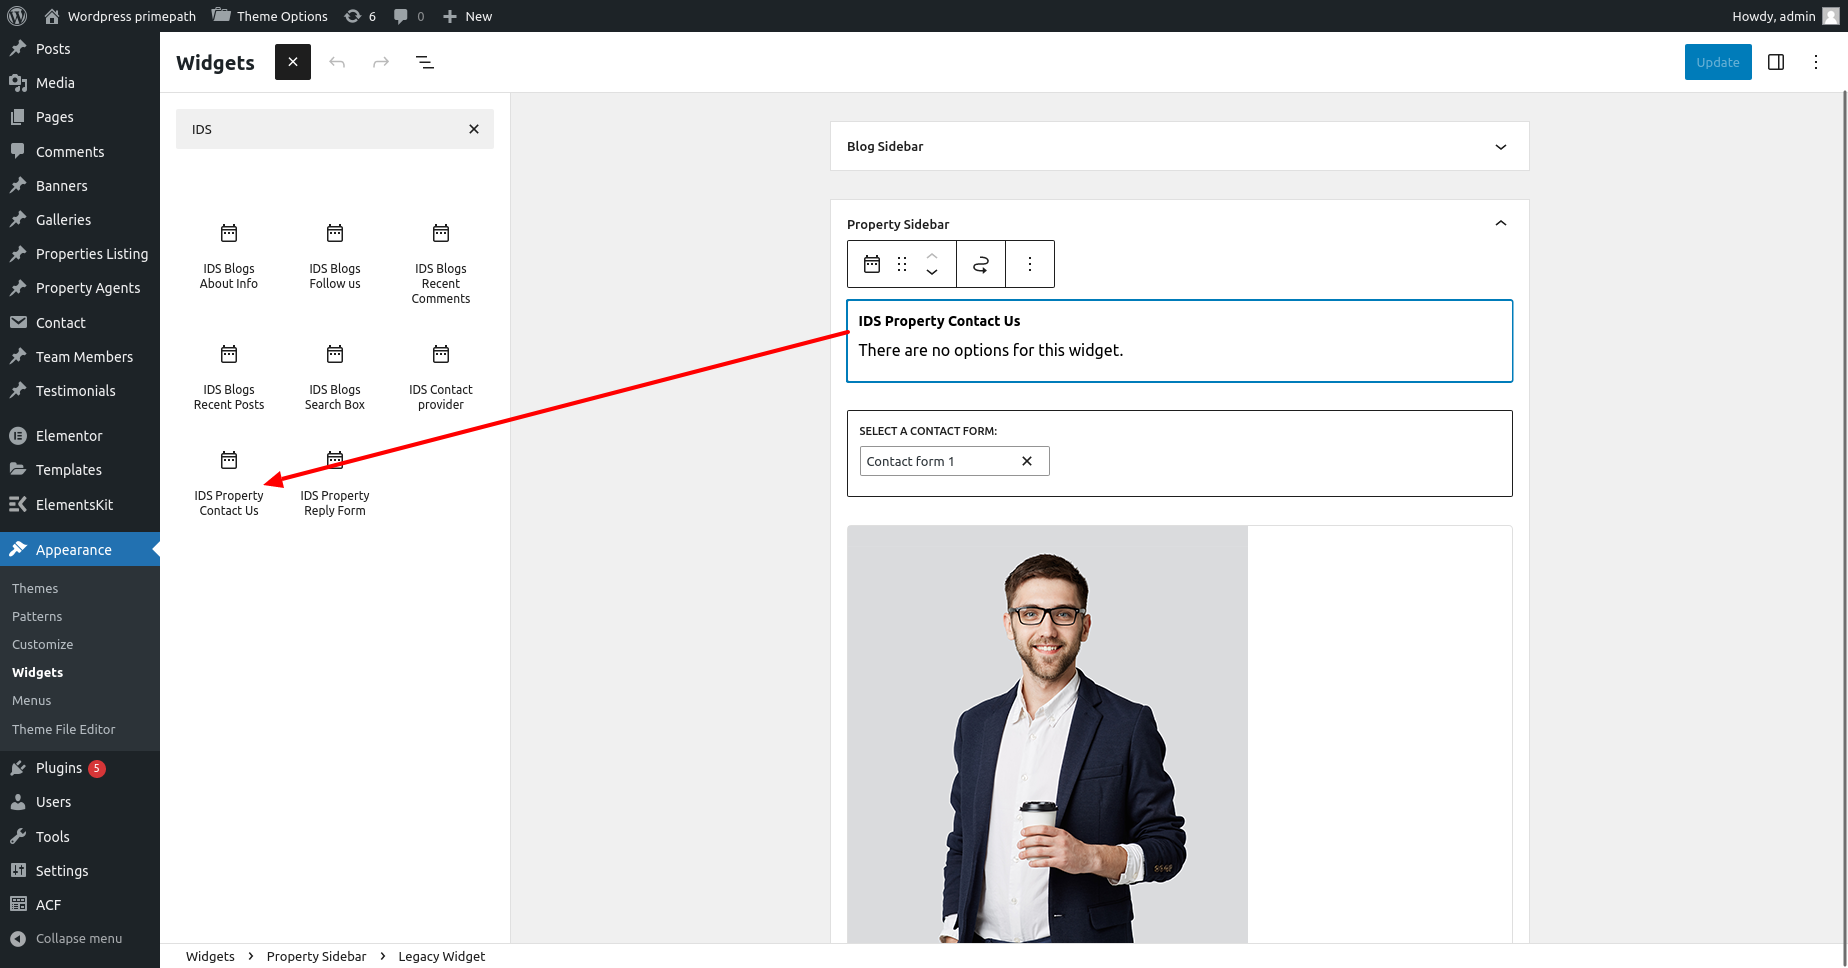
After update widget, this widget will display as like below with contact info section.
Property Reply Form
Using this widget, we can add reply contact form in the sidebar area of property detail page.
After update widget, this widget will display as like below with contact form section.
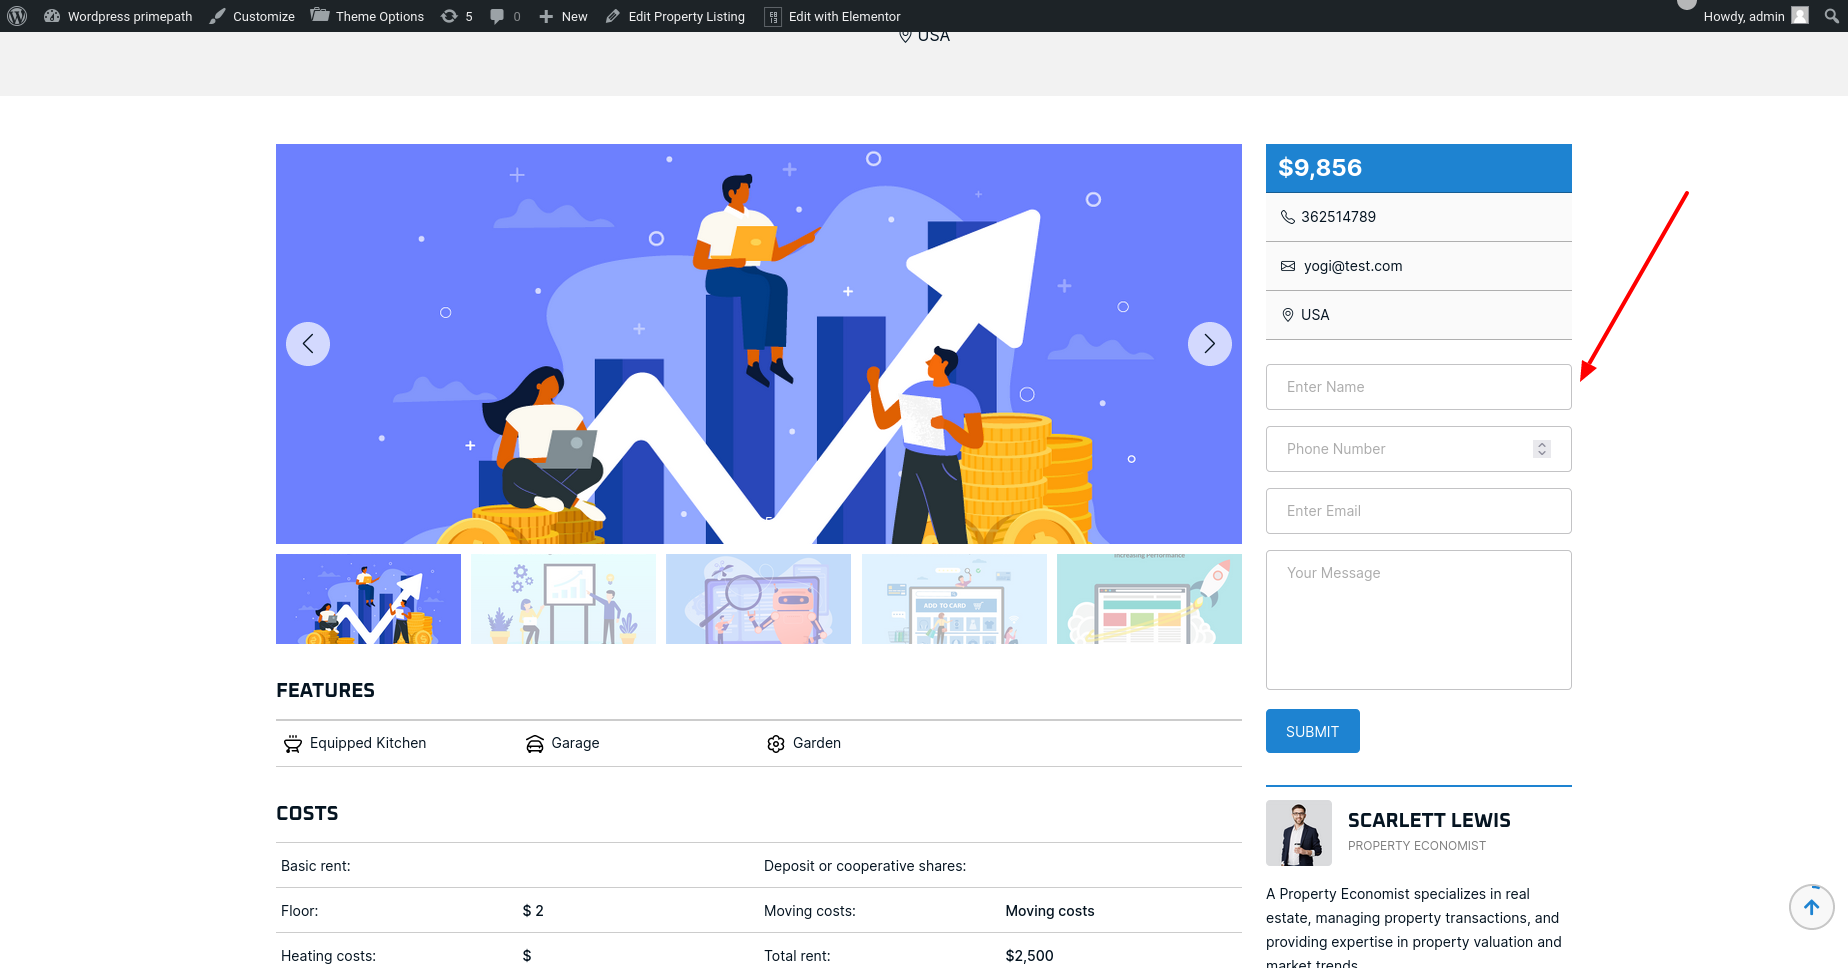
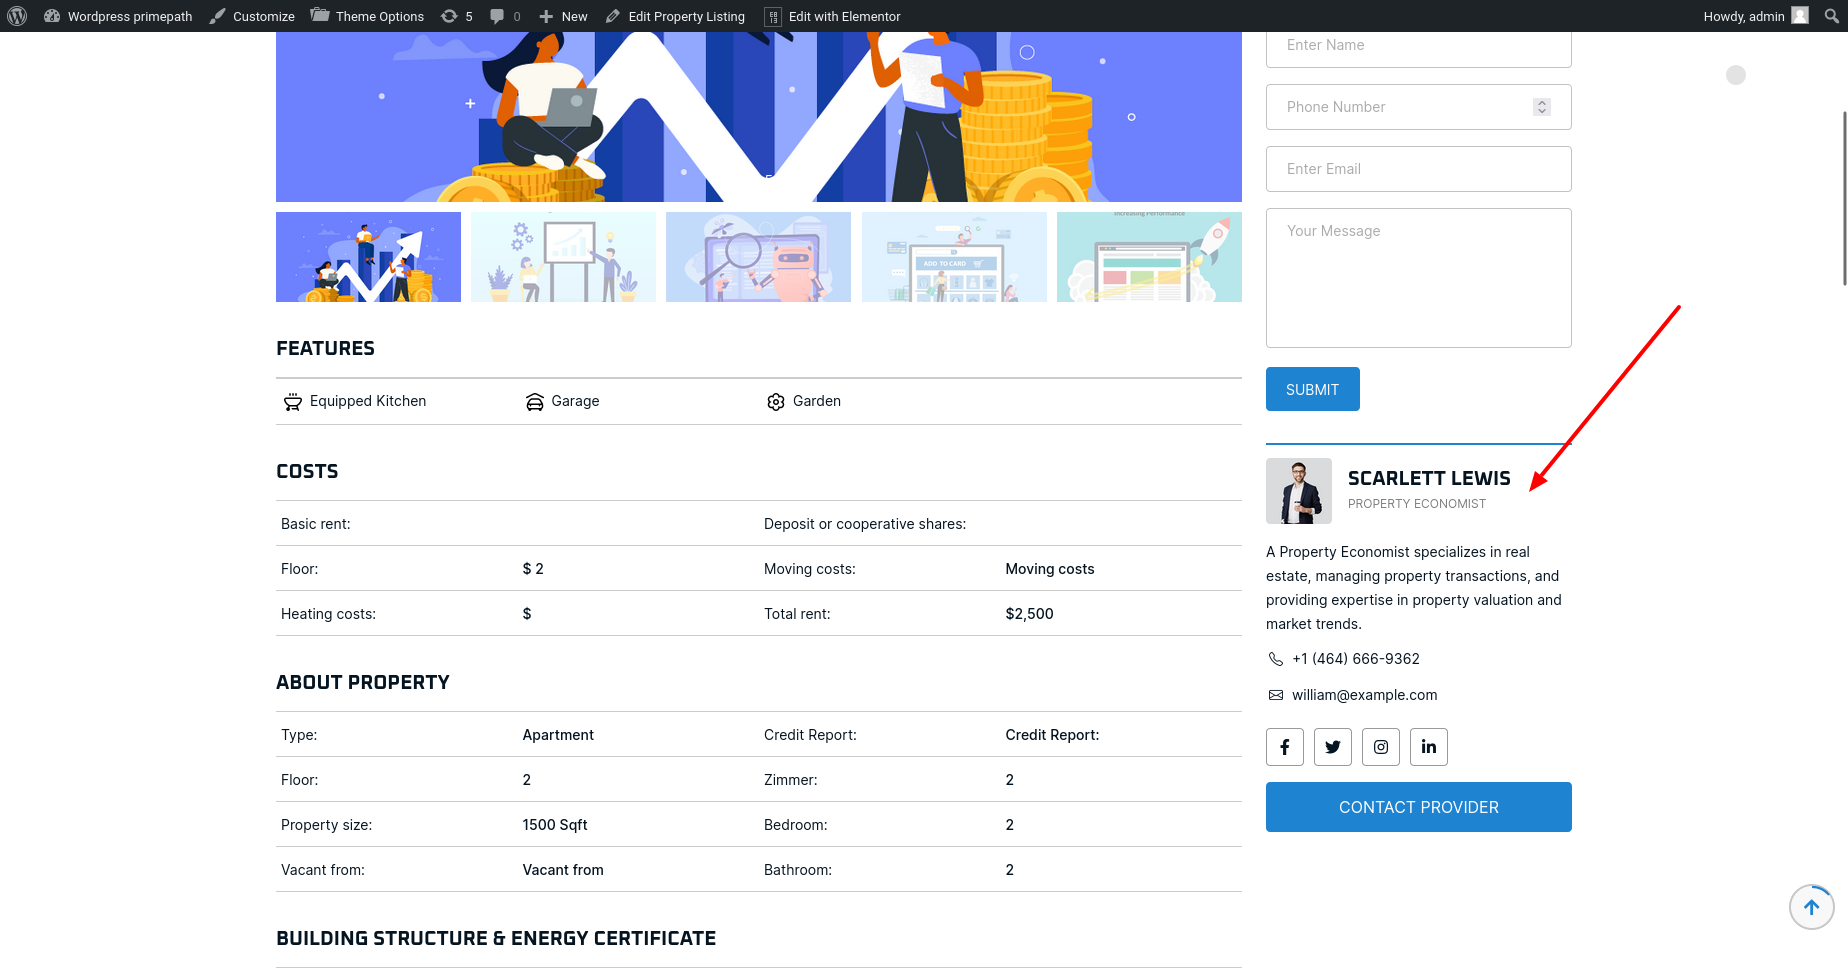
Contact Provider
Using this widget, we can add contact information of provider of that property in the sidebar area of property detail page.
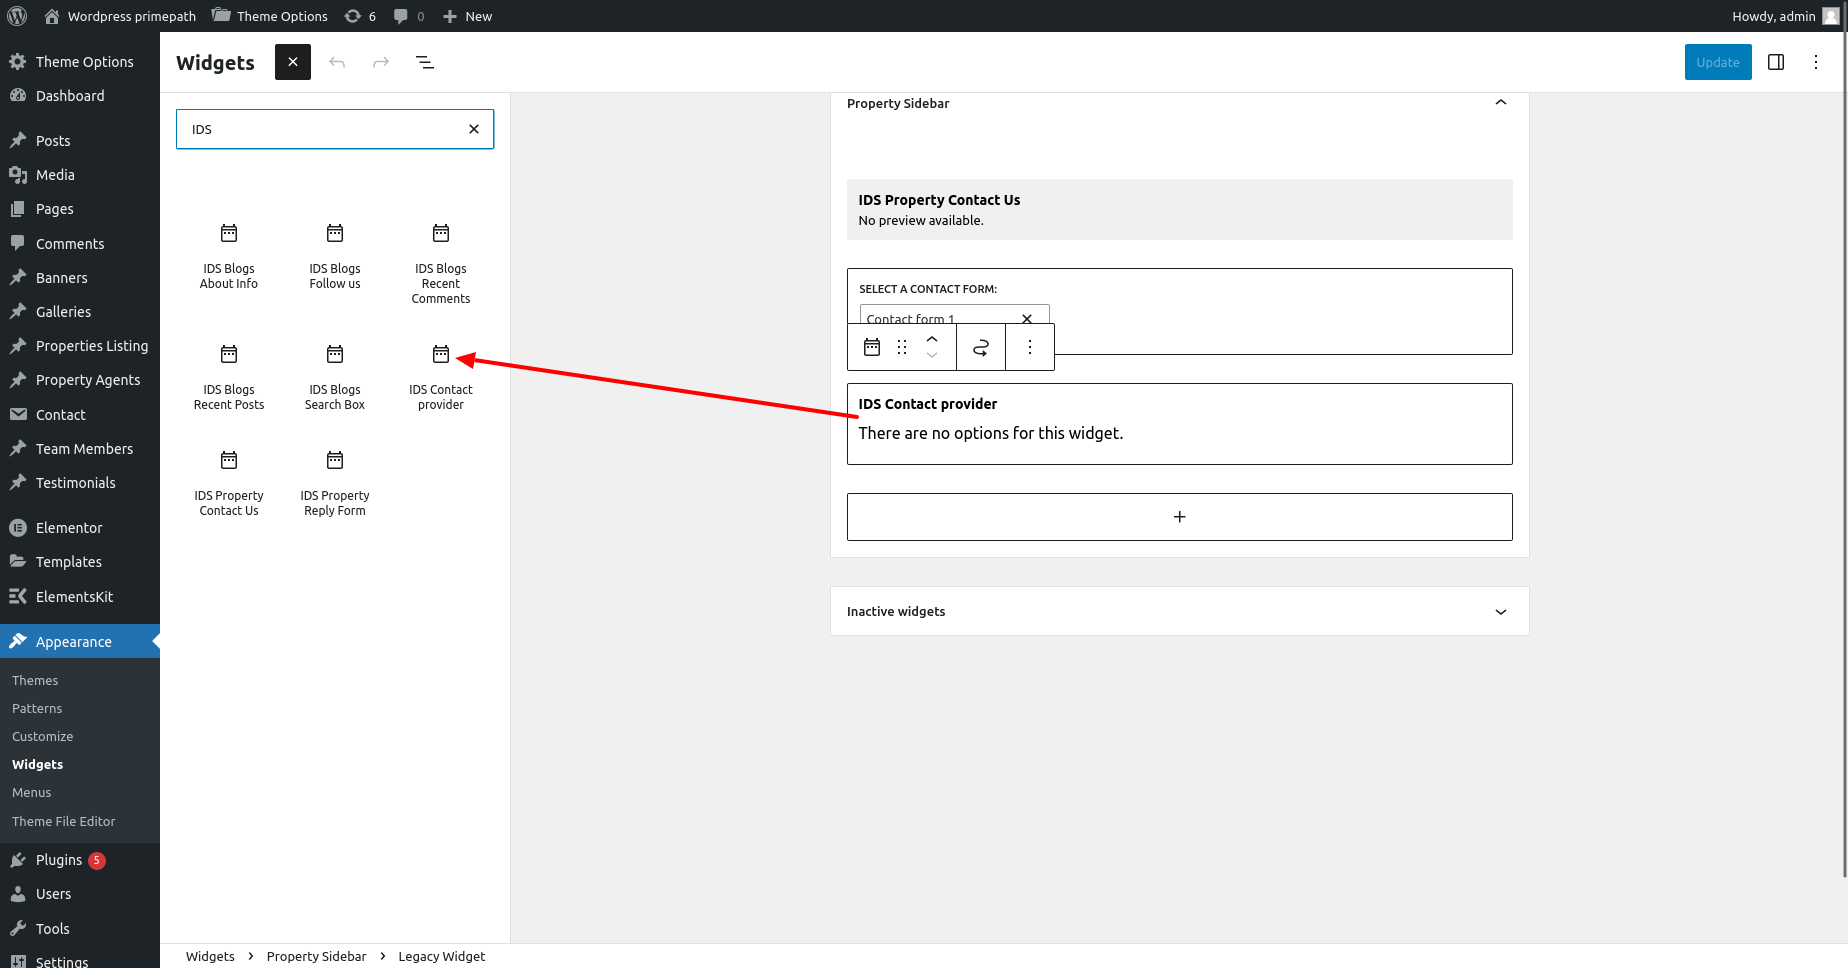
After update widget, this widget will display as like below with contact provider section.
Support Desk
Please remember you have purchased a very affordable theme and you have not paid for a full-time web design agency. Occasionally we will help with small tweaks, but these requests will be put on a lower priority due to their nature. Support is also 100% optional and we provide it for your convenience, so please be patient, polite and respectful.
Please visit our contact page or ask question @infydots
Support for my items includes:- * Responding to questions or problems regarding the item and its features
- * Fixing bugs and reported issues
- * Providing updates to ensure compatibility with new software versions
- * Customization and installation services
- * Support for third party software and plug-ins
- * Make sure your question is a valid theme issue and not a customization request.
- * Make sure you have read through the documentation and any related video guides before asking for support on how to accomplish a task.
- * Make sure to double check the theme FAQs.
- * Try disabling any active plugins to make sure there isn’t a conflict with a plugin. And if there is this way you can let us know.
- * If you have customized your theme and now have an issue, backtrack to make sure you didn’t make a mistake. If you have made changes and can’t find the issue, please provide us with your changelog.
- * Almost 80% of the time, we find that people’s issues can be solved with a simple Google search. You might want to try that before seeking support, as you might be able to fix the issue yourself much quicker than we can respond to your request.
- * Make sure to state the name of the theme you are having issues with when requesting support via ThemeForest.
Files & Sources
These are the primary CSS files used for general front-end styling. Use these to customize your theme even further. All included stylesheet codes under yourthemename/css/
- 1. style.css – Primary stylesheet
- 2. bootstrap.css – Bootstrap stylesheet
- 3. owl-carousel.css – OWL Carousel
- 4. fontawesome.css – FontAwesome Font Icons stylesheet
- 5. custom.css – Pathos Color Schemes stylesheet
- 6. prettyPhoto.css – Lightbox effect css file
- 7. flexslider.css – Flexslider css file
- 8. et-line.css – Elegant icons css file
- 9. carousel.css – OWL Carousel css file
- 10. animate.css – CSS3 animations css file
These are the various attribution inks to the javascript files included or modified to work with in this theme. All included javascript codes under yourthemename/js/
- 1. bootstrap.js – Bootstrap Javascript
- 2. custom.js – All Javascript Plugins
- 3. retina.js – Retina Javascript
- 4. jquery.js – Base Javascript
- 5. prettyPhoto.js – Lightbox Javascript
- 6. owl-carousel.js – Lightbox Javascript
- 7. revslider.js – Revolution Slider Javascript
- 8. flexslider.js – Flexslider Javascript
- 9. awesome-grid.nin.js – Awesome grid portfolio Javascript
- 10. circle.js – Coming soon page Javascript
- 11. contact.js – Contact form validate Javascript
- 12. isotope.js – Masonry Portfolio Javascript
- 13. progress.js – Progress bar Javascript
- 14. rotate.js – Text rotate effect Javascript
- 15. wow.js – CSS3 animation Javascript
Version History (Changelog)
You can find the version history (changelog.txt) file on yourthemename-full.zip folder or you can check changelog on theme sale page.
Once again, thank you so much for purchasing this theme. As I said at the beginning, I’d be glad to help you if you have any questions relating to this theme. No guarantees, but I’ll do my best to assist. If you have a more general question relating to the themes on ThemeForest, you might consider visiting the forums and asking your question in the “Item Discussion” section.
Changelog
-----------------------------------------------------------------------------------------
Version 3.8.4 - May 7th, 2015
-----------------------------------------------------------------------------------------
- new revolution slider plugin version
- fixed security issue with xss vulnerability
- improved demo importer for certain server environments
- updated WooCommerce template files for the outdated message in system status
- added suhosin check in system status
- added information that explains ZipArchive is required on your server for importing demos
- portfolio Grid template improvement
- added more information to demo popup message for individual demo requirements
- RTL style improvements
- breadcrumb function improved for various areas
-----------------------------------------------------------------------------------------
Version 3.8.3 - May 7th, 2015
-----------------------------------------------------------------------------------------
- fixed responsive / retina issue for larger logos
- fusion slider now uses responsive headings all the time
- dropped custom Avada styles for select boxes in IE since it is not supported
- fixed compatibility issue with Category Order and Taxonomy Terms Order plugin
- fixed issue of full width background being affected by padding options
- tested and fixed hellobar issue
- typography settings now apply to single post pages
- improved smooth scroll in certain situations
- youtube & vimeo videos will show at normal size in light box as long as video embed link is not used
- fixed issue of “fixed†featured image mode not working for carousels / recent work
- fixed issue of header tagline font not working with font options
-----------------------------------------------------------------------------------------
Version 3.8.2 - May 7th, 2015
-----------------------------------------------------------------------------------------
- fixed formatting issues with Turkish language files
- letter spacing menu option improvement
- improved fusion slider max content width setting
- removed the “disable first featured image on products†setting since it does not apply
- improved portfolio featured image loading
- removed encoding from tracking code, space before head, space before body, and custom CSS to stop it from parsing code within TO and removing special characters e.g. +
- woo login box now shows login fields for logged out users
- woo cart / my account links now show on mobile
- fixed button styling issue with gravity forms
Copyright and license
Copyright by Infydots Technologies